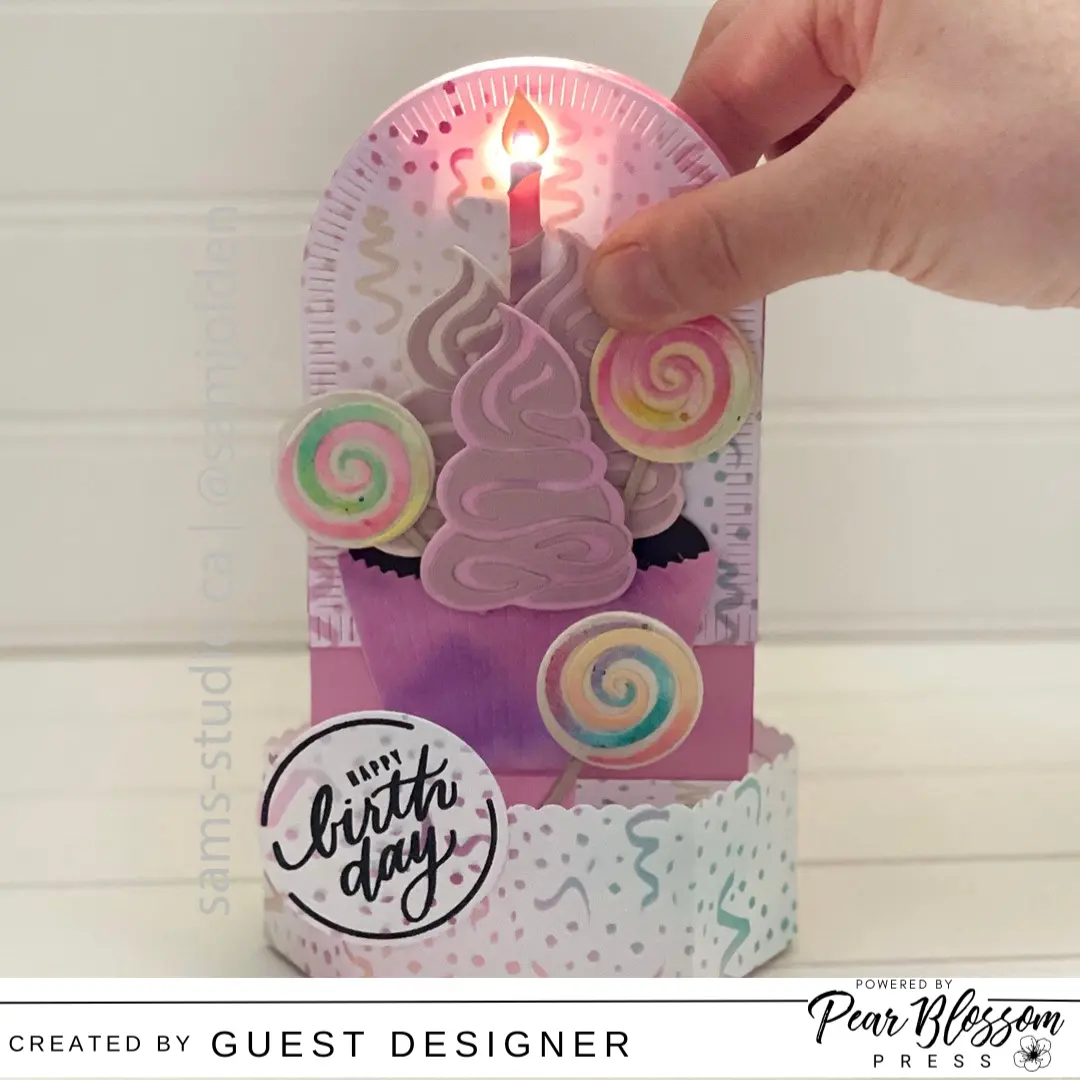
Hi there, Sam Olden here. Super excited to guest design with Pear Blossom and play around with some of their EZ lights. I love, love to make cupcake cards. So, if one is guest designing for Pear Blossom and playing with a really cool little unit with light and button all in one the card just has to have a light up candle on a cupcake!

Supplies:
Pear Blossom Press Stamp and Die
Crafty Meraki Sweet Celebration Cupcake
Lawn Fawn Platform Pop-Up Base
Spellbinders Make a Wish Arch Labels
Simon Says Stamp Circle Sayings
Distress Inks


Get the Look:
- Ink blend randomly over the confetti stencil distress inks in Evergreen Bough, Kitsch Flamingo, Seedless Preserve and Altenew Buttercream Ink on 3 – 6×6 sheets of white card stock.
- Using the 2 of the 6×6 stencilled pieces die cut the lawn fawn pop up base and also die cut the tabs from pink card stock. Build the base. To build the base I recommend watching a great tutorial by Lawn Fawn on the platform pop-up page.
- Die cut an arch from the 3rd stencilled sheet. It is a perfect fit for the centre of the Platform Pop Up. (Make sure to leave some stencilled sheet for sentiment).
- Add a piece of pink card stock 1”x 3” to the base of the arch so that the cupcake will fit space.
- To build the cupcake die cut left over pieces of card stock and past background projects with the Sweet Celebration Cupcake. (The small dies are perfect with scrapes).
- In order to make the candle I die cut the little chocolate wafer in the cupcake set and the flicker dies in the Pear Blossom Press and Stamp Die Set.
- Build the cupcake, with candle and decorations and adhere to the arch.
- To help the light glow through the candle I choose to pierce a hole with a craft pick through the flame and arch panel. (See image for reference).

- Line up the EZ light behind the pierced hole to determine where the push button will be positioned. Do not attach EZ light at this point. Make note of location with a light pencil mark on arch then stamp the word ‘Press’ in Kitsch Flamingo Oxide ink.
- Re-align the light so it shows through the pierced hole and adhere down with your preferred tape. (See image for reference).
- Now take all the components, see image for reference and start building and decorating the pop up.
- Stamp the birthday sentiment in black on remaining confetti stencilled sheet and die cut with a circle. Attach to base.
- To finish the card and for a clean look I added foam tape around EZ light and covered with an additional arch in the back.

Hope you enjoyed learning a fun way to make a pop up light up card. The single EZ light and button unit certainly made the card super easy to add light. No way will this card fit in a small envelop but it really is a focal piece for someone to save and enjoy. Happy paper-crafting : )
