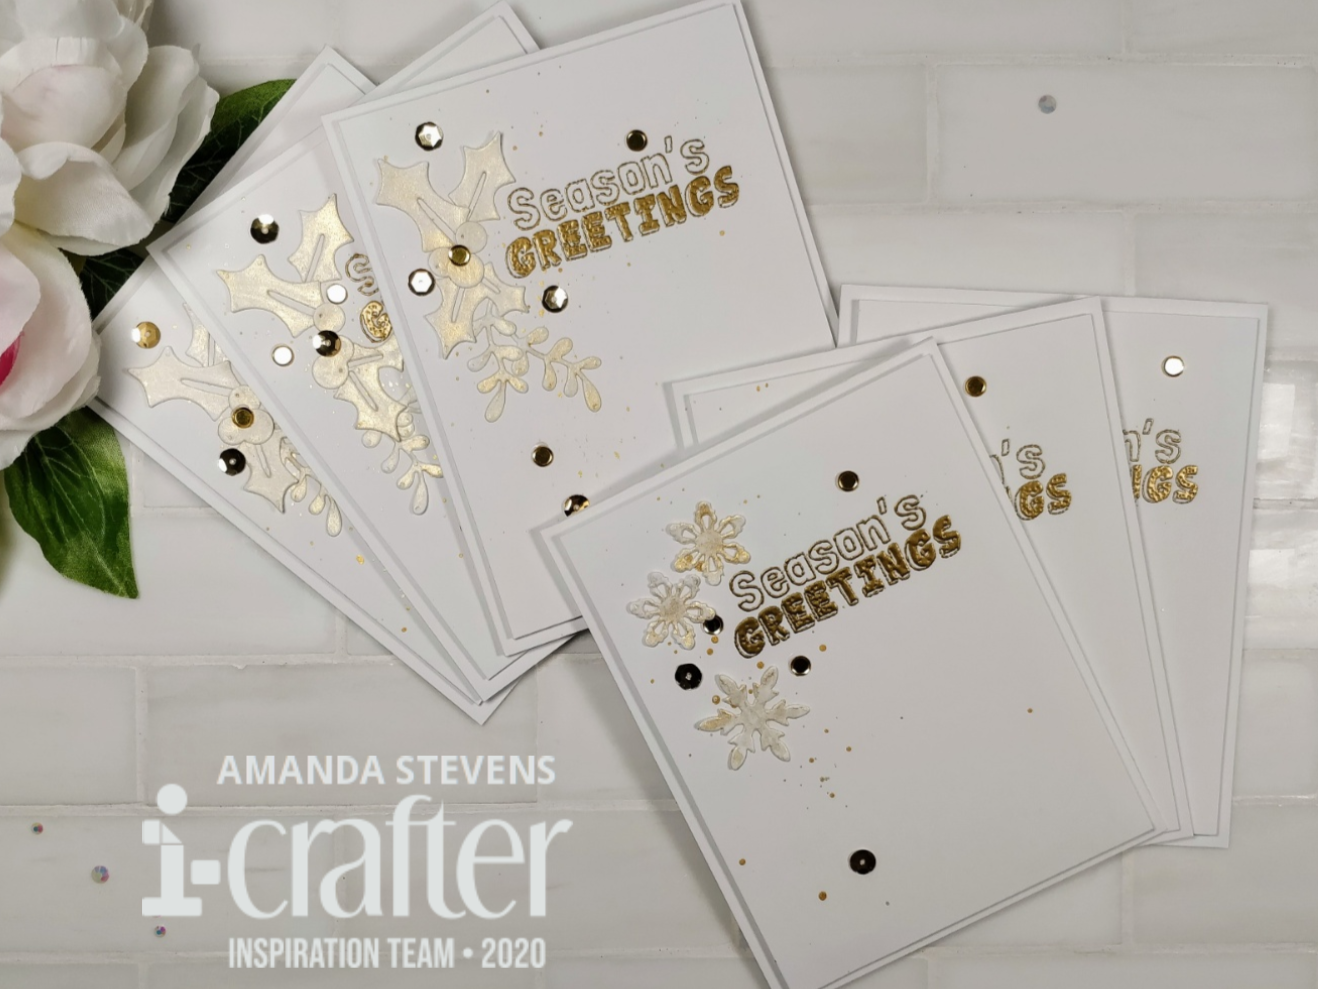
As you know, I’ve been working on Christmas cards already. In previous years, I’ve mass produced over 100 of the same card. In other years, I’ve made all of my holiday cards unique. This year, I’m mixing it up. It seems like making more than ten of the same card gets boring, and making each card a completely different design takes too long. This year, in addition to some individual cards, I plan to make several sets of 5-10 cards at a time. That way I have variety, and I’ll be able to balance the time spent on them. Today, I’m sharing some quick and easy cards that are perfect to mass produce. I made six cards in less than an hour, but I don’t think it would have taken much longer to make twice as many.
Choosing a design that doesn’t require coloring is a huge time saver. And creating an assembly line will help move things along faster. For my cards, I started with pre-cut card fronts and bases. (I cut batches while watching TV every once in a while, and have them ready to go.) These are the steps I took for today’s cards:
Step 1 – Splatter gold shimmer onto the left side of each card front.
Step 2 – Die cut the holly, berries, snowflakes, and leaves from the Snowflake Border and Holiday Wiper die sets from i-crafter. (To make this go faster, secure all of the dies to a piece of low tack tape and cut them all out at the same time. The tape holds the dies together and allows you treat them as one larger die. Use a craft pick to poke holes through the tape first, to easily remove any die cuts that don’t fall out.)
Step 3 – Paint a thin coat of gold shimmer onto the die cut pieces.
Step 4 – On the card fronts, heat emboss a bold sentiment from the Christmas Sentiments stamp set with gold powder.
Step 5 – Trim the card fronts down to create a border. I took off 1/8″ from each side, but you can trim off more or less, depending on the look you prefer.
Step 6 – Glue the card fronts to the card bases with a layer of fun foam sandwiched in between.
Step 7 – Glue the die cuts to the card fronts. (Tweezers make it easier to hold the pieces while you apply glue.)
Step 8 – Add a few sequins for more sparkle.
That’s it, easy peasy! And I did it all during an episode of Jane the Virgin (my current binge watch obsession), including the dry time. I’m not sure if they qualify for clean and simple since I splattered paint on them, but they certainly fall into the quick and easy category. I really like them too. The color scheme is classy, but the font adds a fun, lighthearted touch. Instead of white, you can substitute any other color cardstock. Same goes for the gold. You can swap it for silver, or your favorite metallic color.


To save more time, you can paint the panel before you die cut the pieces (reverse steps 2 and 3). Alternatively, you can cut the pieces from pearl, or glitter cardstock instead, and skip step 3 altogether. You can also trim your card fronts down before you start stamping or splattering. That way you can cut 1/4″ off the top, and one side, instead of 1/8″ all the way around. Fewer cuts saves time.
Alright, now it’s your turn. Have you started your holiday cards yet? Do you like to mass produce, or make individual cards? Do you have a favorite style, or do you like to mix it up? I filmed the process for these cards, but I didn’t get a chance to edit it yet. Would the video be helpful, or are the instructions above enough? Let me know down below…
Thanks for stopping by today. You can find the sister article to this post on the i-crafter blog. Head on over for more inspiration and to see the new release! If you’d like to see more cards using the stamps and dies I used, check this out! I’ll be back soon with another fun card to share.
This site uses affiliate links whenever possible (at no additional cost to you), but only for products I actually use and love.

Those are beautiful Christmas cards!! That’s a good idea!! I get bored making a lot of 1 card!!
Cards are truly stunning and highlight just 2 of many reasons you remain a big fav of all of us students: Instructions! Second, for those of us blessed enough (and old enough?) to have over 50 cards to be sent out by choice each holiday…methods that make sense for doing that. Most videos show us how to make truly beautiful one of a kind cards…but more multi-card options are needed. Thanks so very much for all you do!