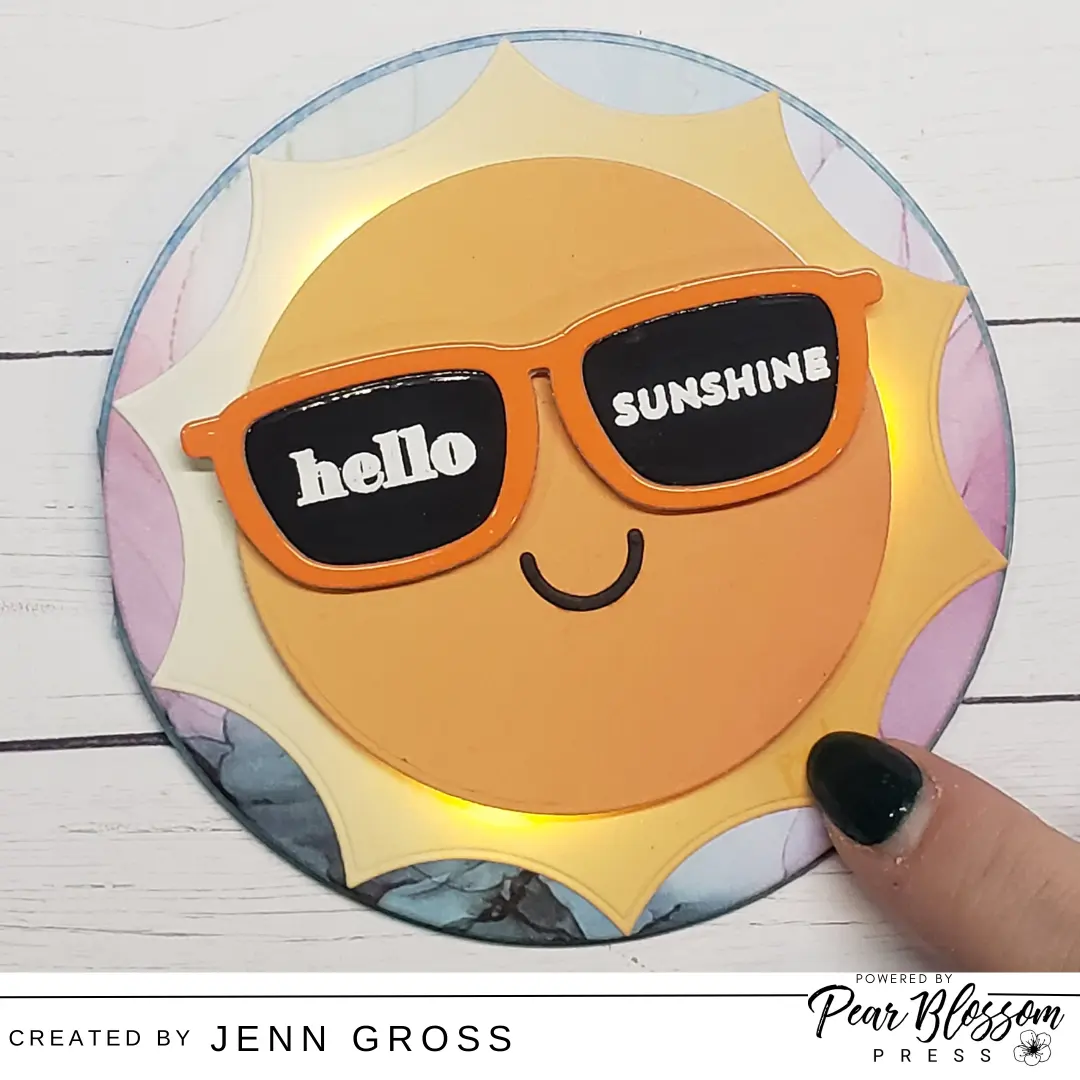
Hello crafty friends, Jenn Gross here with another fabulous light up card! You can follow me onsocial media @journeycoachjenn. Today I am on the Pear Blossom Press Blog sharing some sunshine with this sunny round light-up card. It features the EZ-Lights from Pear Blossom Press used to light up the sun rays. I used both the Sunshine die set and the Circle Card Die set by Trinity Stamps

Pear Blossom Press Supply List
EZ-Lights
World’s Best Foam Tape
PB Press Stamp and Die bundle
Cottontail Embossing Powder Tool
Additional Supplies
Circle Card Die set – Trinity Stamps
Sunshine Die set – Trinity Stamps
Hello Sunshne sentiment from my stash
Glossy cardstocks
Ombre cardstock
White Embossing powder
VersaMark Watermark ink
Bearly Arts Craft Glue
Die Cutting Machine

A – Die cut the Sunshine dies (the rays and circle) from the ombre yellow/orange cardstock. Die cut the Circle Card die from blue cardstock. Die cut the sunglasses from glossy orange cardstock and adhesive foam attached to a piece of cardstock. Die cut the lenses from glossy black cardstock
B – I glued a piece of mirrored cardstock to the back of the orange glossy sunglasses to create the lens. I later change this to glossy black cardstock len inserts)
C – Glue the glasses and the mouth to the sun circle. Die cut a second circle form a gold reflective cardstock and glue it to the backside of the circle sun face. this will be used to create more reflection with the EZ-Lights
D – Die cut a second circle from printed cardstock (the size of the Circle Card die) to use behind the sun burst die cut. Glue the sun burst to the die cut circle the card front. Cut a piece of foam tape into a circle shape and attached it to the front side of the sun burst die cut as shown

E & F – I used a small hole punch to add three holes just inside the foam circle to thread the lights through. I cut a notch in the release paper at each of the holes to reveal the adhesive to attach the EZ-Lights. Thread one EZ-light through each of the three holes and attach the lights by gently spreading the wires and facing the light shining upwards
G & H – Stamp the word press at one of thelower rightsun rays. Remove the release paper from the adhesive circle and position the round sun face on the card front. Test the lights

I – Turn the card front circle over and position the EZ-Light battery pack button under the press stamped area. Secure the battery pack using a small piece of double sided adhesive tape. Use regular tape to secure the excess wires to the back
J & K – Use the World’s Best Foam Tape to frame out the back side of the card front circle, cutting notches to help the foam curve aroung the circle. Remove the release paper and attach the card front to the Circle card base
L – Treat a piece of glossy black cardstock with the Cottontail Embossing Powder Tool and stamp the sentiment Hello and Sunshine foreach lens with Versamark Watermark ink and heat emboss with white embossing powder. Die cut each sentiment lens

M & N – Die cut two additional sunglasses frames from glossy orange cardstock. Glue the lens sentiment inside the glasses and then glue the two frames on top of the glasses completing the card
O & P – Here you see the finished card unlit and lit with the the Prear Blossom Press EZ- Lights

Thank you for taking time to stop by an check out my Hello Sunshine light up cardfeaturing the Pear Blossom Press EZ- Lights. I hope you are inspired to light up your next project. Be sure to visit my blog for additional details and the step tutorial, See you next on the 10th of the month with a new light up project.
Until then, keep it light!
Jenn Gross
Note – Affiliate links are provided when available, If you purchase products from these links, I will receive a small commission from the company. This is at no additional charge to you. I appreciate and thank you for your support. Find additional affiliate links at https://hype.co/@journeycoachjenn
