Hello crafty friends! Jenn Gross here with a Pear Blossom Press light-up card idea I have been pondering for a few months. You can follow me on social media @journeycoachjenn
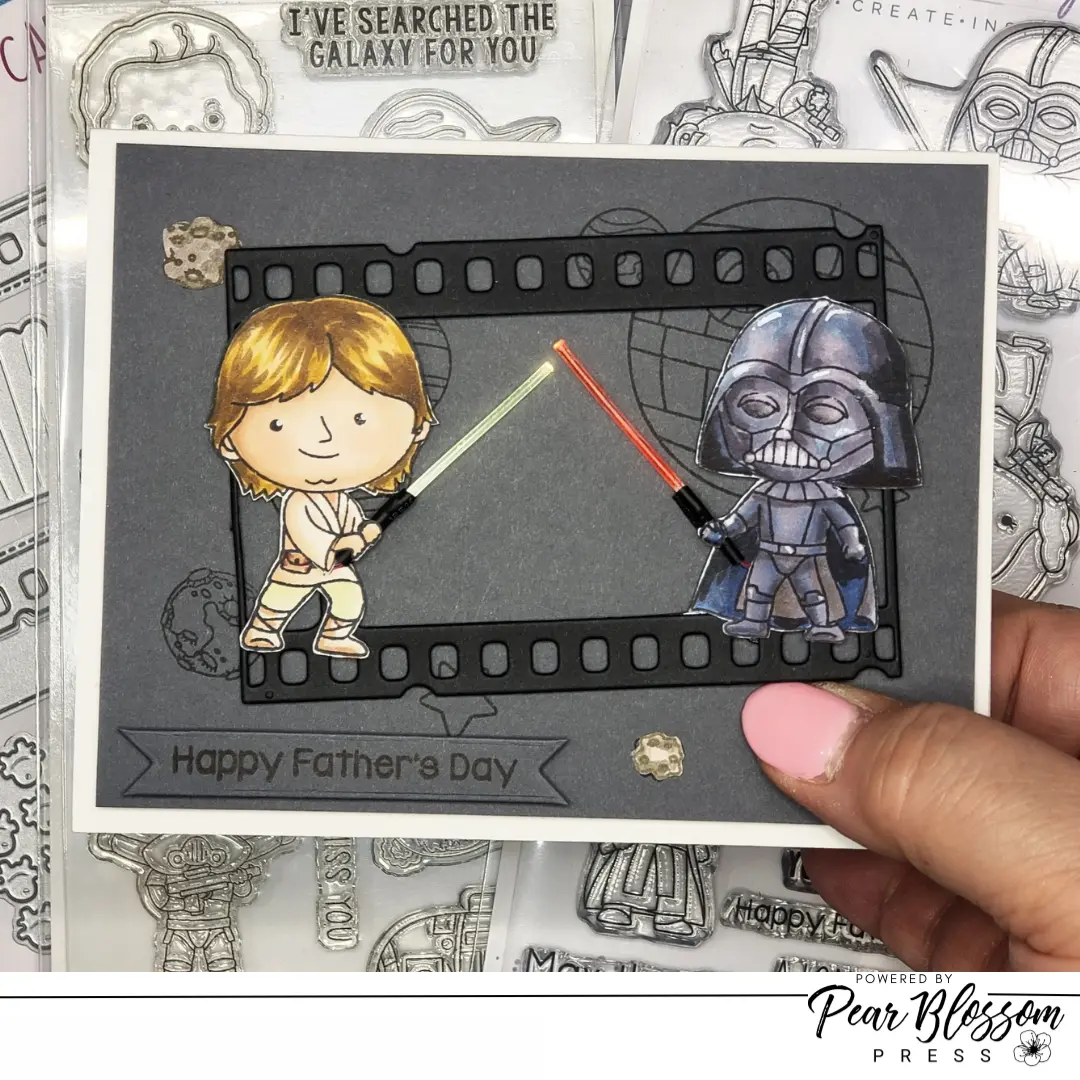
The force is strong with this card and I am beyond excited to see it in action. I am using a Pear Blossom Press EZ-Lights with 0.08″ flexible plastic LED Optic Fiber light source to create the light sabers for this fandom light-up Father’s Day card!

Supply List
Pear Blossom Press EZ-Lights
World’s Best Foam Tape
Other Supplies
Galactic Fighters stamp set – Kindred Stamps
Galactic Travel stamp set – Kindred Stamps
Filmstrip Memorydex Card die – Scrappy Boy Cards and dies
OLO Markers
2mm Shrink tubing found on Amazon
0.08 mm PMMA Plastic Optic Fiber found on Amazon

1- I found two things on Amazon this 0.08 flexible plastic LED optic fiber light source and 2mm shrink tubing in black. I paired these with the EZ-Lights to create light sabers for this father and son duo.
2 & 3 – I cut two pieces of the LED optic fiber to 1 2/3″ long. I cut one end of the optic fiber at an angle.
4, 5, & 6 – Using a small bit of liquid UV resin I attached the angled edge of one of the fiber optic pieces directlhy to one of the EZ lights and set it with a UV flash light. I cut a pice of the black shrink tubing to 5/8″ and slid it over the EZ-Light and optic fiber connection. I used a heat gun to shink the tube into place creating the handle for the light saber and a closed connection.
I repeated these steps with the second optic fiber. We do not need the third EZ-Light and it is perfectly acceptable to snip this extra 3rd light off near the EZ-Light battery pack.

A – I randomly stamped out the Death Star along with some additiona planets and meteors in black on a piece of 4″ x 5 1/4″ dark grey cardstock.
B – I stamped and colored the father and son images with OLO Markers. The film strip is die cut from black cardstock and the images are glued into place on each side of the film strip facing each other.
C & D – I colored one light saber red using the R0.4 OLO Marker and the other one green using OLO Marker YG2.5. I colored the tip of each light saber silver to refect the light back inward.

E & F – I placed the film strip onto the card front to find placement for the lights and cut small holes to pull the light through and glue into each figures hands.
G & H – I used a small clamp to keep the light in place as the glue dried and added and extra colored hand over the top of the sabre handle.

I & J – You can see the light sabers nearly touch. we are working out positining at this point
K & L – I stamped out the press here sentiment into the large meteor under the father and decided to re-stamp the meteors and color them in a neutral brown. I stamped press here in back and am much more pleased with the results. I glued the meteors into place.

M & N – I added adhesive foam squares to the back ot the figures and the film strip. I gently pulled the EZ-Light wires towards the back pulling the filmstrip into place. I marked where the meteor with press me was located on this back side to allow perfect button placement.
O & P – I added a small strip of double sided tape to the middle of the battery pack and pressed the battery pack and button into place I taped down the wires.

Q. R & S – After securing the loose wires to the back of the card front, I turned the card front over and checked out the the light sabers with the button. I am so excited and cannot believe it turned out better than I expected!
T – I turned the card front over to the back side and framed out the card with The Worlds Best Foam Tape, a double thick adhesive foam tape that is repositionable for 30 minutes and secures after 24 hours. This makes it super easy to remove should you get the placement off when attaching the card base.

After framing it out, remove the release paper and adhere it to an A2 card base. And now for the fun, Lighting it up!

Thank you, I appreciate you taking time from your day to stop by and check out this fun fandom Light-Up light saber card featuring the Pear Blossom Press EZ-Lights. I hope you are inspired to create something lovely today! Keep it Light!
Be Creative ~ Stay Inspired
Jenn Gross
Follow me:
Instagram – https://www.instagram.com/journeycoachjenn/
YouTube – http://www.youtube.com/c/JourneyCoachJenn
Blog – https://journeycoachjenn.blogspot.com/
Note – Affiliate links are provided when available, If you purchase products from these links, I will receive a small commission from the company. This is at no additional charge to you.I appreciate and thank you for your support. Find additional affiliate links at https://hype.co/@journeycoachjenn
