Have you ever tried acrylic pours? They are a lot of fun; addictive even! Once you start, you will want to keep going. I created several canvases, but as a cardmaker at heart (and someone with limited wall space; I mean you can only hang so many), I wanted to see if I could create backgrounds for cards. It turns out you can, and they are just as much fun! No two will be the same. Here is a video where I show you how to prep and pour onto chipboard panels, and how I added so much texture to the Layered Shells that I decorated my cards with…
Here are pictures and a detailed description of how I made the cards…

For acrylic pours, in addition to acrylic paint, you need a few other supplies. You will want a flow medium to help the paint move. Floetrol is a good choice. A few drops of silicone will help develop circles, or cells, for neat patterns. You can pick up a bottle of treadmill lubricant, but if you have silicone hair drops, you can add that instead. You will also need cups and something to stir your paint mixtures with.

To prep the paint, add one part flow medium to two parts paint, using separate cups for each color. Stir a few drops of silicone into each cup. If you’d like to add any glitter, or Pearl Ex powders, you can stir it in. However, most of the shimmer will be lost since acrylic paint is opaque. Once your paint cups are mixed, it’s time to pour!

Instead of pouring onto canvases, I poured onto chipboard panels that had been base coated with gesso. I made sure to cover my work surface with parchment paper (just because the roll was handy), but any disposable drop cloth would work. And I kept a roll of paper towels handy. This is a messy project.

I propped my first chipboard panel up on two cups, then I floated a thin layer of my white paint mixture on top. Next, I poured several colors on top and started to move the panel back and forth, and side to side, allowing the paint to flow to the edges. This is the fun part! You can’t really control the patterns that will emerge, but if you have spots where the paint won’t flow to the edge, you can use your finger or a stir stick to help move it a bit. Use a heat gun to help develop the silicone cells. When you are happy with the panel, set it aside to dry. The paint will continue to move a bit. If your chipboard is curling up and the paint is running off, poke it down in the center with a stick to flatten it back out. I made six panels and let them dry overnight.

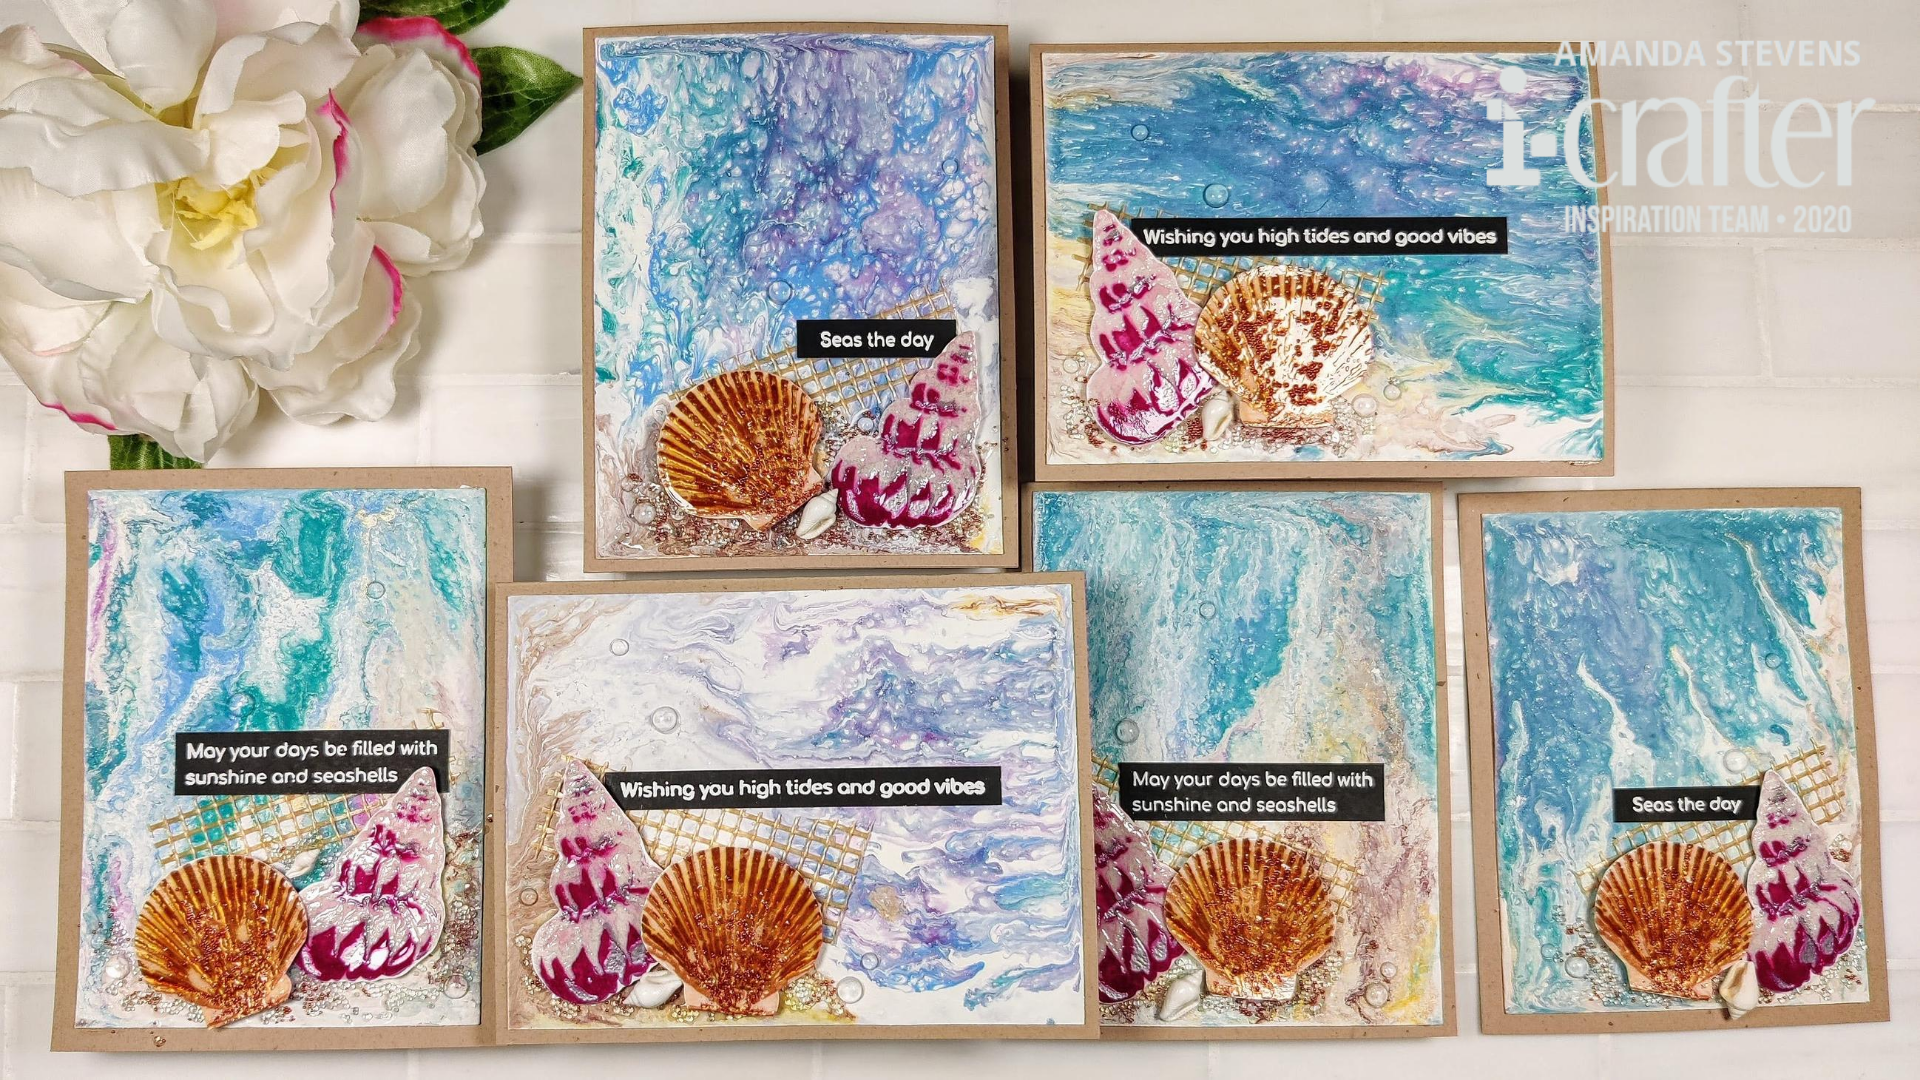
The panels turned out so pretty, and I purposely chose colors to look like water and sand. I knew they’d be great for mixed media backgrounds and I wanted to create shells with lots of texture to layer on top. I stamped out the Layered Shell stamps from i-crafter, using a mix of Distress Oxide inks, metallic embossing powders, and I even sponged Liquid Applique onto one of the stamp layers of the purple shells and heated it for a raised texture. After I stamped the shells, I coated them with Diamond Glaze and sprinkled glass microbeads onto the brown shells. I let them dry completely and fussy cut them.

I glued down mesh pieces and embossed sentiment strips. Then I popped the stamped shells up with foam tape. I glued tiny real shells to each card and more microbeads all around the focal points. I also glued on several large clear drop gems, and added more Diamond Glaze over the microbeads to lock them in place. The panels were glued to kraft card bases.

The Layered Shell stamps are gorgeous just stamped in ink, but with the busy poured backgrounds, I really wanted to add more texture and shine. I love the way they turned out! They really pop off the page. This isn’t a quick project, but it is a fun one. It’s been a while since I played with mixed media, and this reminded me how much I enjoy it. Sometimes, it’s fun to get messy.
Have you tried acrylic pouring yet? How about layered stamps? Would you like to see more inspiration with the stamps I used today? They are part of the new release from i-crafter, and man, there are some awesome new stamps and dies in this one! Check them out…
I can’t wait to make that Mermaid Tunnel Card! Wouldn’t acrylic poured backgrounds make really cool layers for it?
Thanks for stopping by today. I’ll be back soon with more fun cards to share.
This site uses affiliate links whenever possible (at no additional cost to you), but only for products I actually use and love.

yup. . . nope. nope. nope.that is just about the messiest, most uncontrollable art project i can imagine and i want no part of it. have fun, send me one and just. . . nope. i can just see me getting covered with paint EVERYWHERE. and then the birbs get covered, and then there’s flying, and then the dog starts chasing them, and then there’s puppy prints and birb prints and wheelchair prints and . . . yup, that;s a big, big NOPE.
These are gorgeous!! Love the look of pouring and I might give it a try with Arteza pouring paints. No mixing! https://arteza.com/dp/pouring-acrylic-paint-60ml-set-32