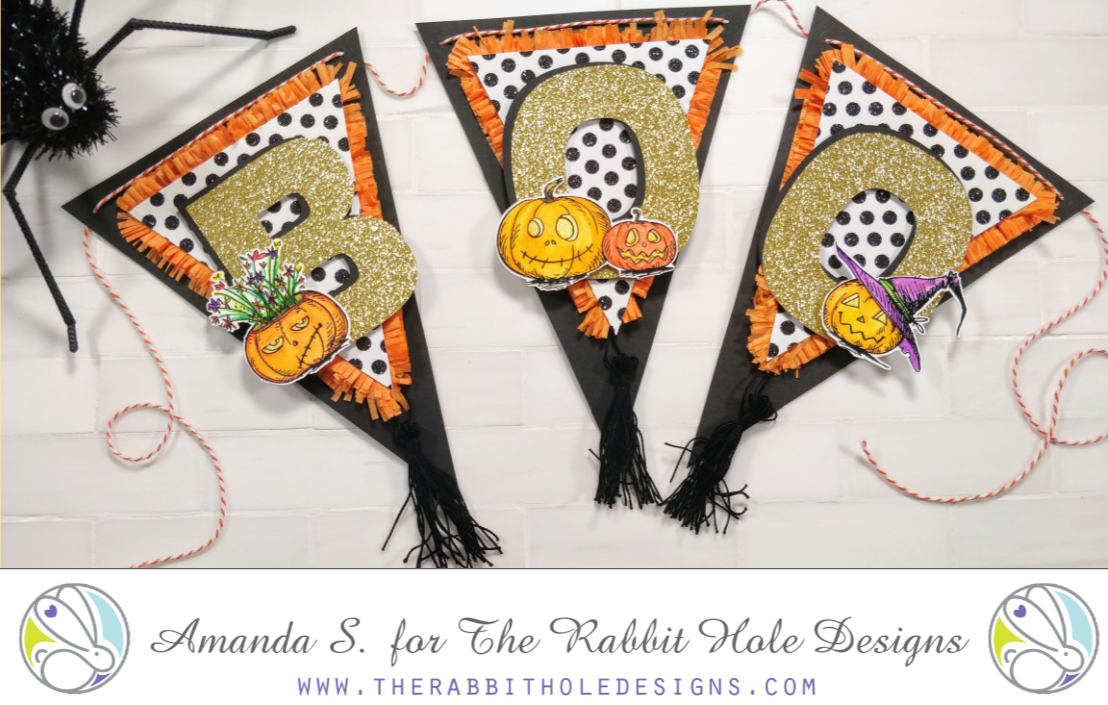
Hello my crafty friend! Now that summer is winding down, the kids are back in school, and Starbucks® has brought back the PSL, you know what that means…It’s time to start planning for Halloween 😉 Today, I’ve got a cute banner to help you get a jump on decorating. I chose to spell out BOO, but you could make your banner spell out any message you like. At the bottom of the post, I’ve got a few more suggestions.
To make the pennants, I first cut out a template for the triangles. To get the same angles, I stacked two pieces of scratch paper on top of each other and folded them in half. Then I lined them up in my trimmer with the fold facing away from my blade and cut a triangle shape. I separated the two pieces and, leaving one folded, I trimmed 1″ from the same sides I had just cut. Then I trimmed 1″ from the top. When I opened both pieces up, they stacked on top of each other with a nice wide border and they have matching angles. I used the templates to cut out the smaller pennant from black and white polka dot glitter paper, and the larger pennant from black cardstock.
To make the fringe, I stacked four pieces of orange tissue paper together and folded them into thirds (the same way they were folded in the package). I sliced the stack into 1″ strips and used fringe scissors to cut along one edge. I glued the fringe to the back of the polka dot paper and feathered the fringe out with a semi-soft paintbrush. I only used two slices per pennant, but you can add more if you’d like a fluffier look.
Before adhering the fringed pennants to the black ones, I made simple tassels from embroidery floss and stapled them to the bottom of the black triangle points. After I glued the large and small pennants together, it was time to add the letters. I used my ScanNCut to cut out 4″ letters from gold glitter cardstock and black cardstock. I glued the black and gold letters together, slightly offsetting them so they’d appear to have a drop shadow. (This makes it easier to read on a busy background like the glitter dots.) Then, I popped the letters up on the pennants with foam tape.
To decorate the letters and really jazz up the banner, I stamped, embossed, and watercolored three jack-o-lantern images. These are brand new stamps from The Rabbit Hole Designs and I absolutely love them! They are from the Pumpkin Hair Don’t Care, Pumpkin Friends, and Gourd-geous sets. Again, I used my handy ScanNCut to fussy cut the images. (Although, the Gourd-geous stamp has a coordinating die available.) Once the images were cut out, I used more foam tape to adhere them to the letters and added Aqua Shimmer to put a sparkle in their eyes. To finish the banner, I punched holes in the top corners and strung them together with orange baker’s twine.


This banner is the perfect size to string across a door, but you can easily adjust it to fit any space you want. Here are a few more sentiment ideas:
- HAPPY HALLOWEEN
- WICKED
- SPOOKY
- TRICK-OR-TREAT
- HELLO GOURD-GEOUS
What will you make your banner say? Have you got this year’s costume picked out yet? I can’t wait for Halloween!!! (Can you tell 😉 ) Let me know in the comments how you celebrate Halloween. And if you’re looking for more inspiration with these new stamp sets, check out this post. You will find the sister article to this one on The Rabbit Hole Designs’ blog today. Hop on over for more fun ideas! I’ll be back soon with another seasonal project.
This site uses affiliate links whenever possible (at no additional cost to you), but only for products I actually use and love.

Ohhhh I love your banner. I am going to make one similar to yours. I have several banners I bought in the last year, just waiting for inspiration. I LOVE to fly banners for different holidays, and to welcome home friends and family (as gifts). I just love yours!!!! The Pumpkin Hair stamp is ADORABLE!!
Love your fabulous banner. I am definitely going to try one myself. Thanks for your wonderful idea.
I love this & the polka dots !!!