
Hello everyone! It’s Samantha Pfrimmer here with you on the Pear Blossom Press Blog today. I am so excited to share a cute interactive card I made pairing products from the May 2025 Altenew Secret Garden Virtual Retreat and the EZ-Light.
SUPPLIES
- EZ-Light
- World’s Best Foam Tape
- PB Press Stamp and Die Bundle
- Altenew Paneled Doors Layering Die Set
- Altenew One-Go: Friendship Flowers Stamp, Stencil, and Die Bundle
- Altenew Willow Branches Die Set
Note: The Altenew supplies used for this card are currently only available to the attendees of the retreat, but there are similar products available that will give you equally wonderful results.
CARD INSTRUCTIONS
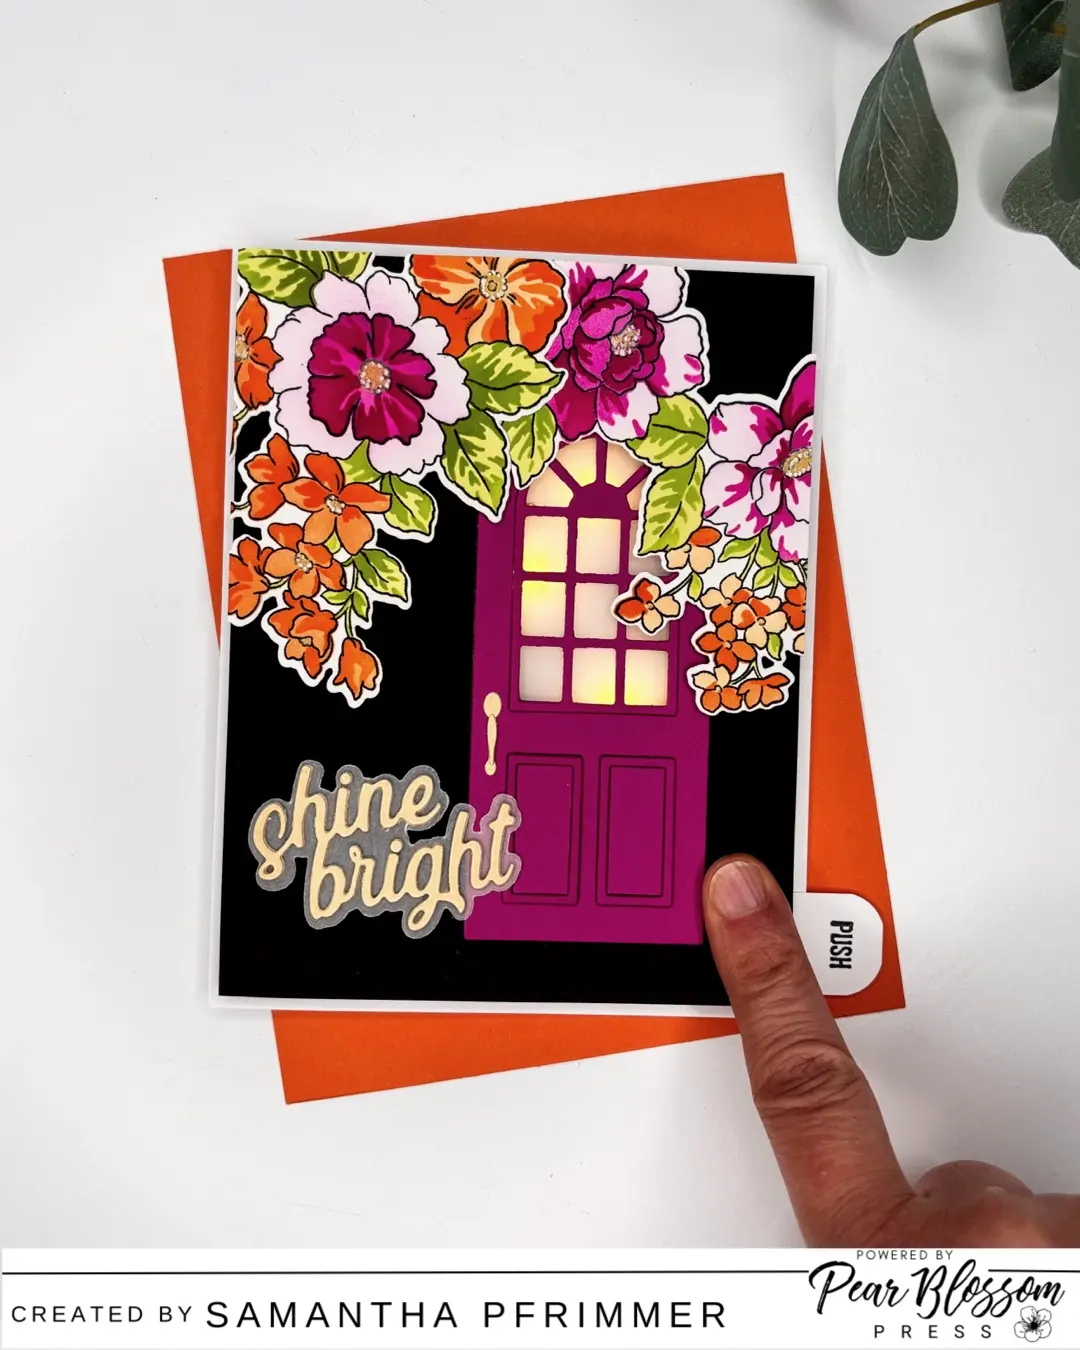
My daughter challenged me to make a card using the color choices she selected. She chose black, orange, and fuchsia, which was the perfect color combination to use with the light-up card I wanted to make with the Altenew Paneled Doors Layering Die Set.
To start my card, I die cut all of my door pieces from fuchsia cardstock, cutting a few more layers so I could stack my die cuts for dimension. I also cut a door handle from brushed gold cardstock and cut a piece of heavy weight vellum to use for my windows. After assembling my door per the layering guide on the back of the packaging I got to work on my flowers.
Using 80lb white cardstock, I stamped my One-Go: Friendship Flowers Stamp in black and, using the layering stencils, colored all of my flowers using orange and fuchsia colored inks with green leaves. After my stenciling was complete, I die-cut the images using the accompanying die set.
To complete my design, I took a black A2-sized panel and, using the window die from the Paneled Doors Layering Die Set, I cut a hole in my card panel where I wanted my window opening placed. I then covered the back of the black panel with vellum and got to work on the front of the card.
I glued my door to the front of the card panel, making sure to line the door up with the window opening in the pane,l before arranging my stenciled flowers around the top of the card and trimming off the excess with scissors.

LIGHT ASSEMBLY
To start, I flipped over my card panel and I arranged my lights round the vellum window opening as shown above and taped them down. I then placed my battery back on the lower right side of my panel, when looking at it from the front, and added the World’s Best Foam tape to the back.
I cut a white card-base measuring 4.5” by 5.75” when folded from 110lb cardstock making this finished card closer to an A6 size. Before adhering my card front to the card base, I cut a strip of cardstock ¾” of an inch thick and 1.5” long, rounded the corners with a punch, and then stamped Push on it using the PB Press Stamp Set. This strip would be mounted off to the lower right of the card to show where the push button could be found. I then adhered my card panel to the white card base and finished up the front with a sentiment cut from brushed gold cardstock using the “Shine Bright” from the Willow Branches Die Set.
Now my pretty card is complete, and I love how these lights illuminate a nighttime doorway. Thanks for reading!


Hello Samantha,
Your card is gorgeous ! I think it was so lovely of your daughter to inspire you to create a card using her colour choices – that is so exciting. I’m sure your daughter loved your card.
Thank You for describing in detail the steps you took to create your wonderful card. It really helps other craters to try your techniques and ‘give it a go’. I like how your photograph shows the placement of your 3-lights from behind the card – that is really so useful.
Your finished card is so beautiful. Thanks for sharing your design and products you used.
Have a fantastic day !
Warm Wishes, Jascinta. (Sydney, Australia)