It seems like Christmas just ended, so how can Valentine’s Day be so close? (Lol, maybe because my tree is still up in the middle of January.) Don’t worry if you haven’t started your cards yet, I’ve got a quick and easy design, guaranteed to wow! Guaranteed how? Because it’s a pop-up! Here’s a quick look at this valentine in action…
Adorable, right? And I promise, it was simple to create, with the help of some dies from i-crafter! There’s no coloring necessary, so it came together fast. Here is the supply list. Grab these dies, or something similar from your stash, and let’s get started…
SUPPLY LIST
Ribbon Rosette Valentine Add-on (conversation hearts and medium hearts)
Impossible Box Valentine Add-on (tiny hearts)
Heather Lowercase Alphabet (sweetheart)
I Love You Pop-up Card (pop-up words inside)
Pro Deck (cutting plate)
i-Grip Reverse Tweezers
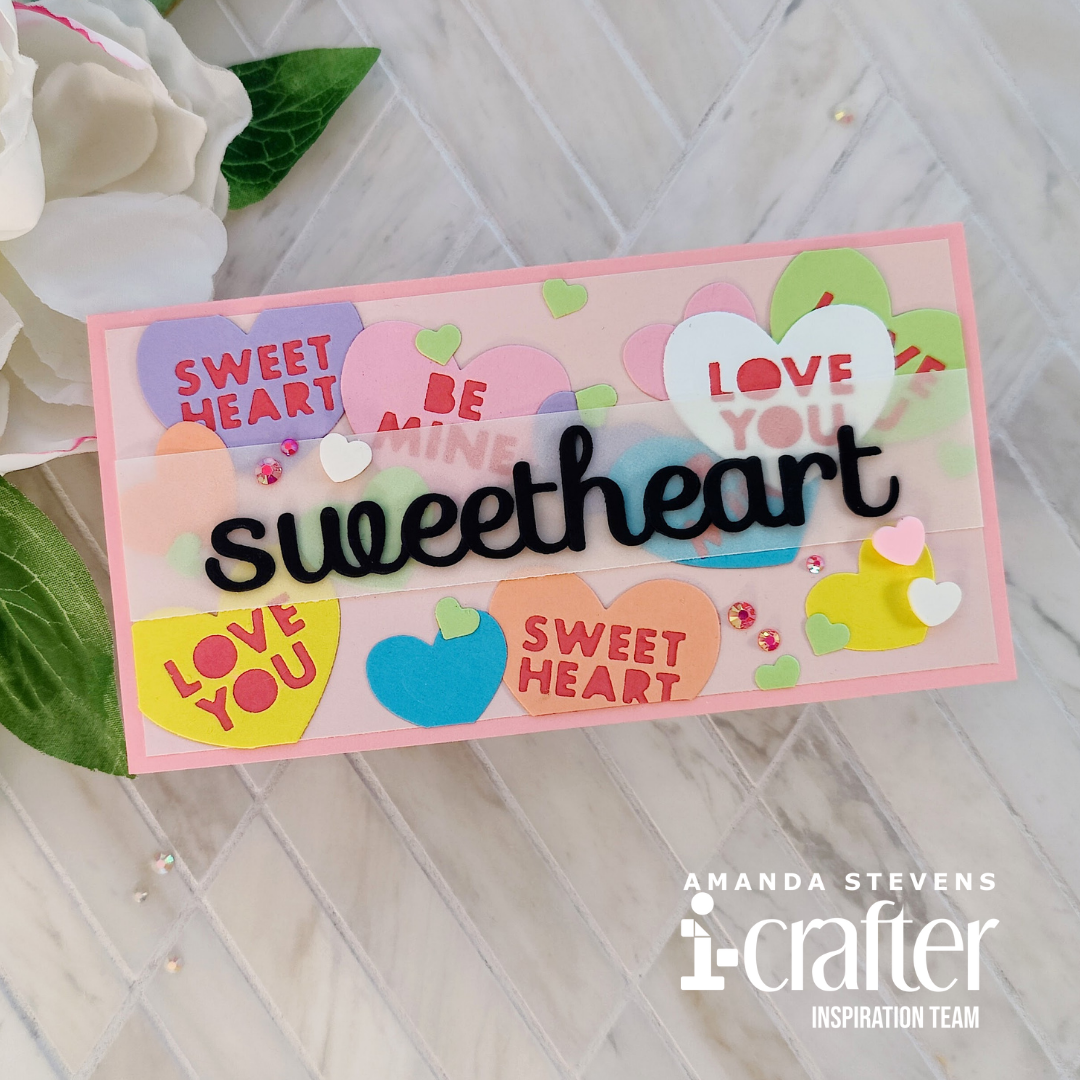
First things first, die cut and prep. Using my Pro Deck (seriously my favorite new tool!), I cut out all three conversation hearts, and the medium heart in the Ribbon Rosette Valentine Add-on set, from several colors of scrap cardstock. Then, I backed the cut out words with strips of dark pink cardstock, to mimic candy. (This left me with more hearts than I needed, but it didn’t take any extra time, so I have them for future cards.) I also die cut tiny green hearts with a decorative die in the Impossible Box Valentine Add-on set. The die cut out all of the small hearts at once, and I picked them up with a piece of low-tack purple tape, to keep track of them until I needed them. While I was at it, I cut out the letters to spell SWEETHEART four times from black cardstock. I lined them up and glued them together, overlapping the letters as I went, to create a smooth, thick sentiment for the front of the card. (If you stack each letter up separately, you won’t be able to overlap them.) Using reverse tweezers makes the job much faster.
Now let’s talk about the card base, before we pull everything together. Since I wanted to use the I Love You Pop-up die inside the card, that meant I needed at least two layers for the base (otherwise the pop-up opening would have big open holes behind it). In addition, to mimic the hot pink letters of the conversation hearts, I wanted a dark pink layer sandwiched in there too. Now whenever you have multiple layers at the centerfold of a card, you run the risk of it not wanting to close if it gets too thick. So instead of using heavy cardstock for my layers, I chose lightweight cardstock in light and medium pinks. The dark pink layer is even thinner copyweight. (You might notice in the photo below that the dark pink was off a shade, so I quickly ink blended the area that would show to match.) That gave me a total of three layers for the folded card base. Don’t worry, the paper was thin enough that it didn’t cause issues at the fold. In fact, it was so thin, that I cut another layer to glue to the back of the card, and a slightly smaller layer for the front of the card (with hearts glued to it). You can see all of the pieces in the last photo below.
[row]
[column size=”1/2″ stack=”sm”] [/column]
[column size=”1/2″ stack=”sm”] [/column]
[/row]
[row]
[column size=”1/2″ stack=”sm”] [/column]
[column size=”1/2″ stack=”sm”] [/column]
[/row]
This card could easily be made in any size, but if you want to recreate the same mini-slimline I made, here are the measurements (W x H) for the layers.
MEASUREMENTS
Medium pink card base 6 1/4″ x 6 1/2″ (fold in half to 6 1/4″ x 3 1/4″)
Medium pink back layer 6 1/4″ x 3 1/4″
Dark pink inner layer 5 3/4″ x 6″ (fold in half)
Light pink inner layer 6″ x 6 1/4″ (die cut words at center)
Light pink front layer 6″ x 3″ (glue hearts to this layer)
I used PVA glue to adhere the card base layers together, and the extra layer on the back. After gluing the hearts to the light pink panel, I trimmed it and wrapped a strip of vellum across the front. Then, I glued the word SWEETHEART on top, and adhered it to the card base. I realized that I forgot to make any white conversation hearts, so I cut a few out and quickly tucked one in place. Scattered clay hearts and pink gems finished the card off.
[row]
[column size=”1/2″ stack=”sm”] [/column]
[column size=”1/2″ stack=”sm”] [/column]
[/row]
Did you notice? No foam tape on this card! I can’t remember the last time that’s happened. Don’t worry, the thicker elements on the front of the card, and the pop-up inside add plenty of dimension. It fits perfectly into a #7 coin envelope. Plus, I have enough hearts to make at least two more cards just like it. What do you think? Do you have a design already picked out for your valentines? I’d love to see if you give this one a try! Just tag me on Instagram @pearblossompress so I can cheer you on.
Thanks so much for stopping by today! I’ll be back soon with more fun cards to share. And stay tuned for some awesome announcements next week! (If you’re not already signed up for our newsletter, don’t miss out!)
This site uses affiliate links whenever possible (at no additional cost to you), but only for products I actually use and love.

One thought on “Conversation Hearts Pop-up Card”