I’m back with a pair of easel cards today. If you’ve never made one before, it’s very simple. Both of the ones I’m sharing are round, but you can make them any shape you want. You’ll just need to cut out three of the same shape to form the card base. I’ll walk you through the process in photos below, but keep in mind you can swap the circles out for ovals, rectangles, squares, even hearts or stars.
Let’s start with the Mermazing Easel Card…
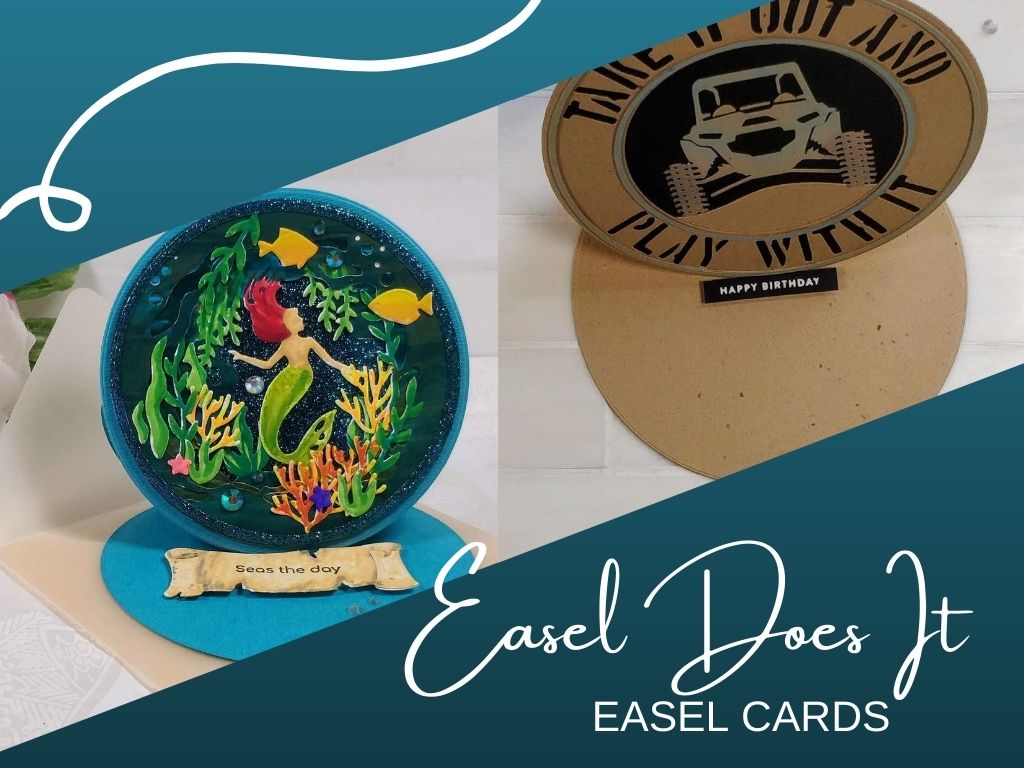
The first step is cutting out your card parts. You’ll want to color them, and get them ready to assemble. For this card, I used the Mermaid Tunnel Card Add-on set from i-crafter, and my nesting circle dies to cut out the pieces. I colored the mermaid layers with Karin Markers. (I didn’t worry about the outer edges of the lower layers since they would be covered up.) I wanted to layer them on top of blue glitter cardstock, but the blue glitter in my stash was a little too light and bright for the colors of the mermaid layers. So I just sponged on a bit of green and black alcohol ink to darken it up. I cut the glitter paper out using a 3¾” circle, with a 3½” circle nested inside. This gave me the back layer for the mermaid scene, and a glitter frame to put on top. Each of the mermaid layers were cut out with the 3¾” circle, and I cut out the three card base layers with a 4″ circle. Once I had the pieces prepped, I glued the three mermaid layers together, sandwiching them between the glitter paper base and frame.

To assemble the card base, I scored two lines in one of the turquoise circles, one at ½” and the other at 2¼.” I folded along the score lines as shown below. Then, I glued the ½” flap to the second turquoise circle. The second circle became the back of my card.

To attach the front of the card, turn the folded panel toward you and apply glue to the bottom flap. Adhere the third circle on top.

You now have an easel card base. It’s ready to decorate. You will need to pop up an element inside the card, to catch the front, and keep it from sliding flat. I did that by popping up my sentiment (stamped from the Layered Shells Set) with foam tape.

To finish the card, I glued the extra die cut elements to the scene, and added a few gems inside and out. I also used my Envelope Punch Board to create a 4½” square envelope from cream colored vellum. I love the way this one turned out! Of course you can use the Mermaid set to create a tunnel card, as it was designed to do, but I wanted to share another fun option. Especially, if you don’t have the Tunnel Card Base yet.

For the second card, with a more masculine twist, I created an easel card featuring a RZR® on the front. This card was for a friend’s 50th birthday, and he is an offroad enthusiast. I found an SVG file on Etsy that was designed for tshirts. I shrunk it down to about 5″ and cut it out with my ScanNCut from kraft cardstock. I blended a little blue ink onto the circle frames and the body of the vehicle. It’s hard to tell, but I also blended on a tiny bit of black on the tires. My small i-Blender brushes really helped because the cutouts were so delicate. Using my nesting circle dies again, I created a kraft easel card, with a smaller black circle on front for layering. I also cut a piece of terrain for the scene with a stitched hillside border (flipped upside down – couldn’t have girly stitching on this card). Inside, a birthday sentiment strip is popped up with foam tape.
I hope I have inspired you to give easel cards a try. They are very simple to construct. And remember, you can make them from any shape!
I’ll be back tomorrow with lots of light-up card inspiration!!! See you then!
This site uses affiliate links whenever possible (at no additional cost to you), but only for products I actually use and love.

WOW! Loving this one. Printing out for my Amanda book, which is beginning to look like an encyclopedia. No telling when I’ll get current projects all done and start trying all your A-Mazing interactives…not to mention my lights.