Hey crafty friend, I’m back with a few new cards showing you how you can stamp with colorful ink, before coloring your images. Sometimes, we just don’t want to stamp with black ink, right? My cards today all feature new stamps from The Rabbit Hole Designs, and they have floral images with lots of leaves and stems. I considered stamping with light brown ink for no-line coloring, but I have rainbows of ink pads that I don’t use enough, so I decided to stamp in color instead. I’ll show you a couple of options with some of the ink pads you might already own…

Grab your supplies and meet me in the craft room…
SUPPLY LIST
No Lion Stamp Set
Merry and Bright Stamp Set
Canson Watercolor Paper
Distress Oxide Ink Pads
Gina K Ink Pads
i-crafter Hybrid Ink Pads
Versamark Ink Pad
Clear Embossing Powder
Cottontail Embossing Powder Tool
Karin Markers
Colored Pencils
Essential Gel Pens
Red Gems
Rainbow Pearls
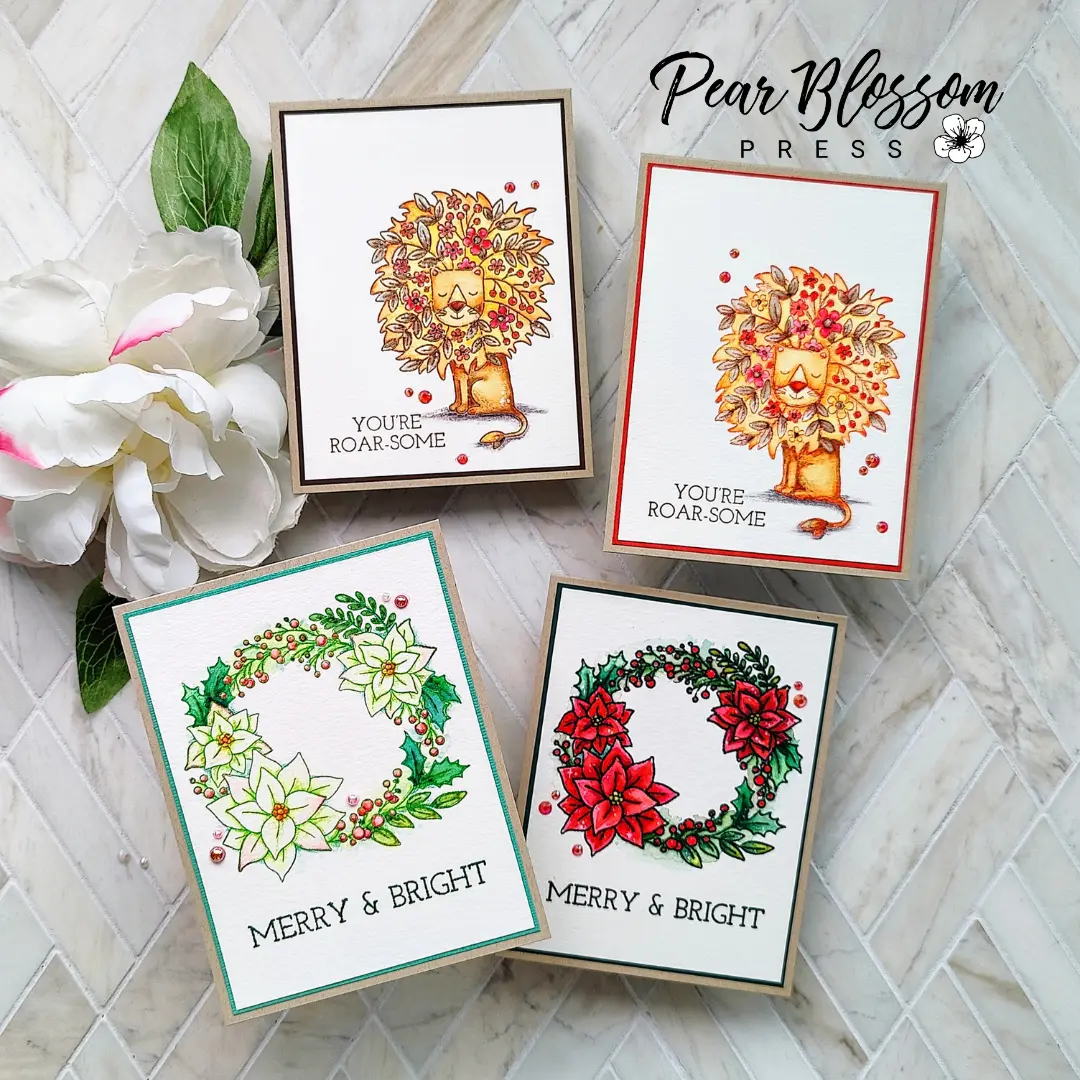
For the images I chose, I decided that watercoloring them would allow me to add layers of color, and give me a loose, artsy feel. Plus, I’m not great at it and this was a good opportunity to practice. Again, I wanted to stamp the outlines in color, rather than black ink, so the florals would have a nice base color. In order to keep the stamped lines from bleeding when I watercolored, I used a couple of tricks. First, I stamped one Lion with Vintage Photo Distress Oxide ink, then stamped over it again with Versamark ink and embossed it with clear powder. (Distress Oxides are water reactive hybrid inks, so the stamped lines would have stayed visible, but a good amount of ink would have bled into the image as I colored if I hadn’t locked it in place with the clear powder on top.) I used the same trick to stamp a Wreath with Gink K Christmas Pine ink for the same reason. Remember, whenever you emboss, use your powder tool first, to avoid stray powder. For the second imprint of each image, I stamped them with i-crafter Hybrid inks. These act more like pigment inks and when they’re dry, they don’t bleed with water.
Next, it was time to color. I painted sections with clear water, then dipped my Karin markers to my paper to let the color bloom into the wet areas. On the embossed panels, each section is divided from the next by the clear powder, so I could work on areas right next to each other. On the other panels, I had to skip sections that touched to keep the colors separate. (You can see my work in progress in the first photo below.) In some sections, I added a second color to bloom into the first for added interest. As the paint dried back, some areas needed more layers of color.
[row]
[column size=”1/2″ stack=”sm”] [/column]
[column size=”1/2″ stack=”sm”] [/column]
[/row]
[row]
[column size=”1/2″ stack=”sm”] [/column]
[column size=”1/2″ stack=”sm”] [/column]
[/row]
Once all four of my panels were dry, I used colored pencils to help deepen the shading. A trick I learned from Kathy Racoosin is to to get into the nooks and crannies with your pencils, and color right up onto the stamped lines. That wasn’t really possible on the embossed panels, because the clear powder got in the way. If you look closely at my embossed cards, you can see narrow white lines around the stamped lines. (Especially, on the shadow under the darker lion.) That’s clear powder that blocked my pencil from getting too close. For that reason, I like the hybrid ink panels better.
[row]
[column size=”1/2″ stack=”sm”] [/column]
[column size=”1/2″ stack=”sm”] [/column]
[/row]
[row]
[column size=”1/2″ stack=”sm”] [/column]
[column size=”1/2″ stack=”sm”] [/column]
[/row]
On both of my embossed cards, the clear powder darkened the stamped ink a bit, so I painted with darker colors. I added white gel pen accents to those cards. After mounting the panels to colored cardstock, I glued them to kraft card bases and added pearls or gems, along with coordinating sentiments. I really like all four of these cards, but I feel like I have a long way to go to improve my watercoloring skills. I’m also considering upgrading my colored pencils to ones with less of a waxy binder so I can get smoother strokes. Do you have any tips to share with me? Let me know below! Also, I’d love to know if you stamp with your colorful ink pads. If not, I hope I’ve inspired you to give them a try!
Thanks so much for stopping by today. I’ll be back soon with more fun cards to share. See you then!
This site uses affiliate links whenever possible (at no additional cost to you), but only for products I actually use and love.
