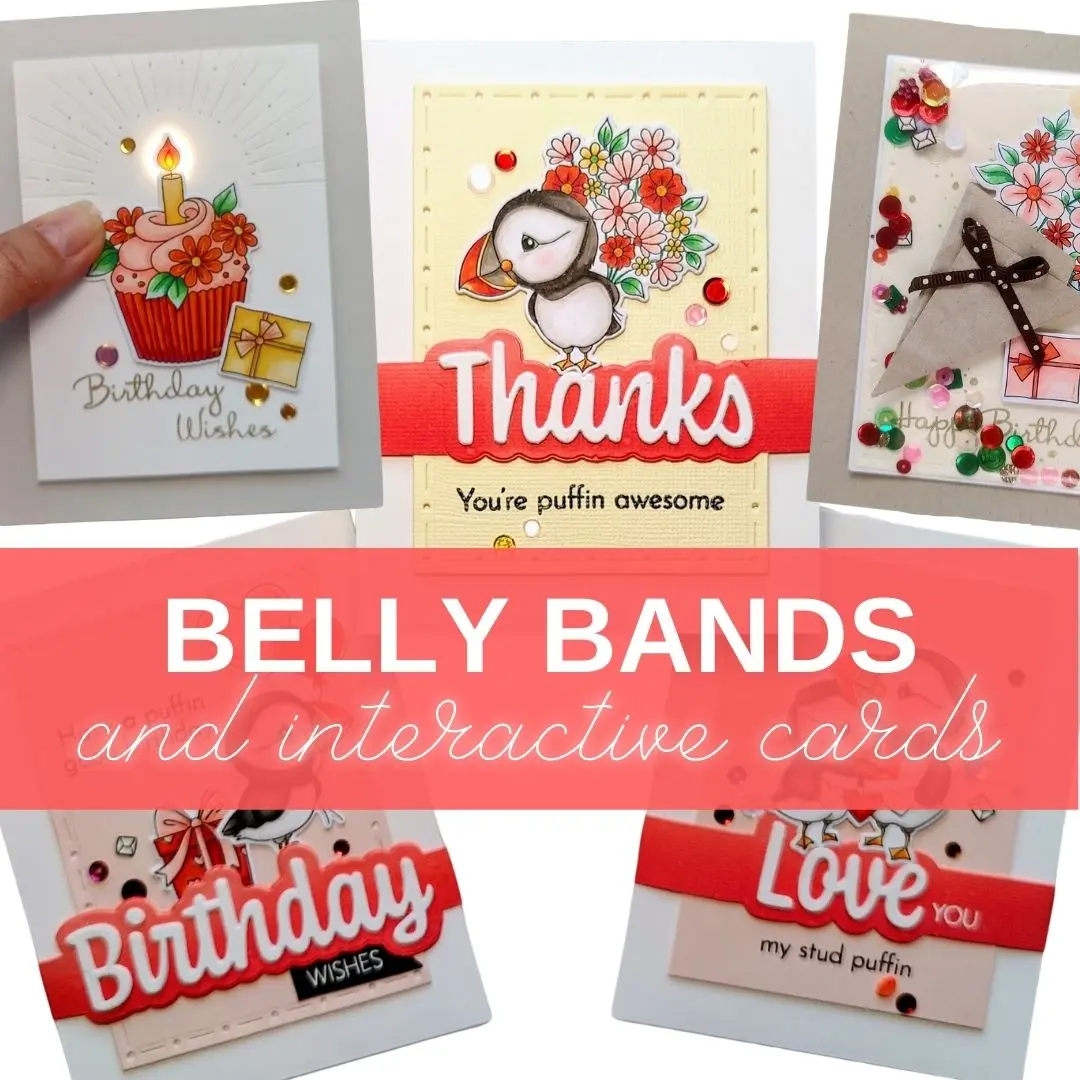
This past weekend, The Rabbit Hole Designs celebrated their 4th birthday with a special release and Instagram hop. And today, their Valentine’s Day sets are available, so we’ve got a great inspirational blog hop! I’m so excited to celebrate with them and share some fun cards. Before I show you the interactive birthday cards, I want to show you the set of belly band cards I made with the Love Puffin Stamp Set…

These were inspired by my friend Lauren Taylor, who created a fantastic card with a little scene on a belly band, and slipped it over a simple card. It’s such a great format that I had to give it a try!
Here are the supplies I used for all of my cards today…
[row]
[column size=”1/2″ stack=”sm”]
SUPPLY LIST
Love Puffin Stamp Set
Love Puffin Coordinating Dies
Year 4 Birthday Stamp Set
Year 4 Birthday Coordinating Dies
Birthday Scripty Stamp Set
Birthday Scripty Word Dies
[/column]
[column size=”1/2″ stack=”sm”]
Love Scripty Stamp Set
Love Scripty Word Dies
Thanks Scripty Word Dies
You’ve Been Framed Layering Dies
One Lights
Push Stamp Set
Crystal Clear Double Thick Foam Tape
[/column]
[/row]
First, I started by stamping and Copic coloring my Puffin and Year 4 Birthday images. Then I cut them out with the coordinating dies. While I was at it, I colored the images for the interactive birthday cards below at the same time.
[row]
[column size=”1/2″ stack=”sm”] [/column]
[column size=”1/2″ stack=”sm”] [/column]
[/row]
For the belly bands, I cut 2″ x 11″ strips of light red cardstock and blended darker red ink along the bottom. Then, I partially die cut the shadow of the large words in the center, leaving the left and right sides uncut. I used a trimmer to cut the left and right sides down, fussy cutting with scissors to get right up to the die cut edges. After stacking up three white layers of the word on top, I folded them around A2 card bases and glued the flaps together. I glued my puffins on top, adding a second die cut layer behind for more support. To dress up the cards, I die cut smaller pink and yellow panels with the You’ve Been Framed Layering Dies and layered them on. Stamped sentiments and scattered sequin mixes finish the cards. Here’s a look at them…
[row]
[column size=”1/2″ stack=”sm”] [/column]
[column size=”1/2″ stack=”sm”] [/column]
[/row]
[row]
[column size=”1/2″ stack=”sm”] [/column]
[column size=”1/2″ stack=”sm”] [/column]
[/row]
Aren’t they cute? I love the way they turned out and I can’t wait to make more cards like this! It’s great layout for wider focal points (like the scripty word BIRTHDAY) that wouldn’t fit onto smaller mat layers without looking funny.
How about I show you the interactive birthday cards I shared on social media this weekend now? I really wanted to create special cards to celebrate The Rabbit Hole Designs‘s 4th birthday, so I made a light-up card and a shaker card! Here’s a look…

You already saw how I colored the images above, so let me show you how I assembled these cards. They both have smaller mat layers cut with the You’ve Been Framed Layering Dies, like the cards above. For the light-up card, I stamped and gold embossed the sentiment and word PUSH onto the die cut mat. Then, I found a raindrop die in my stash and used it to cut a hole on the mat, right behind where my candle flame will layer on top (a regular ¼” hole punch would work too). I attached a One Light to the back of the panel with double stick tape, lining the light up through the hole (yellow dot) and the button under the word PUSH. Then, I added Crystal Clear Double Thick Foam Tape around the panel (it has red release paper, but the tape is clear when the release paper is removed).
[row]
[column size=”1/2″ stack=”sm”] [/column]
[column size=”1/2″ stack=”sm”] [/column]
[/row]
After adhering the panel to my A2 card base, I popped the cupcake and present up with thin foam tape, avoiding the area right behind the flame. A few scattered sequins and gold gel pen highlights add sparkle and finish the card…
[row]
[column size=”1/2″ stack=”sm”] [/column]
[column size=”1/2″ stack=”sm”] [/column]
[/row]
For the shaker card, I decided to wrap the flower bouquet up with brown paper and ribbon to make it pop. I found it easier to use lightweight paper and crumple it up before wrapping it around the flowers. I trimmed the extra away and adhered the flowers inside, sandwiching in thin foam tape for extra dimension. Then, I glued a narrow ribbon bow on top, using tweezers to hold it in place while the glue dried.
[row]
[column size=”1/3″ stack=”sm”] [/column]
[column size=”1/3″ stack=”sm”] [/column]
[column size=”1/3″ stack=”sm”] [/column]
[/row]
The shaker panel has a die cut cream panel with a gold embossed sentiment and gold gel pen dots, layered onto a slightly larger white panel. I folded an acetate sheet over the front of the panel and adhered three sides to the back with double stick tape. This formed a clear pocket that I filled with a mix of sequins and clay embellishments. I sealed the top of the pocket and attached the panel to an A2 card base. (When folding the sides of the acetate around the panel, don’t pull too tight. You want to allow a little extra space so your shaker bits can move freely.) Using thin foam tape, I adhered the bouquet and present on top to finish the card…
[row]
[column size=”1/2″ stack=”sm”] [/column]
[column size=”1/2″ stack=”sm”] [/column]
[/row]
I love how fun and festive this card feels! And I love that the sentiment is only revealed when you shake the sequins around. What do you think?
Who wouldn’t love playing with any of these cards? The belly bands are fun to slide around, the light-up card is really cool, and the shaker card feels like a party is about to erupt! I hope I’ve inspired you to give some of these a try.
Don’t forget, today’s post is part of a hop celebrating The Rabbit Hole Designs‘s new release, and that means there is a lot more inspiration and giveaways!
HOP ALONG WITH US:
The Rabbit Hole Designs
Amy
Essie
Lauren
Erin
Jessica
Lydia
Amanda – you are here
Deana – next stop
GIVEAWAYS:
To celebrate the February 2023 release, The Rabbit Hole Designs is giving away two savings vouchers; one to a lucky Instagram follower and one to a lucky Facebook Fan Page follower. The winner will be chosen at random from the comments left on The Rabbit Hole Designs’s Instagram post, and also from comments on their Facebook Fan Page post. So make sure to head on over to Instagram and Facebook and look for their giveaway posts. To enter, comment on either of those posts by 11:59 pm PST January 12, 2023. Winners will be contacted via DM for the Instagram winner and announced in the Facebook Fan Page for the Fan Page winner on January 13, 2023. Visit The Rabbit Hole Designs for complete details.
Thanks so much for stopping by today to help me wish The Rabbit Hole Designs a very happy 4th birthday, and to see part of their new Valentine’s Day release! I’ll be back soon with more fun cards to share.
This site uses affiliate links whenever possible (at no additional cost to you), but only for products we actually use and love.
