Hello again my crafty friend. I’ve got a sweet and simple baby card to share with you today. It came together really quick too. Let me show you…

Adorable, right? If you’d like to make a card like this, grab the supplies listed below, but remember you can use this layout as a template and change the images, sentiment, and colors to fit any theme.
SUPPLY LIST
Two By Two Safari Stamp Set
Two By Two Safari Die Set
Congrats Die (retired)
Bean Scene Stencil
Pumpkin Spice Sparkle Mix
Rubber Embossing Pad and Plate*
One of my favorite (and easiest) ways to use a stencil is to dry emboss with it. To do this, you need a squishy pad that will work with your die cutting machine. Some machines also require a different top plate for dry embossing. Using the pad and sandwich your machine’s manufacturer recommends, sandwich cardstock between your stencil and the rubber pad, then run it through the machine. (Remember, paper goes between the pad and stencil so the rubber can push the paper up and through the stencil openings.) As your panel is embossed, it can stretch a little. I recommend trimming it to the exact size you want after it is embossed, especially when you are matting it to another panel that is only slightly larger. If it stretched in one direction, it would be noticable.
[alert color=”#ddddce” shadow=”3″]TIP… Trim dry embossed panels after embossing to avoid stretch issues.[/alert]
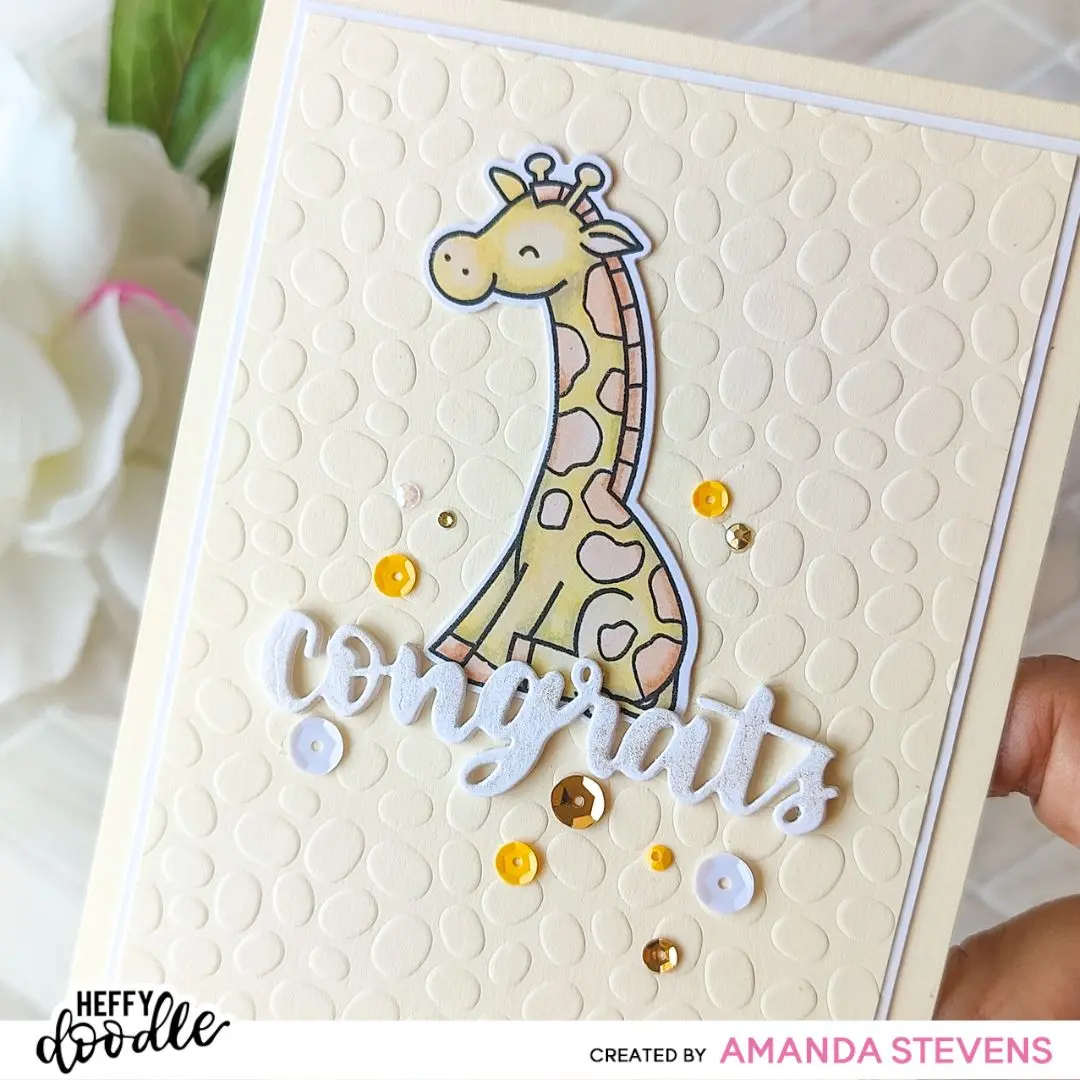
To make this card, I dry embossed a cream panel with the Bean Scene Stencil, then I trimmed it down to 3¾” x 5.” After mounting it to a white panel, measuring 3⅞“x 5⅛,” I mounted it to a cream A2 card base. You’d never know the soft pebble texture is supposed to be coffee beans, right? It reminded me of giraffe spots.
The giraffe was stamped with black ink and colored with Copic and Olo markers. I die cut the image, plus an extra layer to stack it on. This gave me a thicker piece that stands out against the background more than a single layer would. I cut the sentiment five times and glued the first three layers together. Then, I glued the stack to the giraffe so he was sitting on top of the word. I glued the last two layers of the word together and trimmed away the parts that overlapped the giraffe. I glued that around the giraffe so the back of the word was flush with the giraffe, then glued it to the card. A few sequins from a coordinating Sparkle Mix and a brush of Sparkle Pen on the sentiment finish the card.
[alert color=”#ddddce” shadow=”3″]TIP… Stack die cuts to create more contrast between images/words and background. This is especially useful when using ton-on-tone or similar colors.[/alert]

Thanks so much for stopping by today. I hope I’ve inspired you to give this card a try. Would you recreate it in soft colors for a baby card like I did, or change it up with bright colors and party animals? I’d love to know! Tag me on Instagram so I can see.
[alert color=”#ddddce” shadow=”3″]TIP… Save this post and use the layout as a template. Swap image, sentiment, and colors to suit your occasion.[/alert]
I’ll be back later today with a few more fun cards to share. See you then…
This site uses affiliate links whenever possible (at no additional cost to you), but only for products I actually use and love.
* Use the correct rubber pad and plate sandwich for your die cutting machine. The set listed above is what I use with my i-Motion Die Cutting Machine. It also works with Sizzix machines that take 6″ or wider plates.
