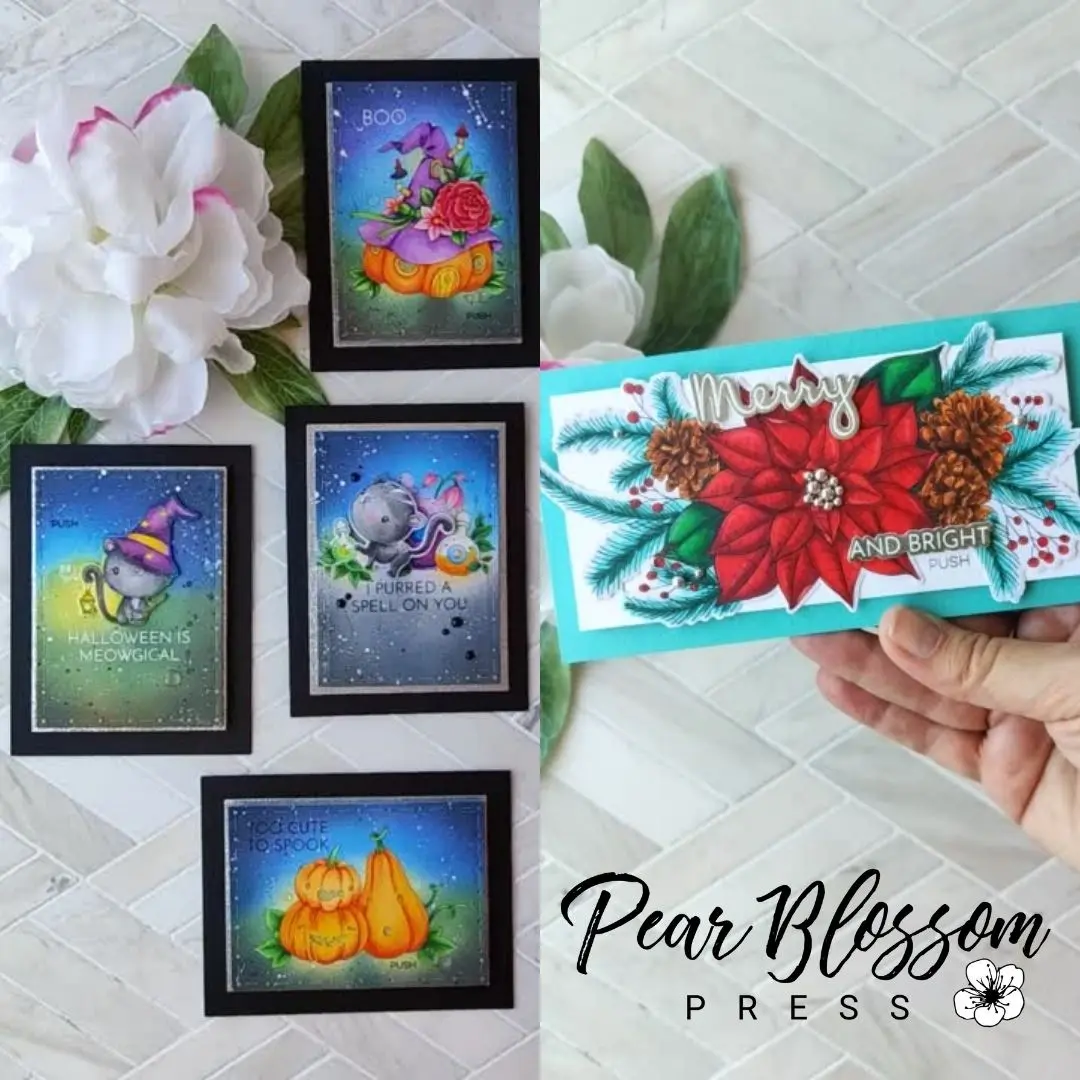
The new release from The Rabbit Hole Designs has adorable Halloween images and a new Poinsettia set illustrated by Kelly Taylor. They are all so cute and fun to color. And you know I couldn’t resist lighting a bunch of them up. Take a look…
[row]
[column size=”1/2″ stack=”sm”]
[/column]
[column size=”1/2″ stack=”sm”]
[/column]
[/row]
So fun, right? I love the way these cards turned out! Since this is part of a big inspirational hop to celebrate the new release, I won’t share too many specifics, just the basics on how I created the cards, and closer looks at each one. You’ll want to grab the supplies below to recreate them…
SUPPLY LIST
MEOWGICAL STAMPS AND COORDINATING DIES
SPOOKY SIGHTINGS STAMPS
SILLY PUMPKINS STAMPS
POINSETTIA STAMPS AND COORDINATING DIES
YOU’VE BEEN FRAMED DIES
ONE LIGHT
EZ-LIGHT
TWINKLE LIGHT
WORLD’S BEST FOAM TAPE
INTERACTIVE LABELS STAMPS
All of the Halloween cards were created in basically the same way. I stamped the pumpkins and magic potion bottles onto Copic friendly panels, trimmed down with the smallest of the You’ve Been Framed Dies. Then, I stamped and fussy cut masks for those images and applied them. I stamped two kitties onto another Copic friendly panel. After ink blending and splattering over the masked panels and one additional panel, I peeled up the masks and colored all of my images. To add lights to the pumpkin cards, I used a craft knife to cut out the windows/faces, then backed them with yellow vellum. I stamped the sentiments and “PUSH” onto the panels. I taped EZ-Lights in place behind the windows and lined up the button under the word “PUSH,” Then popped the panels up with double thick foam tape. Silver glitter paper and black card bases help the panels really pop.
[row]
[column size=”1/2″ stack=”sm”] [/column]
[column size=”1/2″ stack=”sm”] [/column]
[/row]
[row]
[column size=”1/2″ stack=”sm”] [/column]
[column size=”1/2″ stack=”sm”] [/column]
[/row]
For the two kitty cards, I die cut the cats and colored the white borders to match the ink blended backgrounds. Originally, I thought I’d add Twinkle Lights behind the potion bottles, but to do that, I should have stamped and colored the bottles on vellum, instead of cardstock. Since the coloring was done and I really liked it, I opted not to add lights to the potion card. To make the other kitty’s lantern glow, I punched a ¼” hole in the ink blended panel behind where the lantern sits. Then, I taped a One Light behind the hole. The kitty sits on top, elevated by very thin foam tape (avoiding the lantern). Black pearls and glitter enamel dots add more sparkle and dimension to the finished cards.
[row]
[column size=”1/2″ stack=”sm”] [/column]
[column size=”1/2″ stack=”sm”] [/column]
[/row]
[row]
[column size=”1/2″ stack=”sm”] [/column]
[column size=”1/2″ stack=”sm”] [/column]
[/row]
Switching gears to Christmas, the new Poinsettia set from Kelly Taylor is debuting this month, and you’re not going to want to miss it! It’s gorgeous and so nice to color. The florals are large and Kelly draws and test colors her images first, adjusting any lines as necessary to make sure they’re easy to color. (If you picked up her Lovely Lilies set, you know what I mean.) I stamped the large swag and colored it with Olo markers, adding a touch of colored pencil details to the poinsettia petals and some of the deepest shadows. After die cutting the swag, I punched ⅛” holes where three berries were, and backed them with red vellum. I marked where the three holes lined up on my 2⅝” x 5⅝” panel and punched the panel too. Using silver embossing powder, I stamped the word “PUSH” onto the panel and glued the swag on top. I taped the LEDs of a Twinkle Light behind each hole and lined up the button under the word “PUSH,” before popping the panel up on a teal card base with double thick foam tape. To finish the card, I embossed the sentiment with white powder on silver cardstock and cut it out with the coordinating dies. Then, I glued on a few silver pearls in the flower center and near some of the berry sprigs. When you push the button, the lights twinkle!
[row]
[column size=”1/2″ stack=”sm”] [/column]
[column size=”1/2″ stack=”sm”]
[/column]
[/row]
Thanks so much for stopping by today. I hope you are inspired to play along and make some light-up cards for the upcoming holidays! Ready for more great ideas? Hop along with us!
HOP LIST
THE RABBIT HOLE DESIGNS
TRACY S
WENDY
ERIN
AMY
JENN G
TANNA
LYDIA
AMANDA – YOU ARE HERE
CEAL – NEXT STOP
KELLY T
DEANA
LAUREN
ANNIE
JENN S
JESSICA
RICK
SEEKA
DAWN
This site uses affiliate links whenever possible (at no additional cost to you), but only for products I actually use and love.

Do you have a video showing how you do it?
Just love these cards!