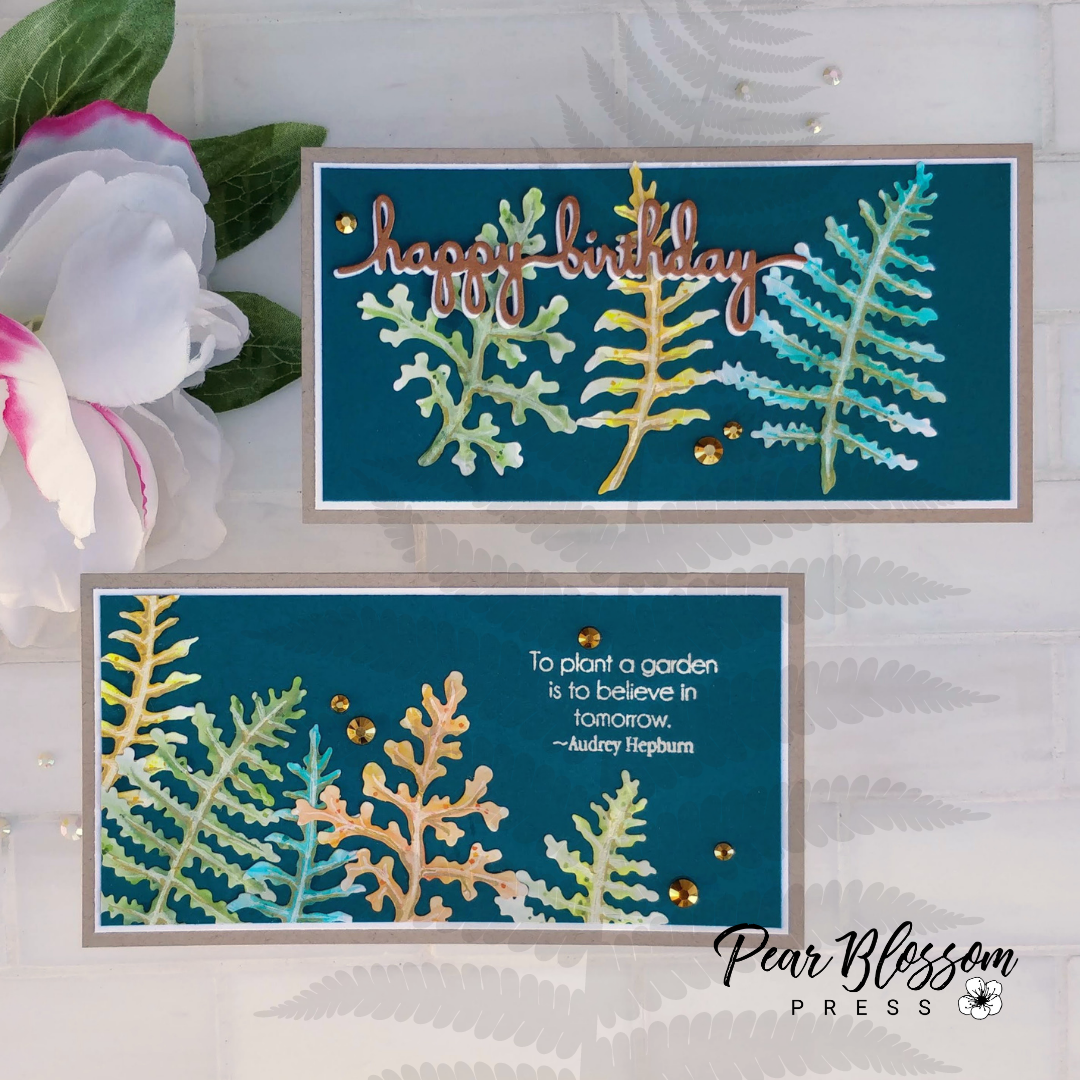
Have you seen the new Ferns & Ivy dies from Spellbinders? I love that instead of the more girly florals, these have a soft feel that anyone will love, making them perfect for masculine cards too. (I know guys like flowers, but we don’t tend to associate flowers with masculine cards). You know me, I love to color die cuts, so I cut out a bunch of these ferns from white cardstock and got to work…
[seven_tenth]
[/seven_tenth]
[three_tenth last][/three_tenth]
Let’s slow that down and take a look at each step. First, I die cut three of each fern from white cardstock (watercolor paper would work too), then watercolored them with a waterbrush pen and Karin markers (see color chart in photo). Adding the deepest color near the stems and base of each leaf, I pulled and blended the color out toward the tips. For extra texture, I splattered more ink on the leaves. After they were dry, I added gel pen highlights and shimmer with Essential gold and white gel pens.
[row]
[column size=”1/2″ stack=”sm”] [/column]
[column size=”1/2″ stack=”sm”] [/column]
[/row]
[row]
[column size=”1/2″ stack=”sm”] [/column]
[column size=”1/2″ stack=”sm”] [/column]
[/row]
Once the ferns were finished, pulling cards together was a breeze. I trimmed dark teal cardstock panels down to 5 3/4″ x 2 3/4″ and glued on the ferns. I trimmed the excess leaves off, and layered the panels onto 5 7/8″ x 2 7/8″ white panels, before gluing them to kraft mini-slimline card bases (6 1/4″ x 3 1/4″). For one card, I die cut and stacked three white and one antique gold layer of HAPPY BIRTHDAY from D-Lites Sentiments. The sentiment from Spring Quotes was heat embossed with white powder on the other card. Gold gems add a final touch of shimmer. These cards fit into #7 coin envelopes.
[row]
[column size=”1/2″ stack=”sm”] [/column]
[column size=”1/2″ stack=”sm”] [/column]
[/row]
[row]
[column size=”1/2″ stack=”sm”] [/column]
[column size=”1/2″ stack=”sm”] [/column]
[/row]
What do you think? I love the way these turned out, and I can use them for guys or gals. So now that we’ve figured out how to incorporate florals into masculine cards, it’s time to figure out how to add lights to floral cards. (I think I have an idea!) I’ll show you what I come up with there, as soon as it’s done.
Thanks for stopping by today! Tomorrow, I’m sharing the new Heffy Doodlers Challenge, and later this week, we have an awesome guest designer sharing a fun Halo Light card! See you soon.
This site uses affiliate links whenever possible (at no additional cost to you), but only for products I actually use and love.
