It’s time for the new Heffy Doodlers Challenge, and this month the theme is Spring Fling! I’ve created a fun and simple interactive card to kick the challenge off. Bonus – I’m stretching my supplies and repurposing a die set!

If you aren’t familiar, the Heffy Doodle fan group on Facebook is called Heffy Doodlers. Each month, they sponsor a new challenge, where the winner receives a £35.00 gift card to the Heffy Doodle shop! Entering is easy; create a card that fits the theme, snap a pic, and drop it in the challenge album on Facebook. Winners are chosen randomly. Luckily, I get to help coordinate the challenges and create the inspiration cards. Let’s take a look at my Spring Fling Interactive Birdhouse…
[row]
[column size=”1/2″ stack=”sm”]
[/column]
[column size=”1/2″ stack=”sm”] [/column]
[/row]
[row]
[column size=”1/2″ stack=”sm”] [/column]
[column size=”1/2″ stack=”sm”]
[/column]
[/row]
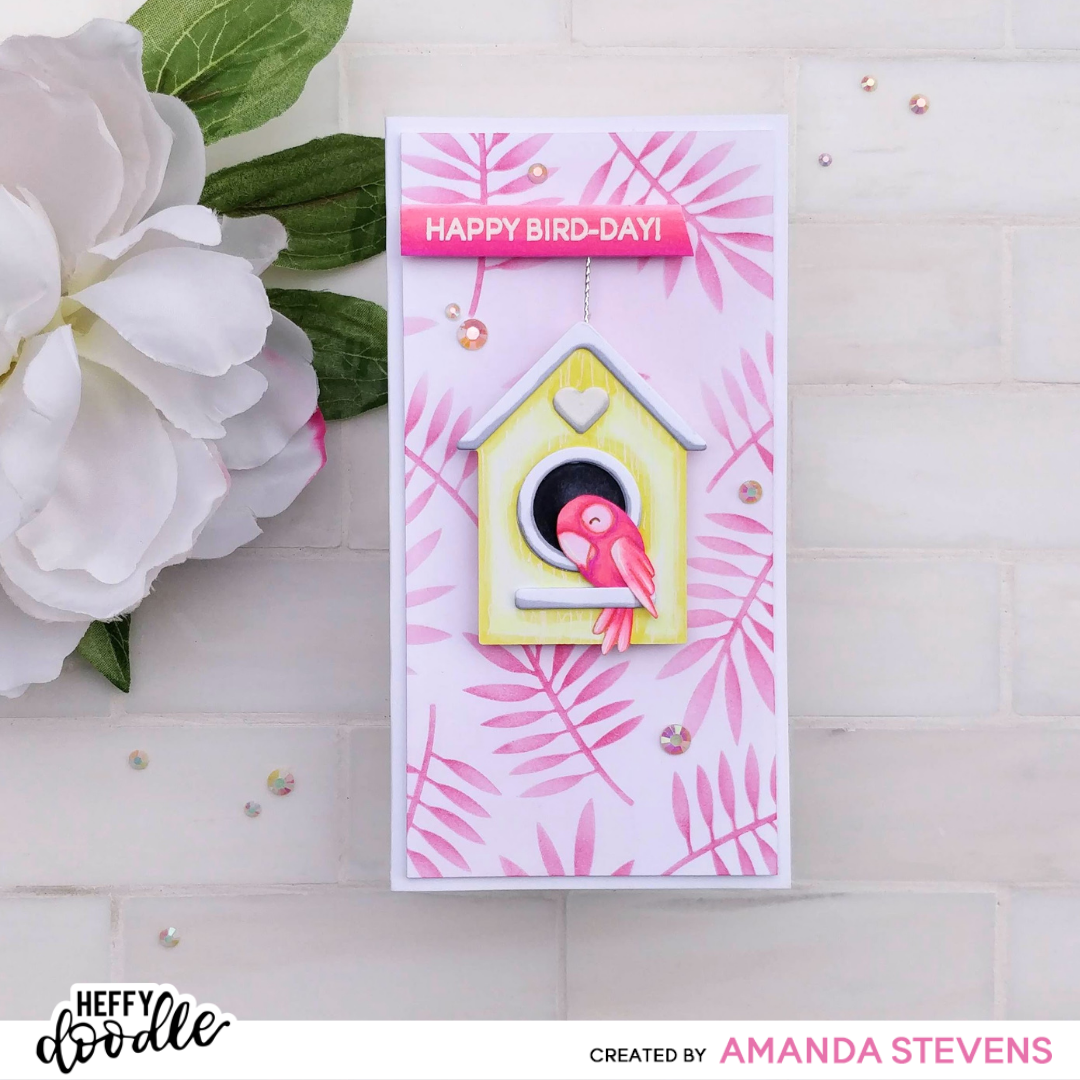
As you see, the birdhouse swings freely. This was so simple to do. I just taped one end of a silver cord to the top of the birdhouse, and the other to the bottom of the sentiment. Double thick foam tape pops everything up for more dimension. Notice the back of the birdhouse? I didn’t remove the release paper from the foam tape, to keep it from sticking to the card. (If you don’t want your birdhouse to move, you can stick it down instead.)
Now let’s talk about how I made the birdhouse. It’s actually the Build A Cabin die! I love stretching my supplies and repurposing them. To turn the cabin into a birdhouse, I really just needed to change the door. The die cuts a curved door that goes all the way to the bottom. It is designed to swing open. In order to cover the cut line, I flipped the cabin over (with the cut on the right), knowing I could hide the line behind the bird. Since I was working on the back side of the die cut, the woodgrain embossing was less visible. I just added it back in with a white gel pen, after coloring it with Copic markers. To add more dimension to the birdhouse, I cut two layers of the roof, heart, and door jam. I also nested a pair of circle dies and cut two frames to create the center hole. A little shading with a grey marker, before gluing them to the cabin, adds even more dimension.
Of course, the birdhouse needs a bird, right? I stamped a parrot from the Wingman stamp set with Warm Glow ink, and Copic colored him too. Instead of cutting him out with the coordinating die, I fussy cut him right along the edge. (I didn’t want a white border to disconnect him from the scene.) I tucked him under the door jam, pulling his wing over the top. A little foam tape behind his head keeps him flush.
To pull the card together, I blended pink ink through the UnbeLEAFable stencil on a 3″ x 6″ panel, and without adding more ink to my brush, dusted a light layer of pink over the panel to soften it. After mounting the panel to a white mini-slimline card base (3¼” x 6¼”) with thin foam tape, I popped the embossed sentiment strip and birdhouse in place. A few iridescent gems and shimmer pen highlights on the bird finish the card. This card fits into a #7 coin envelope.

I just love the bright spring colors and the way the birdhouse sways. The simple interactive element adds a whole new level of fun! I hope you’re inspired to play along with us in the Heffy Doodlers group and create a Spring Fling card of your own! All of the details, along with last month’s winner, can be found on the Heffy Doodle blog.
Thanks so much for swinging by today! Don’t forget, we’ve got a special guest designer later this week, sharing a fun new Halo Light card! See you then.
This site uses affiliate links whenever possible (at no additional cost to you), but only for products I actually use and love.
