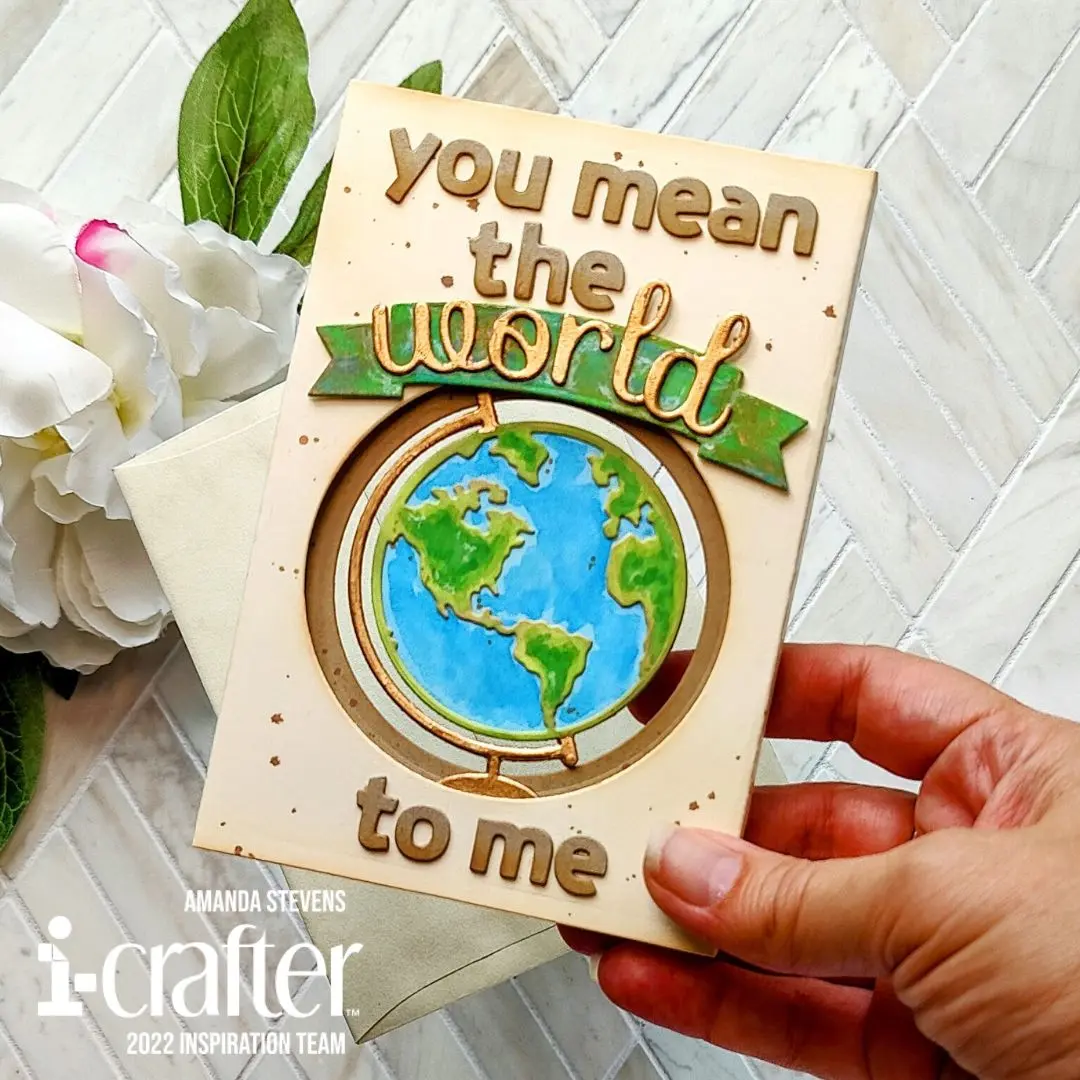
Hello again my crafty friend! Now that my anniversary has safely passed, I can share the card I made for my husband. Of course, a flat card wouldn’t do, so I made a shadow box card with a globe nestled into the tunnel. Since we celebrated eight years, I incorporated bronze Foundry Wax details (bronze is the traditional gift for eight years). Here’s a look at the card…
One thing I should mention is that my husband loves maps (we have quite the collection of atlases). So when I was thinking about what to make for our anniversary, I knew the globe would be special to him. With the help of alphabet dies, I was able to customize the perfect sentiment. You can use the same idea to create custom cards of your own by swapping out the globe and sentiment for elements that fit your theme.
Let me show you how I created this card. Grab your supplies and meet me in the craft room…
Supply List
Shadow Box Card Die Set
Classic Circles Die Set
Hello World Die Set
Carly Alphabet Die Set
Heather Lowercase Alphabet Die Set
PRO Mending Deck
i-Motion Die Cutting Machine
i-Blend Blending Brushes
Copic Markers
Essential Gel Pens
Foundry Wax
I started by die cutting my pieces. Quick side note: I just got the new i-Motion Die Cutting Machine and I love it! My old machine was on it’s last leg and it was time to replace it. This new machine is smooth, compact, has built-in storage, and when I drop in my PRO Mending Deck, instead of using the normal plastic cutting plate, I get clean, beautiful cuts with nice beveling. If you need a new machine, I would encourage you to check out the i-Motion Die Cutting Machine! Back to the card details…
After cutting three each of the letters to spell out my sentiment, I stacked them up. I cut several layers of the banner and stacked it up too. To add shading to the Carly letters, I blended brown ink on the bottom. Since the globe is visible from both sides, I cut the Americas for the front, and the Asia view for the back. I Copic colored the solid layer in blue and the landmass layers with green and brown. I used the same colors on the banner, along with white gel pen that I drew on and quickly smudged with my finger to blend. To create the bronze effect on both sides of the globe stand and the front of the Heather letters, I applied Mined Foundry Wax with my finger and heat set it. (If you don’t have Foundry Wax, you can use a gold gel pen.)
[row]
[column size=”1/2″ stack=”sm”] [/column]
[column size=”1/2″ stack=”sm”] [/column]
[/row]
While I still had my blending brushes and brown ink out, I added shading to the Shadow Box Card pieces. To add more texture, I pressed my Bling Palette into the brown ink pad and picked up the color with a wet paintbrush to splatter onto the pieces. Be sure to do this to both sides of the center layer. Speaking of the center layer, the Shadow Box Card cuts a hole in the center panel that is a little smaller than the globe. I wanted it to be bigger, so the globe looked more like it was floating. I used one of my Classic Circles Dies to get the right size.
To assemble the card, I glued the globe pieces to the center panel, then folded the score lines of all three panels. I nestled the center panel into the back layer and glued them together. Before gluing the front panel to the back, I added the sentiment pieces. (It’s just easier to glue things in place while the panels are still flat.)
[row]
[column size=”1/2″ stack=”sm”] [/column]
[column size=”1/2″ stack=”sm”] [/column]
[/row]
[row]
[column size=”1/2″ stack=”sm”] [/column]
[column size=”1/2″ stack=”sm”] [/column]
[/row]
That’s it. I didn’t add any gems or sequins since the bronze wax was shimmery enough. Plus, this is a card for my husband and he just doesn’t appreciate sparkle as much as I do. What do you think? My husband loved it! It’s on display on his desk at the moment.
[row]
[column size=”1/2″ stack=”sm”] [/column]
[column size=”1/2″ stack=”sm”] [/column]
[/row]
[row]
[column size=”1/2″ stack=”sm”] [/column]
[column size=”1/2″ stack=”sm”] [/column]
[/row]
I really love the size of this Shadow Box Card. It fits perfectly into an A2 envelope and it’s not too deep, so you still have plenty of real estate for decorating your card. I hope I’ve inspired you to pull out your box card dies and create one of your own. I’d love to see! Tag me on Instagram if you do, so I can cheer you on!
Thanks so much for stopping by today. I’ll be back soon with more fun cards to share! See you then…
This site uses affiliate links whenever possible (at no additional cost to you), but only for products I actually use and love.
