Hey crafty friend, it’s time for the new Heffy Doodlers Challenge, and this month we have a Lemon Chiffon Mood Board to inspire everyone. I made a fun, interactive slimline card to kick the challenge off. Take a look and see what happens when you shake it…
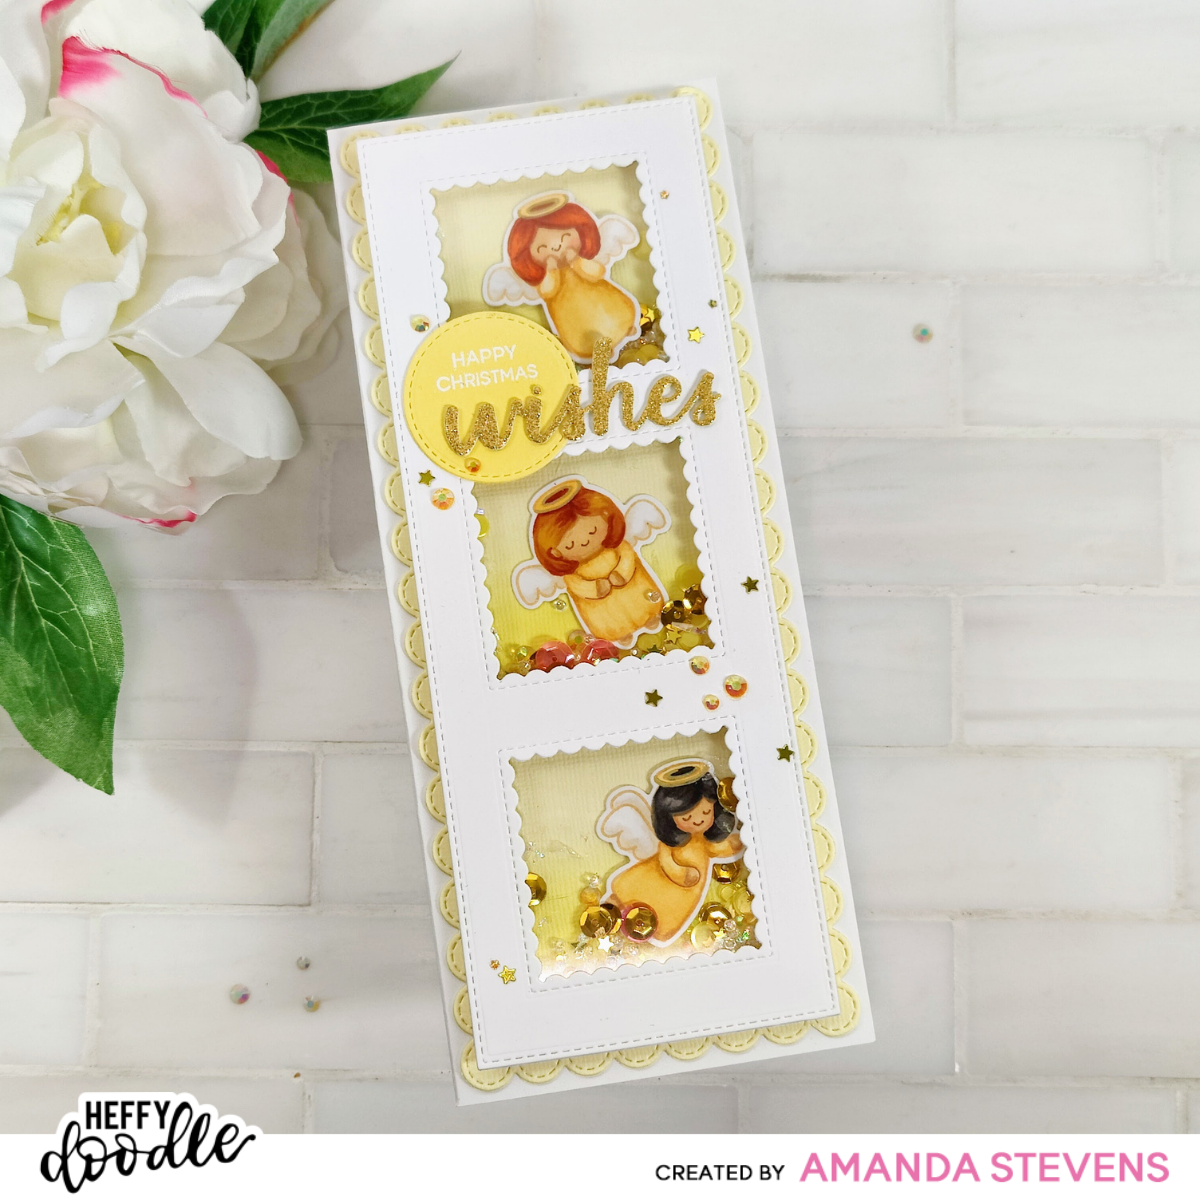
Isn’t it cute? I love shaker cards! This one was simple to make. I started by stamping three angels from the My Little Angel stamp set in Warm Glow ink, then colored them with Copic markers. After adding gold gel pen highlights to the halos, I die cut the angels with the coordinating dies.
[row]
[column size=”1/2″ stack=”sm”] [/column]
[column size=”1/2″ stack=”sm”] [/column]
[/row]
To prepare the shaker layers, I die cut the window panel using two dies in the Stitched Slimline Trio set. Then I backed it with acetate, and added double thick foam tape around all sides, and the dividers between the windows. I taped clear thread to the back of each angel and suspended one in each window, adhering the ends of the clear thread to the foam tape. Then, I set it aside while I worked on the back layer.
Using the scalloped die in the Slimline Pull Tab set, I cut the back layer from yellow cardstock. I also cut a second scalloped piece from scrap cardstock. (It will help line things up during assembly, but is not on the finished card.) To add interest to the yellow layer, I blended on darker yellow ink near the bottom of each window opening.
 Since the yellow scalloped layer is larger than the white window layer, getting them lined up with shaker bits in place can be challenging. You can either scoop your shaker bits into the center of the larger layer, then adhere the window on top, or you can use this trick. I tucked the scrap scalloped layer into the corner of my Misti, and placed my window layer on top, upside down. I scooped the shaker bits into each section, removed the release paper on the foam tape, then making sure the window layer was centered on the scrap piece, I adhered the yellow layer over the windows, using the scrap layer as a guide.
 After that, I adhered the shaker to the front of a slimline card base (8 1/2″ x 3 1/2″), and added my sentiment. I heat embossed HAPPY CHRISTMAS onto a die cut circle and glued it to the card, adding several stacked layers of the die cut word WISHES below. A few more of the stars and gems from the shaker mix were scattered across the front of the card to finish it off.
[row]
[column size=”1/2″ stack=”sm”] [/column]
[column size=”1/2″ stack=”sm”] [/column]
[/row]
[row]
[column size=”1/2″ stack=”sm”] [/column]
[column size=”1/2″ stack=”sm”]
[/column]
[/row]
I love how this one turned out. Shaker cards are always fun. And by adding the clear thread to the back of each angel, they can dance around inside, without turning upside down. Lol, I can’t tell you how many times I added free floating focal images to shakers, only to have them end up completely askew.
So are you inspired to play along? If so, create a card, tag, or project of your choice, using the Lemon Chiffon Mood Board to guide you, and post it in the Heffy Doodlers Facebook Group! A random winner will receive a £35 gift voucher to the Heffy Doodle Shop! All of the details can be found on their blog. Good luck my friend!
 Thanks so much for stopping by today! I hope you are taking time to enjoy the season this year. I tried to schedule fewer projects than normal on my calendar this month, so that I can spend more time with my family. Lol, I still ended up biting off quite a bit, so I’ll be back soon with more fun cards to share. If you don’t make it back to the blog before the end of the year, I wish you a wonderful holiday, and a happy, healthy new year! I’ll see you soon, my friend.
This site uses affiliate links whenever possible (at no additional cost to you), but only for products I actually use and love.
