The new Kokeshi Dress Up set from i-crafter is so cute, and tons of fun to play with! The mix and match hair and accessories remind me of playing with paper dolls when I was a kid. Of course, you can cut the pieces from colored cardstock and washi, or origami paper, but I really like starting with white cardstock and coloring the pieces myself.
For my cards today, I die cut all of the doll pieces from white cardstock and colored them with Copic markers. The die set includes tiny eyelash and sandal strap pieces, but the larger doll die embosses the same lines into your cutout. So you can use those lines as placement guides, or skip gluing the small pieces on, and just highlight the lines with a marker.

After coloring the pieces, I used the Japanese Kumiko stencil and rubbed Luster Cream and gold Pearl Ex through, onto the kimonos, fan, and umbrella. The stencil has several patterns that morph into each other. It’s also extra large; big enough for slimline cards, A2 cards, and everything in between! I used different sections of the stencil for each kimono.

Once all of the pieces were colored, I assembled the dolls. Aren’t they the cutest ever?!

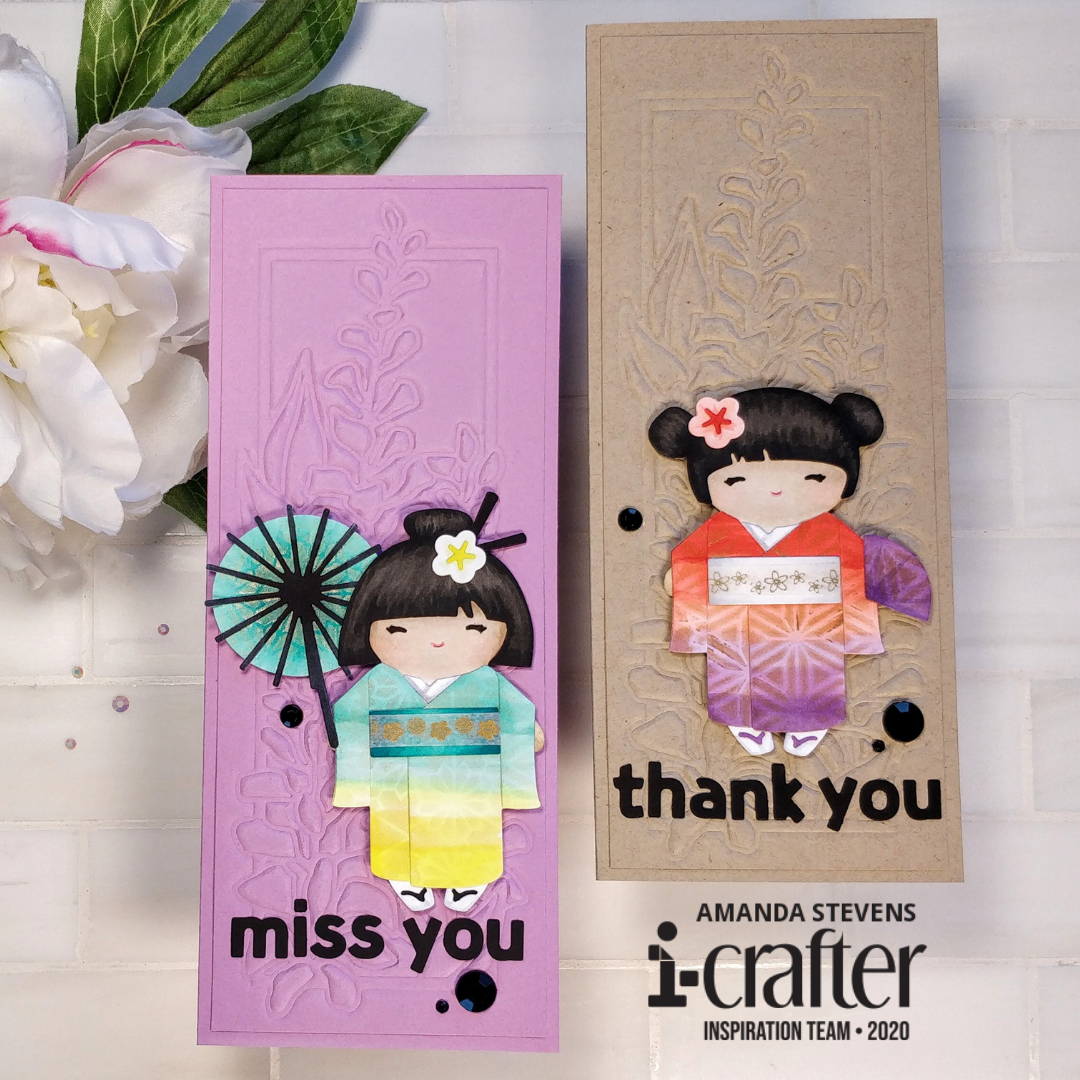
Originally, I was thinking I’d put both onto one card, but they are large enough to stand on their own. I decided to make a pair of slimline cards. I cut sheets of lavender and kraft cardstock into 8½” x 3½” cards, along with an 8¼” x 3¼” card front. Here is a cut guide to help…

To keep the focus on the dolls, I decided to emboss the card fronts with the Wisteria Vines slimline die and a squishy pad. This gave me texture, with a subtle tone-on-tone background. I glued the embossed panels to the card bases. Then, it was time to figure out doll and sentiment placement. I cut the words “miss you” and “thank you” from black cardstock with the Carly Alphabet die set. I considered lining the text up from top down, instead of left to right, but in the end, I decided on left to right, under the dolls. (If you line your words up on gridlines and pick them up with washi tape, you can flip them over and move them around to get an idea of what they will look like in different places.)

Oh, and while I had the washi tape out for the words, I decided the gold and white tape would be really cute added on top of the obis. It adds extra decoration and pulls the gold in from the kimonos. Here is a closer look at the finished cards…

The dolls are popped up with foam tape. You can see the gold highlights shimmer as you move the card around.

A few black gems add more sparkle.

I really love these cards, and I can’t wait to make more!

I hope I’ve inspired you to play with these fun Kokeshi Dress Up dolls too. If you’d like to see more of the Japanese themed release from i-crafter this month, head on over to their blog, for links to all of the teams’ projects!
Thanks for stopping by today, I’ll be back next week with lots of inspiration to share. Happy new year my friend!
This site uses affiliate links whenever possible (at no additional cost to you), but only for products I actually use and love.

Absolutely STUNNING cards…largely because of your gorgeous coloring! WOW!
This are wicked cool paper dolls! I am digging the new products indeed! Happy New Year!