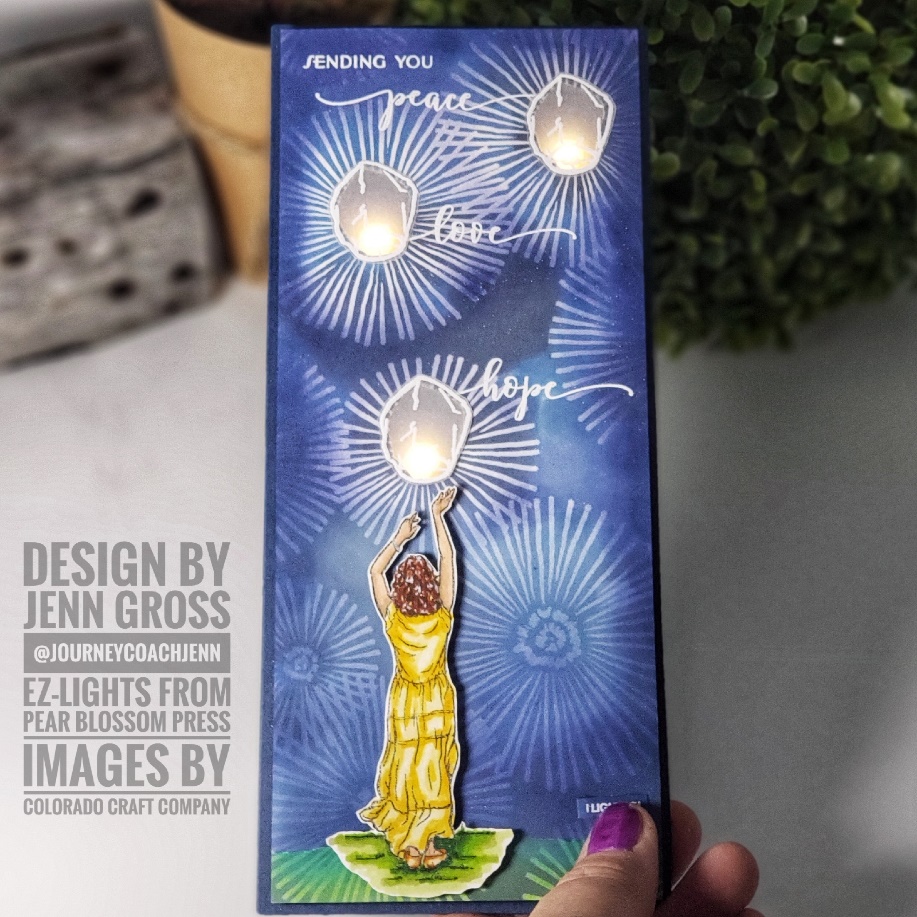
Hello my Crafty Friends! Jenn Gross here from Journey Coach Jenn. Welcome to today’s blog! I created this lovely light-up card using EZ -Lights and Colorado Craft Company’s Sky Lantern Sympathy stamp set. I hope you enjoy the tutorial for this slim line light up card.

A – I started with a piece of 3 3/4″ x 9″ piece of burst printed cardstock. I used Chipped Sapphire Distress Oxide ink to blend the background and only revealing three of the burst on the upper area of the card
B – I used the sky lantern stamp and stamped it in the middle of each burst with black ink keeping in mind I needed to be at least 1/4′ from the edge of the card front to allow for foam tape to seal the card later
C – Using my kraft knife to cut out the inside of each stamped lantern. I stamped and used white embossing powder to add the “Sending You” sentiment on the top left of the card and Peace, Love, and Hope to the side of each of the lanterns
D – I stamped and used white embossing powder to create the vellum lanterns and cut them out. I also color the lady image with alcohol markers and cut her out

E – I glued the embossed vellum lanterns on each of the lantern openings I cut in the card front and grabbed my EZ-Lights. Pear Blossom Press makes these amazing EZ-Lights! They are pre-wired and all you need to do is lay them out and secure them with tape. Add the battery and secure the switch. Let me show you how
F – I turned the card over and added a small piece of double sided foam adhesive underneath each of the lantern openings. This is where we will add the light into place behind the Vellum lanterns
G – I plan to place the switch on the lower right and side of the card front with at least a 1/4″ border from the edge of the card sides, so we position the switch to the lower left of the back side of the card (when you turn the card over it will be on the right front side) Maneuver one of each of the three mini lights to one of the lanterns using the foam tape to keep it in place
H- I secured the lights by adding a second layer of foam tape a top the foam tap holding the lights in place. This will secure the lights in place. I gathered the extra wires and attach them to the middle of the card back with tape

I, J – I added 2 layers of double sided foam tape to the back of the card, securing the switch and framing out the card and each lantern
K – The card base is a folded 8″ x 9 1/4″ piece of Navy cardstock and here you see all the foam support for the card

L – I exposed the foam adhesive in the middle of the card and pulled back the tape covering just at the corners to expose a small bit of foam adhesive framing the back side of the card front. This allows me to position and center the card front to the card base
M – Once the card front is in place, I press down the middle where the foam adhesive is exposed to attach it to the card base. I pull/peel the excess tape covering away to expose the foam tape on the edge of the card and press it to sealing it to the card base

N – I locate the button switch for the lights in the card front. I stamp a small star on top of the switch. I also stamped and embossed the “I light up!” sentiment and cut it out. It is glued just above the star/switch
O, P – I add foam squares to the back of the lady image and adhere her just under the lowest sky lantern like she has just released it

Sky Lantern Sympathy – Colorado Craft Company
EZ-Lights by – Pear Blossom Press
I hope you enjoyed this slimline card and EZ-Lights tutorial, and I think the slimline is the perfect shape for the sky lanterns as they float upward. Please leave me a comment letting me know if this card, image, or technique inspired you. Thank you for joining me today! You can find the sister article to this post on my blog. As always, please let me know if you have questions.
Be Creative ~ Stay Inspired
Jenn Gross
Follow me on Social Media
Instagram – https://www.instagram.com/journeycoachjenn/
YouTube – http://www.youtube.com/c/JourneyCoachJenn
Blog – http://www.journeycoachjenn.com/
Link Tree – https://linktr.ee/journeycoachjenn
Please know, I have an affiliate relationship with some of the companies and the product links found on this blog. If you purchase products from these links, I will receive a small portion of your purchase at no additional cost to you. I appreciate and thank you for your support.

As soon as I saw this stamp set from Colorado Craft I just KNEW you were going to make a light up lantern card. Beautiful!
Oh thank you Lisa! I love that you can see into the future! You comment made me smile 😊❤