Hello my friend! I’m a little late with the pretty Halloween card that I promised. My apologies for the delay; I was traveling and the WiFi was spotty on the road. I just couldn’t get this post uploaded sooner. But it’s really cute, right? And worth the wait, I hope!
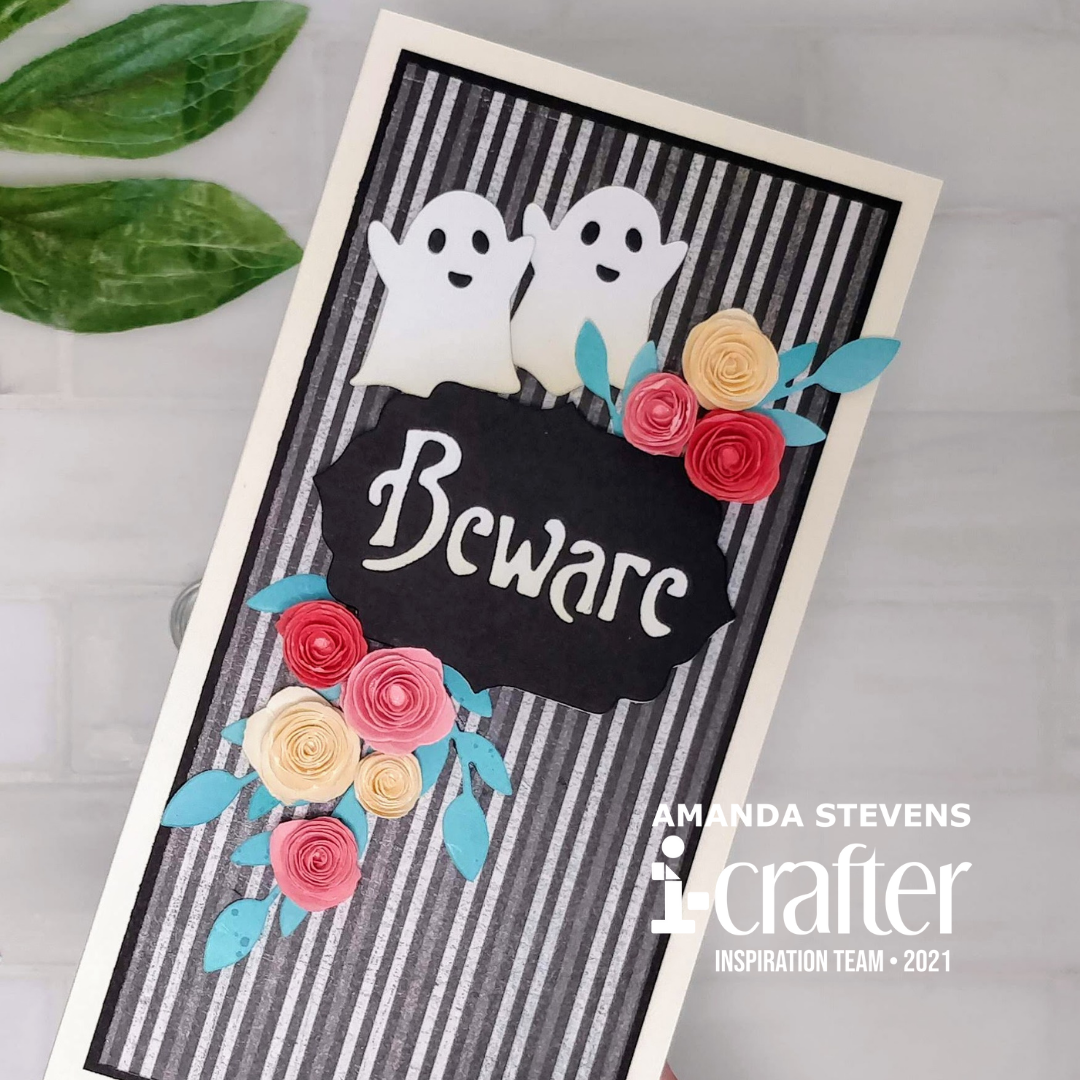
I wanted to combine shabby chic florals with Halloween imagery for this pretty little mini-slimline, and The Haunted Mansion at Disneyland immediately came to mind. The distressed black and white striped background, and 3D flowers really add to the look.

Believe it or not, this card was actually easy to make. I used dies to do all of the work, and there’s not really any coloring involved. Let’s dive in…
Step 1. Die Cut
Using the leftover teal ink smooshed panel from this card, I cut out the leaves in the Flip Card Heart Blooms die set. From coral, red, and yellow scraps, I cut the 3D rose die in the Hello Flower die set several times. To jazz up the pair of white ghosts, cut from the Ribbon Rosette Halloween Add-on set, I blended Antique Linen ink on the bottom, and colored the eyes and mouths with a black marker. Using the Apothecary Labels set for the sentiment, I die cut the BEWARE label, with the word dropped in from black cardstock, and just the solid layer from white cardstock. To distress it, I blended more Antique Linen ink onto the bottom of the white label, so it would create an ombre effect when the two layers were glued together.
Step 2. Create Background
I cut and folded a mini-slimline card base from cream cardstock (3¼” x 6¼”). Then, I cut a black panel measuring 2⅞” x 5⅞” and a striped pattern paper panel measuring 2¾” x 5¾” and glued them to the base.
Step 3. Assemble Card
Using double thick foam tape, I attached the label to the card. Then, I glued one ghost right above, and the teal leaves in place. Thin foam tape pops the second ghost up on the left side. After I rolled up the 3D roses (some tight, and some loose), and applied a dot of glue at the bottom to hold them together, I glued them to the card. That finished it up.
Here’s a closer look at the focal point…

I just love the way this one turned out! Don’t you? It reminds me of the silly headstones, and the Victorian decor in Disney’s Haunted Mansion. The cream base and distressed layers add to the shabby chic feel.
Supply List
Apothecary Labels
Ribbon Rosette Halloween Add-on
Hello Flower
Flip Card Heart Blooms
You might be wondering about mailing this card. Since I used double thick foam tape for the label, the 3D roses sit almost flush, so they shouldn’t get smashed in transit. The card fits into a #7 coin envelope, and only needs a single stamp. Although, I’d use a butterfly stamp to be safe (2 oz postage).
Thanks so much for stopping by today. I hope I’ve inspired you to create some pretty Halloween cards of your own. If you do, tag me on Instagram @pearblossompress so I can see!
This site uses affiliate links whenever possible (at no additional cost to you), but only for products I actually use and love.

One thought on “Shabby Chic Halloween Card”