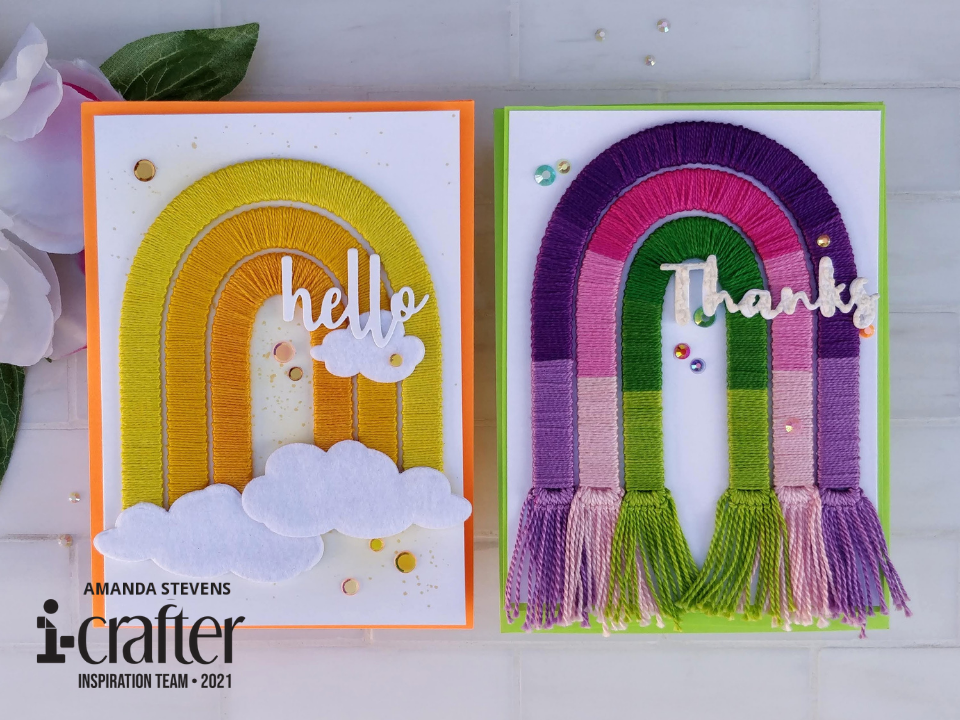
Have you seen the new Stitched Rainbow die set from i-crafter? It is so much fun to play with! I couldn’t stop at one card; I had to make two. These might be my favorite cards in a while. I love the texture and softness. And the rainbows are so big, they fill up a card without needing much of a background.
The set includes three dies to form a rainbow, as well as the words THANKS, and HELLO. The rainbow pieces have ridges on the edges to help you evenly wrap embroidery floss around them. It may look like it takes a long time to wrap them, but it actually went quickly. I wrapped all of the pieces for both cards one evening while watching TV. The dies also cut slots near the bottom so you can attach fringe if you’d like. I found that cutting the rainbow pieces out several times and stacking them together gave me thicker pieces to work with, and were more stable while wrapping.
Let’s look at the yellow rainbow card first. I know, you’re probably thinking a monochromatic rainbow kind of defeats the purpose, but I love it! I made it for a friend who just had surgery, and yellow is her favorite color. I die cut the arches three times each from yellow cardstock and glued the layers together. By cutting the pieces from a similar color to the embroidery floss, it wouldn’t be noticeable if a little of the paper showed through. To keep the pieces flat, I taped the end of the floss to the back and wrapped over it. I wrapped each arch in a different shade of yellow floss. When I got to the end, I used a large eyed needle to tuck the floss under and pulled it up about an inch to secure. That way, there were no knots and the back was as pretty as the front. Instead of adding fringe to the bottoms, I chose to leave them clean.
To pull the card together, I blended and splattered yellow ink onto an A6 card base and glued the rainbow to it. For a little more softness, I die cut several clouds from the Hello Sunshine set out of both white cardstock and felt. I glued the felt to the cardstock to stabilize the clouds, then adhered them over the rainbow with glue and foam tape. I die cut the word HELLO three times from white cardstock and stacked them together. A few yellow sequins finish the card. To really make the colors pop, I paired the card with a bright orange envelope. Isn’t it pretty?
[one_half] [/one_half]
[one_half last] [/one_half]
[one_half] [/one_half]
[one_half last] [/one_half]
Now let’s look at the multi-color rainbow. Instead of wrapping each arch in a solid color, I used three shades of floss. It took a little more time to change threads, but not much. This time, when I got to the bottom of the arches, I tied them off in the same way, but I left the slots exposed and added fringe. The fringe was really easy to create. I cut eight 4″ lengths of floss for each side, folded each strand in half and looped it through the slot and itself (like a latch hook knot).
For this card, I matted a plain white panel onto a green A6 card base, leaving a narrow border. I glued the rainbow flat to the card and dressed up the background with lots of rainbow gems. The sentiment was cut three times from white cardstock and stacked. To add more soft texture, I spread Liquid Applique over the top and puffed it with my heat gun (a snow marker would work just as well). It’s almost cloud-like! A bit of foam tape under the TH helps elevate and support the sentiment, the rest of the word is glued to the rainbow.
Note: I used twisted embroidery floss on my cards so each strand is visible. If you use regular floss, the strands will blend into each other more.
Thanks so much for stopping by today! If you give these cards a try, I’d love to see! Tag me on Instagram. I’ll be back soon with more fun cards to share.
This site uses affiliate links whenever possible (at no additional cost to you), but only for products I actually use and love.

WOW! WOW! WOW! Between you and Linda Kanase a person can hardly keep their wallet in their purse!! Cards are gorgeous and while obviously, normal postage would not suffice, do you expect they could be mailed using just a “butterfly” stamp and a Forever stamp? Hard to gauge here how thick they might actually turn out.
Thanks Cheri! Both cards are less than 1/4″ thick, so they don’t count as packages. But they weigh just over an ounce. So they need the additional 15¢ postage. I forgot to note that I used almost one full skein on the largest arch, 3/4 for the middle, and about 1/2 for the smallest. I also used stiff cardstock throughout, for a nice sturdy feel.
Gorgeous!!!
These cards are so lovely!! I’m so inspired. Thanks for sharing your creativity!
Awesome cards! I love the fringe! nicely done!