Hello my crafty friend! As promised, I’m back with another fun way to create a beach scene card with your Copic markers (or any alcohol based markers). This time, instead of creating an ocean that leads out to the horizon, we’re changing the point of view, and looking down into the water from above.
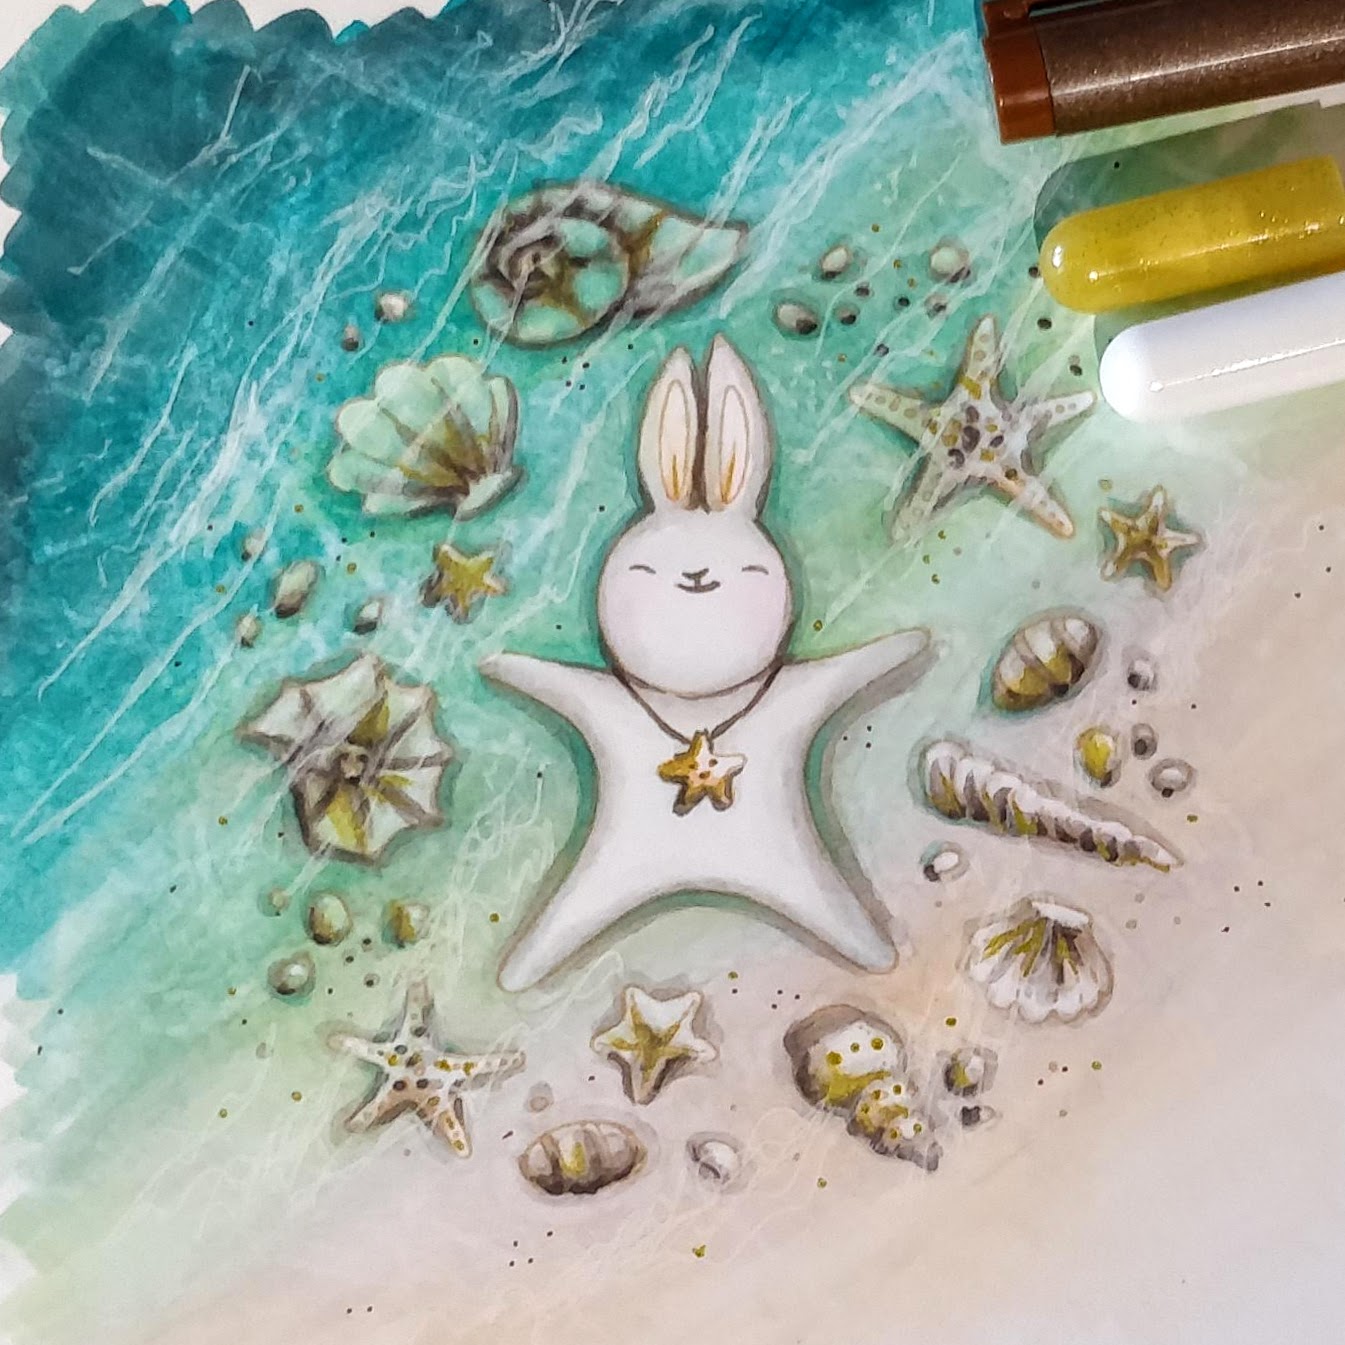
In order to tell that we’re looking through the water, to the sandy floor below, we need images of shells, or items that would be in the sand. I chose the new Starfish in the Sand Stamp Set from The Rabbit Hole Designs for my card. It gives me a ring of seashells to cover the ocean floor, as well as an adorable beach bun to have floating on top of the water. It’s perfect for this perspective.
To get started, I stamped the image with Warm Glow ink onto a white panel. Using a handful of teal, green, and beige Copic markers, I roughed in the water and sand background. It doesn’t have to be perfect, but a smooth transition from dark to light is what you are going for at this point. (You can see the exact colors I used in the pictures below.)
[row]
[column size=”1/2″ stack=”sm”] [/column]
[column size=”1/2″ stack=”sm”] [/column]
[/row]
The next step is to rough in the reflections in the water. To do this, use your Colorless Blender, and draw squiggly lines from multiple directions. This moves/bleaches away the color, and starts to create the illusion of looking through moving water. It takes a few minutes for the blender to dry, and as it does, the area becomes lighter. It may not look like it’s working at first, but go slow and give it time to dry as you work. (You can see a few areas where I didn’t think it was working and got heavy handed. Don’t worry, I fixed them later with white gel pen highlights.)

Now it’s time to start coloring the stamped images. Using more Copic markers, color the shells and bunny, adding shadows around the images, so they don’t look flat.
[row]
[column size=”1/2″ stack=”sm”] [/column]
[column size=”1/2″ stack=”sm”] [/column]
[/row]
To sink the deeper shells to the bottom of the ocean floor, we need to tint them with the lighter teal and green inks. Water becomes more clear, the shallower it gets, so the shells in the lower right corner don’t need to be tinted.
[row]
[column size=”1/2″ stack=”sm”] [/column]
[column size=”1/2″ stack=”sm”] [/column]
[/row]
Now to add the finishing touches. Squiggle the colorless blender over the tinted shells here and there, to continue lines that you roughed in earlier. Deepen some of the shadows with teal or green markers. Add gold highlights to the shells and bunny’s necklace for a bit of shimmer. Scatter brown dots around the scene with a Sepia Copic Multiliner. Lastly (and most importantly), draw wavy lines over the reflections with a white gel pen. Before the ink dries, smudge it with your finger. Don’t be afraid to draw over the shells, but avoid drawing over the bunny (since he’s floating on top of the water). Notice the areas where I was heavy handed with the colorless blender? I added more white gel and really made them bright reflections (like I did it on purpose). Voila! Isn’t that neat?

Alright, so now we have a lovely beach scene, let’s turn it into a card! Easel cards are always fun, and a great way to show off a pretty panel. They are also really easy to make.
Using a 4¼” scalloped circle die, I cut the panel down. For the card base, I die cut three 4½” circles from kraft cardstock. To create the hinge, I scored one of the kraft circles at 3/8″ and again at 2 3/8.” This will be the center circle, sandwiched between the other two kraft circles. I glued the narrow flap to bottom circle, and the large flap to the top circle. The colored panel was popped up on the top circle with foam tape.
[row]
[column size=”1/2″ stack=”sm”] [/column]
[column size=”1/2″ stack=”sm”] [/column]
[/row]
[row]
[column size=”1/2″ stack=”sm”] [/column]
[column size=”1/2″ stack=”sm”] [/column]
[/row]
To finish the card, and help the easel stand up, I popped up a sentiment strip with foam tape inside the card. The sentiment is from the new Beachin’ Stamp Set, it coordinates perfectly with the Starfish in the Sand Set. A few iridescent gems on the front of the card, as well as inside, pull it together and add more shimmer.


I hope you’ll give this coloring technique a try and let me know what you think. It was my first attempt, so I’ll probably pick up a few more tricks the more I practice. If you’ve got advice, I’d love to hear it; let me know in the comments below.
Thanks so much for stopping by today! I’ve got an awesome set of cards to share tomorrow, so I hope you’ll come back then.
This site uses affiliate links whenever possible (at no additional cost to you), but only for products I actually use and love.

Nope, never tried to color moving water and I may never after seeing yours! LOL. What an amazing coloring job! For your first time. Geeze! Love it!
This is amazing. Great coloring.
Beautiful!
I love how your card turned out! I’ll have to give that technique a try. Your water looks amazing!
I really love this, Amanda!!!
Had to stop by and leave a comment here too! Can’t wait to incorporate this into a card. What a smart idea!
Thanks Jeannie! I know once you get started, I’ll be taking tips from you. You are a master!