The phone rings; it’s my sister. She says, “Manda, I need a baby shower card.”
“No problem. Anything in particular you’d like? Colors, style, etc?”
“Well, the theme is camo.”
“Camping?”
“No, camo.”
“That’s a theme?”
Lol, apparently it is. And my sister really liked the Tank Father’s Day card I made in June, so I pulled out the same stamps and dies and got to work…
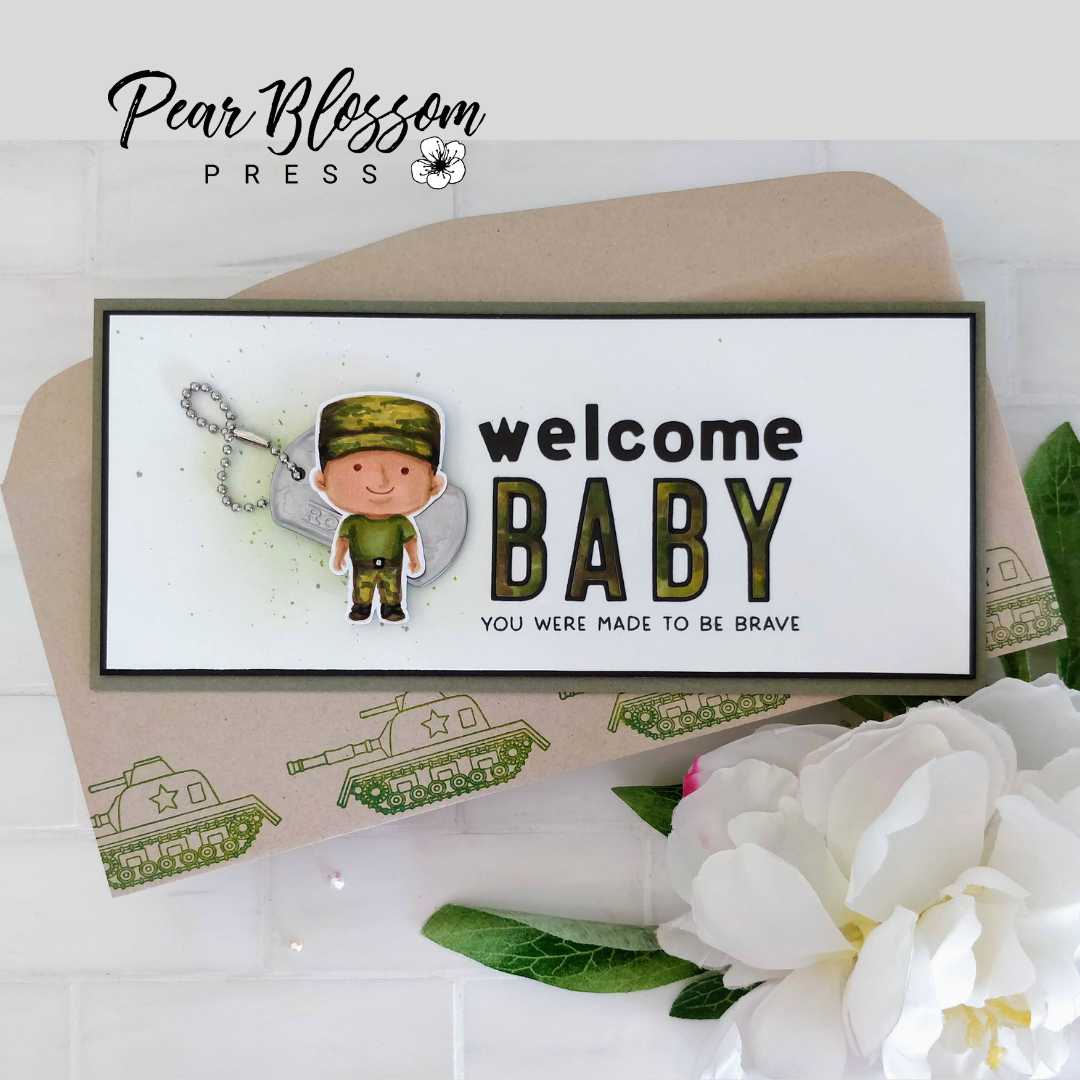
To create the DIY Camo paper, I taped off a white panel large enough to die cut the word BABY with i-crafter’s Haley Alphabet. Using Copic markers, I scribbled random squiggly lines in olive tones. You can see the colors I used below. (Feel free to change the colors to blues, greys, desert, or even pinks. When you create your own camo, it can be any color you like.) Don’t worry if your panel looks like a hot mess at this point; after the letters are cut out, they will look great.
[row]
[column size=”1/2″ stack=”sm”] [/column]
[column size=”1/2″ stack=”sm”] [/column]
[/row]
When I was happy with the colors, I die cut the word BABY from the camo panel, and again from black cardstock. I also die cut the word WELCOME with i-crafter’s Carly Alphabet. Then, I set all of the letters aside in a little tray, so they wouldn’t get lost while I worked on the other parts of my card.
As it happened, my husband just bought a pair of pants that came with a metal dog tag attached. It was embossed with the company’s logo. He was going to toss it, but asked me first if I had any crafty use for it. Isn’t he awesome? I knew it would make a fun addition to the card, but I needed a way to hide the company logo. That’s when I decided to layer a soldier from Kindred Stamp’s Born to be Brave set on top. (If you’d like to recreate this card, and don’t want to buy a pair of pants for the tag, you can find plain dog tags here.) I stamped out my soldier in Warm Glow ink, and using the same Copic markers as above, plus a few more, I colored him up no-line style. You can see the colors below. Then, I fussy cut him with my Scan N Cut, leaving a narrow border. I’ve found that the SNC has trouble with no-line coloring, so I draw an outline with a pencil. (It’s also a good way to get an even border if you fussy cut by hand. Especially, for us lefties.)
[row]
[column size=”1/2″ stack=”sm”] [/column]
[column size=”1/2″ stack=”sm”] [/column]
[/row]
To pull the card together, I cut a white panel down to 3 3/8″ x 8 1/8″ and blended olive ink on the left side, where the soldier would be. I splattered green and black ink on top as well. Then, I stamped a sentiment from the same Born to be Brave stamp set on the right side in black ink. Using a ruler and my grid mat, I lined up and adhered the die cut sentiment in place. Then, I glued the white panel onto a black panel, measuring 3 1/2″ x 8 1/4.” Thin foam tape pops the black panel up from the olive slimline card base, measuring 3 3/4″ x 8 1/2.” With a combination of thin and double thick foam tape, I adhered the soldier and dog tag to the card. A bit of glue under the ball chain keeps it from moving around.
No naked envelopes, right? A few green tanks stamped across the bottom of my #10 envelope coordinate perfectly. What do you think?
[row]
[column size=”1/2″ stack=”sm”] [/column]
[column size=”1/2″ stack=”sm”] [/column]
[/row]
While it might be strange for a baby shower card, it would be a great WELCOME HOME card for returning servicemen, right? Who would you make a card like this for? And didn’t I tell you the DIY Camo would look great once it was die cut? I hope I’ve inspired you to give it a try.
Don’t forget, Kathy Racoosin’s new coloring challenge is on now, and running all month. Post your creations using the hashtag #thedailymarker30day to join the fun. Whether you’re coloring your own camo, or your favorite florals, the idea is to have fun and try new things. And there are still a few days left to take advantage of our special offer, 20% off to celebrate the 20th challenge! Use the discount code 20FOR20 at checkout, to take 20% off your entire order, before tax and shipping. Cannot be combined with other discounts. Offer valid through August 20, 2021. Click here to go to the shop!
[row]
[column size=”1/2″ stack=”sm”] [/column]
[column size=”1/2″ stack=”sm”]

[/column]
[/row]
[button color=”primary” size=”lg” shape=”rounded” link=”https://pearblossompress.com/collapsible-marker-bag/” target=”_self”]Get Kathy’s Collapsible Marker Bags Here![/button]
Thanks so much for stopping by today. I’ll be back soon with more fun cards to share, and more of the small tags I’ve been coloring each day for the challenge. In addition to my beloved Copic markers, I’ve been playing with colored pencils and Gamsol. I can’t wait to show you!
This site uses affiliate links whenever possible (at no additional cost to you), but only for products I actually use and love.
