Tunnel card, that is…
Have you seen the new Love Birds add-on for i-crafter’s Tunnel Card yet? Hubba, hubba! These birds are stunning! And with the die set, creating tunnel cards is a breeze (pun intended).
[seven_tenth]
[/seven_tenth]
[three_tenth last][/three_tenth]
Aren’t these cards fun? Today’s post is picture heavy, so I’ll try to keep the descriptions brief. You know what they say; a picture is worth a thousand words. But if I miss anything, please feel free to ask in the comments below. Also, if a picture is too small to see the details, click on it for an expanded view.
The first thing to know is that the Tunnel Card base is sold separately from the Love Birds add-on set. The base comes with the windows to create a lovely swan scene, but i-crafter has a series of add-on sets to change the scenes. And each one just gets cuter! (Also, you don’t necessarily need the base to use the add-ons. I’m working on a video now with eight different ways to use them; only half of the cards use the base.)
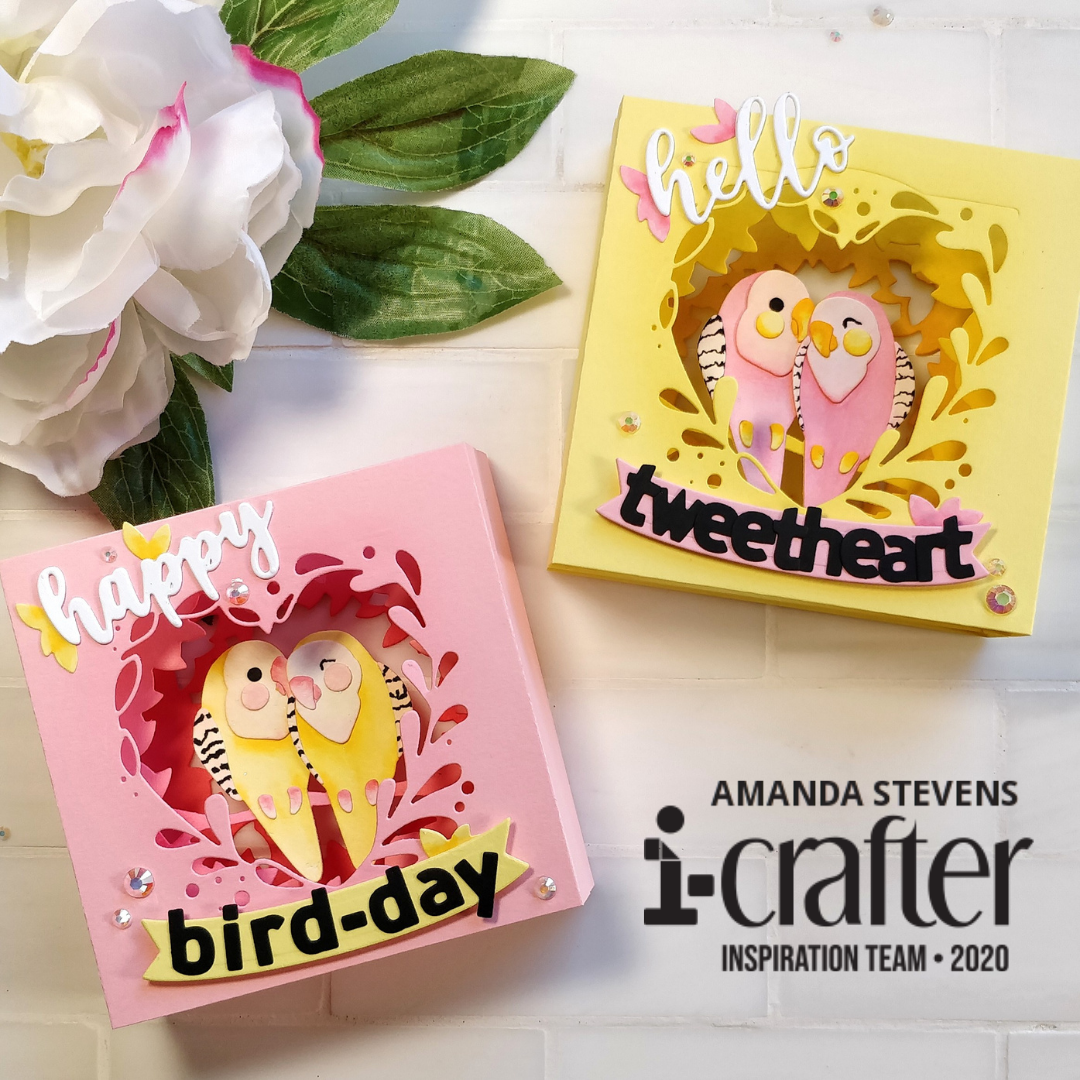
Now let’s get started. The first thing I did was to die cut all of my pieces. Since I was making two cards, I die cut two pairs of the birds, and their detail pieces from watercolor paper. To color the birds, I used a water brush pen and only three Karin markers (rose pink, gold, and black). For one set, I colored the birds pink and gave them yellow accents.

It may look like the birds are complicated to piece together, but the dies that cut the solid birds actually emboss the outlines, so it’s easy to see where everything goes.

For the second set, I painted the birds yellow, with pink accents. Aren’t they adorable? I know I’ll be using these birds for more than tunnel cards!

I wanted punny sentiments, so I shopped my stash for HAPPY and HELLO. Then, I used the Carly Alphabet to cut out BIRD-DAY and TWEETHEART. (The banner is in the tunnel base set.)

With the birds and sentiments ready, it was time to work on the tunnels. (Don’t worry, they are super simple to assemble.) I dropped the different windows into the tunnel base and cut out the front, center, and back layers from both pink and yellow. I blended coordinating ink around each window, applying very little ink to the front panels, a moderate amount to the centers, and a heavy layer of ink to the back panels.

The tunnel base scores two lines down each side. Notice that the center panels have the sides trimmed away? You’ll want to use the inner score lines as a guide to cut them off. Then, we fold all four lines on the top panels away (mountain folds). The bottom panels are folded in the opposite direction (valley folds). I stood the yellow panels up to help show you what that looks like.

To assemble, apply glue to the narrow flaps on the bottom layers, and glue the center panels on top. Don’t forget to glue your painted birds to the center panels.

Apply glue to the narrow flaps on the top layers, and attach to the center panels.

Now they’re ready to decorate! (If my instructions aren’t clear, check out this video.)

I adhered the sentiments in place and added a few gems.

Aren’t they pretty? The pink one is going to my niece. Her birthday is right after Christmas, and all too often, she gets combo gifts. I want to make sure her birthday feels separate and special.

Which is your favorite, pink or yellow?

I plan to use the yellow for a Valentine for one of my daughters. Luckily, neither read my blog. I’m sure glad you do though! I’d love to know what you think. Let me know in the comments below.
Be sure to head over to i-crafter and check out the new release this month! In addition to the Love Birds, you’ll find a new Flip Card set, and the neat Matchbox Stories set. (I’ll show you a fun little project with the Matchbox set later this week.)
Thanks for stopping by today. For those of you in the US, I hope you had a wonderful Thanksgiving. My husband and I went for a hike that morning, in the spirit of doing something healthy before stuffing our faces. I slipped and fell down a hill. Luckily, I only hurt my pride, and my knee. (The knee part got me out of dishes though, so I didn’t complain.) I’m hobbling around, but I’ll have that video for you soon, and the matchbox story on Thursday (it’s really cute). See you then!
This site uses affiliate links whenever possible (at no additional cost to you), but only for products I actually use and love.

One thought on “Tunnel of Love”