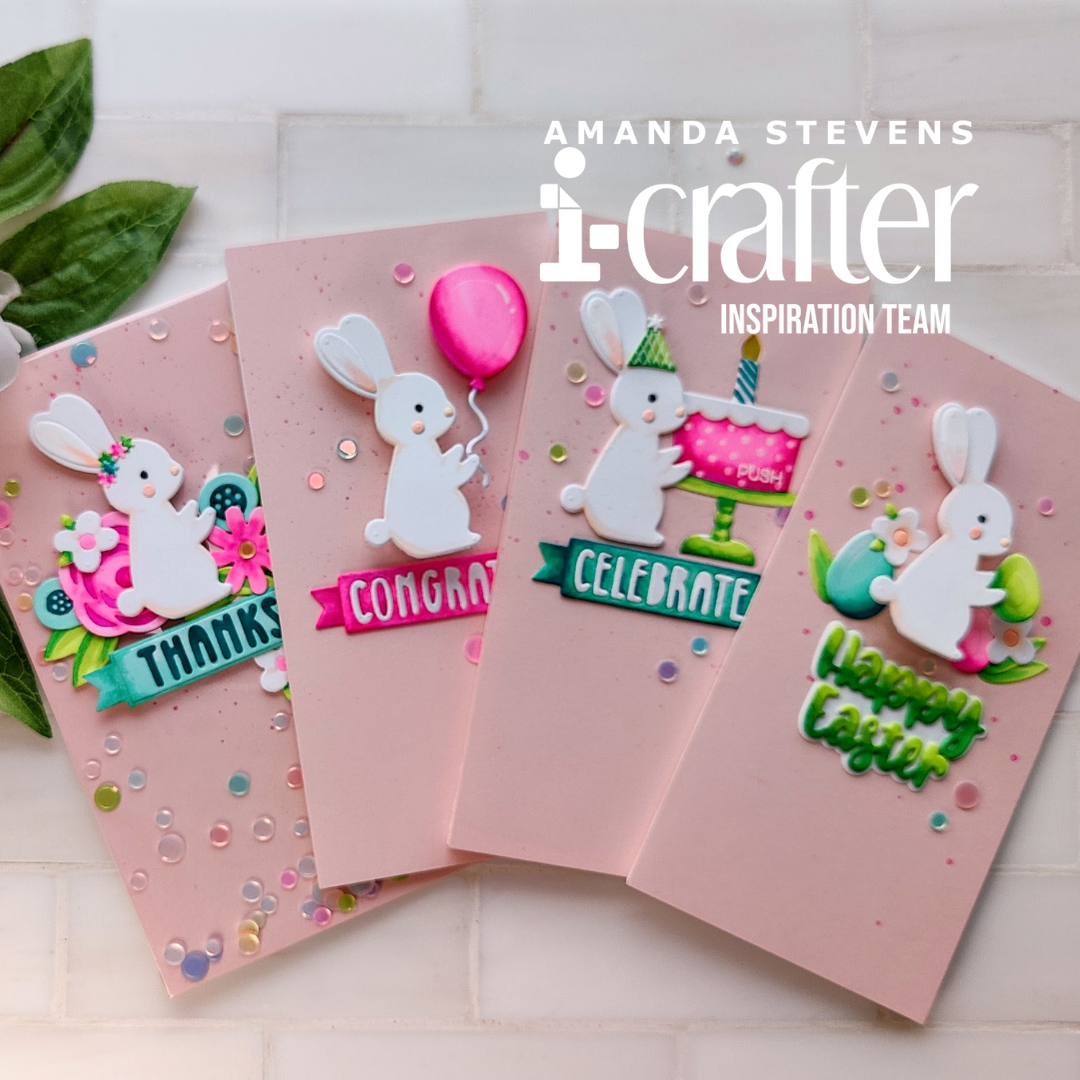
The new release from i-crafter just came out and I couldn’t wait to dive in, but I just had to play with the new Easter Embellishments first. There is the cutest little bunny in there! You know me, mom to four bunnies, and avid papercrafter, so this set stole my heart right away. Of course, bunnies aren’t just for Easter, so I pulled out two other sets to mix and match with, and created hoppy mail for four different occasions. Plus, I was in the mood to step my cards up a bit, so I made all four cards interactive! Here’s a quick a look at them in action…
Cute, right? Want to see how they came together? I promise, it was easy! Quick, grab these items and let’s get started…
Supply List
Easter Embellishments
Gift Card Box
Birthday Pop Up Card
Pro Deck Cutting Plate
Mini Action Wobbles
One Light
The first thing I did was to die cut all of my pieces. Since I prefer thicker, stacked pieces, I die cut three bunnies for each card, and 1-2 layers for the additional pieces. I cut them all from white cardstock so I could Copic color them myself. You can always cut from colored cardstock to save yourself that step, but I love the way colored die cuts look. It’s like no-line coloring, except the lines are easy to see/color, because they are the cut edges. The nice thing about i-crafter dies is that they also emboss details, so you can use them as guides to glue down the smaller die cut accents (or just color them in if you don’t want to fuss with tiny pieces). For example, on the bunny, the die cuts out the rabbit, plus the eye, cheek, nose, and inner ear. But the die also embosses the shapes into the rabbit’s face, making it a no-brainer when it comes time to assemble. As far as the coloring goes, I kept things simple and just used a few colors for everything.
While we’re talking about coloring, I wanted to mention that I repurposed a few die cut pieces for the floral scene on the Thanks card. I used some of the extra inner ears and colored them as leaves, one extra Easter egg was colored to look like a lotus pod, and that bunny’s flower crown is made from extra party hat puffs.
[row]
[column size=”1/2″ stack=”sm”] [/column]
[column size=”1/2″ stack=”sm”] [/column]
[/row]
Coloring Chart
Bunnies – E000 R30 W8
Pinks – RV06 RV04 RV02
Greens – YG09 YG23 YG01
Teals – BG49 BG34 BG11
Balloon String – C2
Highlights – White Gel Pen
After all of my pieces were colored, I sorted them into little dishes to keep track of them. Then, I cut my mini-slimline card bases from white cardstock, and topped them with pale pink card fronts, cut to the same size (3 1/4″ x 6 1/4″). If my pink stock was heavier, I would have used it for the bases. Unfortunately, I decided to make them interactive after I glued the card fronts down. So I had to cut two more pink layers for the light-up card, and the shaker card. I splattered them all with pink ink, to add interest to the panels.
Assembling the cards was quick and easy. I used the same layout that I shared in yesterday’s card sketch for all four cards. For the Easter and Congrats cards, I simply popped the bunnies up with Mini Action Wobbles. A quick note about wobbles: you want to try to attach them as close as possible to the center of your element. Otherwise, they don’t wobble as well. In the case of the bunnies, the wobbles needed to be trimmed slightly to fit near their necks. For the bunny holding the balloon, I added a small piece of double thick foam tape to the back of the balloon, leaving the release paper in place on the other side. This way, the foam supports the balloon, and the release paper allows it to slide back and forth, without sticking. Here is a look at the back of one bunny with the trimmed wobble…

Here are the two wobble cards finished…
[row]
[column size=”1/2″ stack=”sm”] [/column]
[column size=”1/2″ stack=”sm”] [/column]
[/row]
[row]
[column size=”1/2″ stack=”sm”] [/column]
[column size=”1/2″ stack=”sm”] [/column]
[/row]
If you haven’t made an infinity shaker card yet, you owe it to yourself to give it a try. They are so fun! You simply decorate your card front, then fold a larger sheet of acetate around, and adhere it to the back on three sides. I cut my acetate about an inch larger than my panel, and used double-stick tape to secure it. I also clip the corners before folding the acetate. Once you have three sides attached, you can fill from the top and seal it up before attaching it to your card base. I opted to use pastel sequins so they wouldn’t compete with the bright die cut images on top. (I adhered those with thin foam and more double-stick tape.)
If making your own pocket sounds like a hassle, you can pick up a pack of Infinity Shaker Covers that are already trimmed and have adhesive all around. They even have a protective film to keep the acetate in pristine condition. I would have used one on this card, but they are A2 sized, and I was making mini-slimlines.
[row]
[column size=”1/2″ stack=”sm”] [/column]
[column size=”1/2″ stack=”sm”] [/column]
[/row]
Here is a look at this fun infinity shaker card…
[row]
[column size=”1/2″ stack=”sm”] [/column]
[column size=”1/2″ stack=”sm”] [/column]
[/row]
Alright, I saved my favorite for last. This one uses our new One Light to light up the candle on the birthday cake! To assemble this one, I lined up the pieces on my card front to figure out where the cake would sit. Then, I die cut the cake from the pink panel and backed it with vellum. After coloring the vellum flame with a yellow marker, I trimmed the flame off of the colorful cardstock piece and inlaid it in the panel. This left us with a vellum area for the light to shine through. Now to mark where to push the button, I have a neat trick. I put the panel into my Misti, then lined up my One Light on top of the cake, with the LED at the base of the flame. Then, I positioned a “PUSH” stamp on top of the button so I could pick it up with the lid of my Misti. After removing the light, I was able to stamp/emboss the word in exactly the right place on the cake!
[row]
[column size=”1/2″ stack=”sm”] [/column]
[column size=”1/2″ stack=”sm”] [/column]
[/row]
Next, I adhered the One Light to my card base (remember, that layer doesn’t need to be pink), then attached the card front with double thick foam tape. Easy peasy! Like the other cards, I glued on a few more of the pastel sequins for sparkle.
 Here is a look at the finished card…
[row]
[column size=”1/2″ stack=”sm”] [/column]
[column size=”1/2″ stack=”sm”] [/column]
[/row]
So what do you think? Four interactive mini-slimlines that fit perfectly into #7 coin envelopes for you. Am I just a crazy rabbit mom, or are these not adorable? Who wouldn’t love to get hoppy mail like this? Want to see them in action one more time?
Thanks so much for stopping by today. Don’t forget, the new release from i-crafter is available now! Head on over and check out all of the awesome new goodies! I’ll be back soon with more fun cards to share.
This site uses affiliate links whenever possible (at no additional cost to you), but only for products I actually use and love.

Oh, these are my favorite projects of them all from the new release! They are so super cute! <3 // Emelie