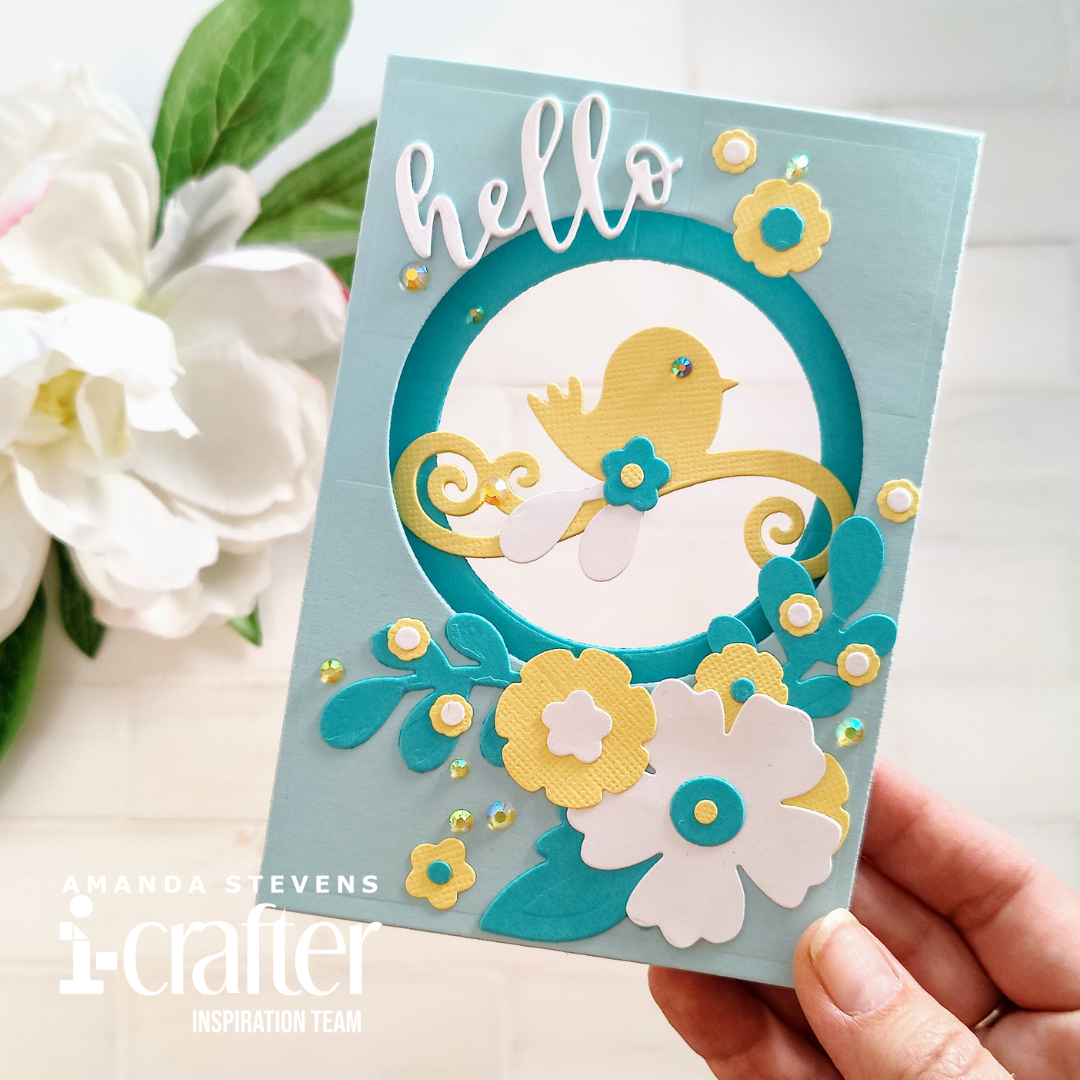
As spring approaches, I thought it would be fun to make a floral tunnel card with a sweet little bird peeking through. This card was incredibly easy to create, with the help of the new Shadow Box Card die set from i-crafter. This is a different size box card than others like it on the market. With the finished card measuring 3 3/4″ wide, 5 1/2″ tall, and only 1/2″ deep, you get a lot more real estate on the front to decorate; it’s almost A2 sized when popped up! Since there is no coloring needed, it came together fast too. Isn’t it great when interactive cards are quick and easy to make? Here is a quick look at it in action…
[row]
[column size=”2/3″ stack=”sm”]
[/column]
[column size=”1/3″ stack=”sm”][/column]
[/row]
Adorable, right? I love the soft pastels and the tunnel that leads all the way through the center of the card. Since it’s a new die set, let me walk you through the assembly process…
First, you’ll want to die cut your pieces. (All of the dies I used are included in the Shadow Box Card set, except the sentiment. That is from the Dashed Circle Flip Card set.) I kept my color scheme limited to yellow, white, and two shades of blue. After cutting a pair of light blue card bases, I cut a darker blue center layer, the flowers, two birds, and three layers of the sentiment. Before gluing the center layer in between the card base layers, it’s easier to glue any decorative pieces on while it’s still flat. In this case, I glued the bird and a few floral pieces. For extra stability, and to carry the design through, I glued the second bird to the back side.
To assemble the box, fold the side flaps back on the center layer, and the side flaps forward on the back card base layer. Tuck the center layer in and glue the flaps to the back, as seen in the photo below. Wet glue is helpful for this as it allows wiggle room so you can adjust and make sure the circles line up nicely.
 Next, fold the side flaps back on the front card base layer, and tuck the back of the card in. Glue the flaps where they overlap. This will form a clean box, with the seams in the back.
[row]
[column size=”1/2″ stack=”sm”] [/column]
[column size=”1/2″ stack=”sm”] [/column]
[/row]
Now, all that’s left to do is decorate the front. I added flowers and a stacked sentiment, along with a few yellow gems for sparkle. Using a few leftover die cuts, I decorated my envelope. Normally, I don’t glue things to my envelopes for fear of them causing trouble in the mail, but this card will be hand delivered, so I’m not worried. If I were going to mail this card, I might have cut some of the floral pieces from fun foam and used them to stamp my envelope instead.
[row]
[column size=”1/2″ stack=”sm”] [/column]
[column size=”1/2″ stack=”sm”] [/column]
[/row]
What do you think? Don’t you just love the size of this tunnel card? I think it’s awesome! If you want to give this a try, you’ll find the supply list below. All of the decorative dies are included in the Shadow Box Card die set, I chose to substitute a different sentiment (it includes the word MOTHER). And I can’t say enough good things about my PRO Deck cutting plate. It’s one of those tools that I didn’t know I needed until I started using it.
SUPPLY LIST
Shadow Box Card Die Set
Dashed Circle Flip Card Die Set (sentiment)
PRO Deck Cutting Deck
Locking Tweezers

Thanks so much for stopping by today. In addition to this new Shadow Box Card set, i-crafter has several other great new sets, perfect for Mother’s Day and spring. Head on over to their site and check out the whole new release! Before you go, you might want to pop over and see the other interactive card I’m sharing today. It’s an infinity shaker!
This site uses affiliate links whenever possible (at no additional cost to you), but only for products I actually use and love.

2 thoughts on “There’s a New Size Tunnel Card on the Block!”