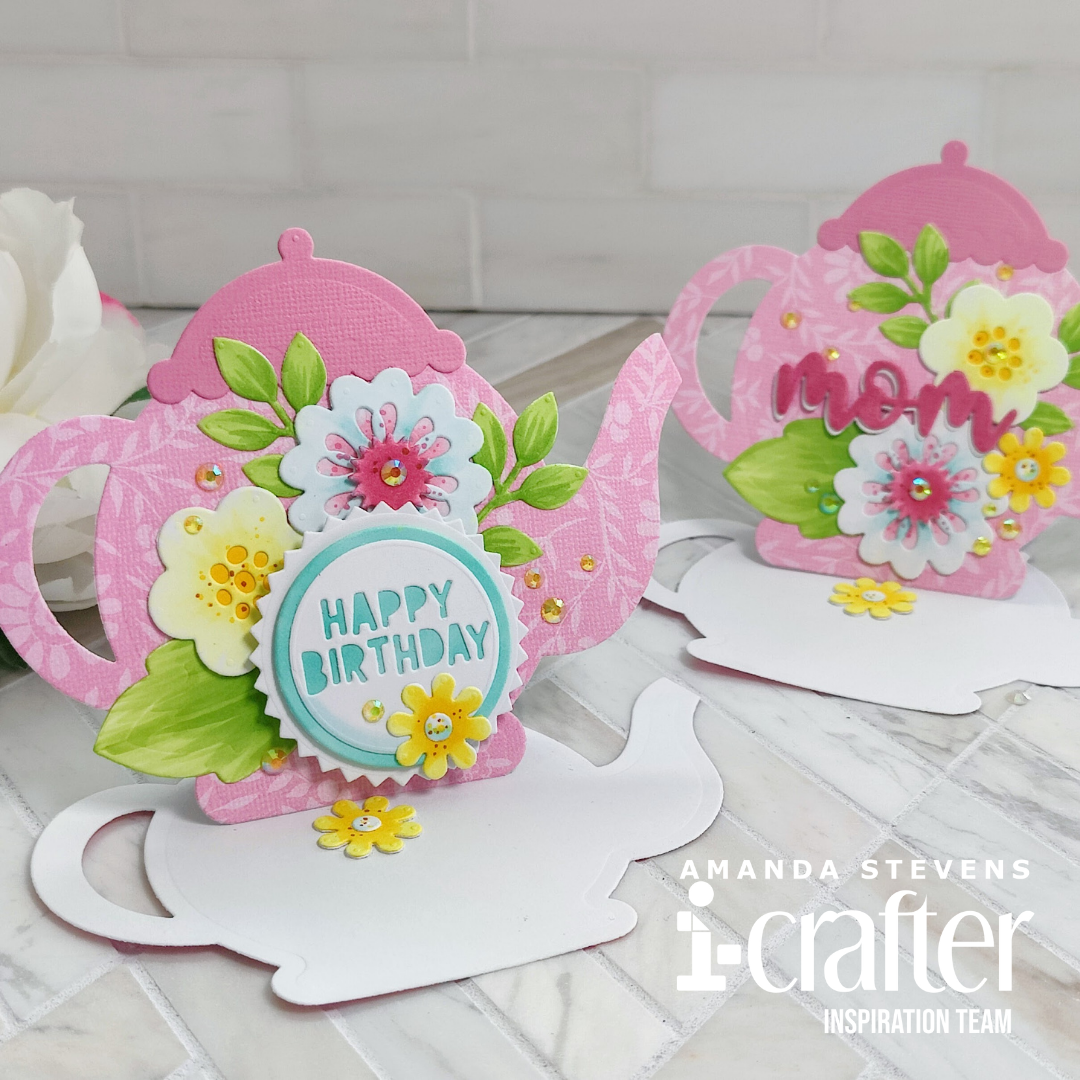
Hello crafty friend; I’m so glad you stopped by today. I made a cute little pair of teapot-shaped easel cards, and I can’t wait for you to see them! With Mother’s Day in the not too distant future, I wanted to make a card for the occasion. While I was at it, I cut out the pieces for a second card, and turned it into a sweet birthday card. Take a look at how they pop-up…
[row]
[column size=”7/10″ stack=”sm”]
[/column]
[column size=”3/10″ stack=”sm”][/column]
[/row]
Fun right? Don’t worry, they’re easy to recreate too! Before I walk you through the steps, be sure to grab these items from your stash…
SUPPLY LIST
Mom Teapot Die Set
Classic Circles Die Set
Ribbon Rosette Die Set
Elephant Family Phrases Stamp Set
PRO Deck Cutting Deck
Locking Tweezers
Copic Markers
Alright, the first thing to do is to die cut your pieces. The teapot, all of the florals, and the word MOM are all in the new Mom Teapot Die Set from i-crafter. I found a pretty pink pattern paper in my stash that was cardstock weight; I cut a pair of teapots from it, then flipping the paper over to the white side, I cut two more (this gave me mirror images for the backs of my cards). Using a coordinating pink cardstock, I cut four lids, and the word MOM three times. From white cardstock, I cut another layer of the word MOM, along with several each of my floral pieces. I also cut the HAPPY BIRTHDAY circle and pinked edge circle, and a pair of 3″ circles from the Ribbon Rosette Die Set and Classic Circles Die Set. With my PRO Deck Cutting Deck, everything cut clean and perfect in a single pass.
 I love the look of Copic colored die cuts, so I cut all of the decorative elements from white cardstock to color myself. If you prefer, you can cut them from colored cardstock and save a little time. You can see the colors I used and the details I added in the photos below. The result is very similar to no-line coloring. Especially, after you layer up the flowers and sentiments.
[row]
[column size=”1/2″ stack=”sm”] [/column]
[column size=”1/2″ stack=”sm”] [/column]
[/row]
Now let’s assemble the easel cards. Keep in mind, you can substitute virtually any shape for the teapots. You need two matching pieces for the front and back layers. You also need a center layer to form a hinge. If your front and back layers are complicated shapes, use a circle or rectangle to form the center layer. (If your shapes are simple, you can cut three identical layers.) In the case of these cards, I used a 3″ circle for the center.
The center layer needs two paralel score lines to form the hinge. I scored the circles at 3/8″ and 1 3/4″ and worked the folds back and forth.
 Next, sandwich the circle in between the teapots, gluing the 3/8″ flap to the back layer of the card, and the lower larger flap to the front card layer. I prefer wet glue so I have wiggle room and can make sure things line up nicely.
[row]
[column size=”1/2″ stack=”sm”] [/column]
[column size=”1/2″ stack=”sm”] [/column]
[/row]
This creates the hinge that allows the front layer of the card to lift and stand. (We’ll add a stacked flower inside the card later to act as a stop and help keep it standing upright.) Here’s a side view of the hinge…
 With the card bases created, all that’s left to do is decorate. I adhered the floral pieces onto the front of each card, along with a sentiment, using a combination of glue and foam tape. Inside the card that says MOM, I stamped a Mother’s Day sentiment in coordinating ink. Depending on the shape you use and the spacing for your hinge, it’s not always easy to stamp inside an easel card after it’s assembled, so you might want to stamp first. In this case, my card folds all the way open.
 To help the cards stay upright, you’ll want to add a dimensional bumper inside. I often pop up a sentiment banner with a little foam tape, but in this case, I stacked three flowers together and glued them inside. It helps carry the theme through and adds more decoration inside. Using tweezers to place the flower is helpful. They allow you to get your hands out of the way and make sure you are getting placement right.
 After that, the final step is to add gems. These are very feminine and gems help add sparkle and take things over the top. By the way, these cards fit into color coordinating A2 envelopes, so I choose not to add any further decoration to those. Here’s a look at the finished cards…
[row]
[column size=”1/2″ stack=”sm”] [/column]
[column size=”1/2″ stack=”sm”] [/column]
[/row]
[row]
[column size=”1/2″ stack=”sm”] [/column]
[column size=”1/2″ stack=”sm”] [/column]
[/row]
I just love the way these turned out and I’m so glad I made two at the same time. It really didn’t take much longer at all since I had all of the supplies out and was basically making them identical. I’d love to know what you think. Let me know down below!
Thanks so much for stopping by today. I’ll be back soon with another fun project to share, and we have several guest designers working on awesome new cards. I can’t wait for you to see!
This site uses affiliate links whenever possible (at no additional cost to you), but only for products I actually use and love.

One thought on “Teapot Easel Cards”