Hello my crafty friend! By now, you’ve probably seen the new release from i-crafter. It’s full of Halloween goodies, including the Impossible Box, Monsters set. Don’t let the name fool you, this box is really easy to assemble. And both the box, as well as the decorative monster faces, can be mixed and matched with other sets, making this set even more versatile. Today, I’ll show you three ways to use it.
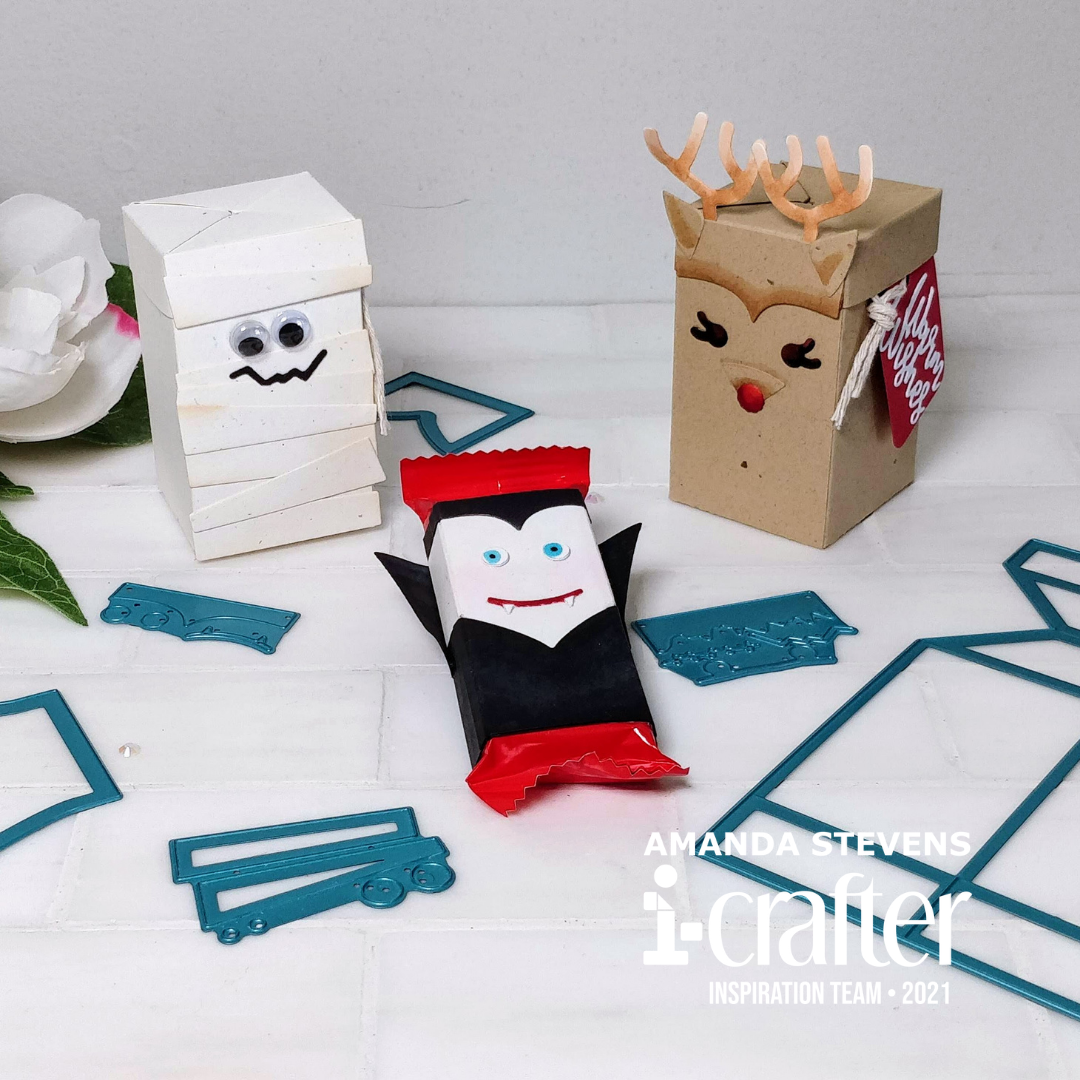
Here’s a quick look at all three of today’s projects…
[row]
[column size=”2/3″ stack=”sm”]
[/column]
[column size=”1/3″ stack=”sm”][/column]
[/row]
First, let’s look at one of the intended ways of using the box. We’ll assemble it, and decorate it as a mummy. You’ll want to cut two of the box shapes, then a few bandage strips, and a squiggly mouth from the included decorative face dies. The two box pieces overlap at the tabs, and get glued together to make one large, four-panel box piece. To dirty up the bandage strips, I blended a bit of Tea Dye ink around the edges. Instead of the eye dies included in the set, I opted to use a pair of googly eyes for my box.
[row]
[column size=”1/2″ stack=”sm”] [/column]
[column size=”1/2″ stack=”sm”] [/column]
[/row]
[row]
[column size=”1/2″ stack=”sm”] [/column]
[column size=”1/2″ stack=”sm”] [/column]
[/row]
Assembling the box is very simple, but there is one trick to it. After you have the two box panels glued together at the tabs (as shown in the first picture above), fold the top toward you at the first score line (second photo). The next score line folds toward you as well, and the third line folds back. That will allow the top of your box to fold down into a lid. Next, fold all of the vertical score lines back. It will curl into a box shape. Glue the box together with the long tab, making sure the top fold is down toward you. Don’t glue the short tab yet. (See third photo.) Now you can collapse the box and glue the little tab at the top (forth photo). Notice that the bottom isn’t glued shut yet? Save that for the last step so you can fold the box flat again. It’s easier to glue the decorative pieces on, and they take up less space if you store them flat until you are ready to fill them.
[row]
[column size=”1/2″ stack=”sm”] [/column]
[column size=”1/2″ stack=”sm”] [/column]
[/row]
Locking tweezers make life easier when gluing the small decorative elements in place. You can apply glue and line the pieces up without getting your fingers in the way. If you want to label your boxes, you can tie on cute little tags. I cut the smallest tag from the Tags and Labels set twice, once from green cardstock, and again from black. I centered the TRICK OR TREAT sentiment from the Halloween Add-on set for the Ribbon Rosette die set on the black tag, and ran it through my die cutting machine again. Then, I glued the two tags together and tied them loosely to the top of my box with twine. Cute, right?
 After gluing the bottom shut, it’s ready to be filled with Halloween treats!
[row]
[column size=”1/2″ stack=”sm”] [/column]
[column size=”1/2″ stack=”sm”] [/column]
[/row]
[row]
[column size=”1/2″ stack=”sm”] [/column]
[column size=”1/2″ stack=”sm”] [/column]
[/row]
Alternatively, you can use the decorative monster pieces on a strip of paper to wrap around fun size candy bars. You can see in the last photo above, I used them to turn a Kit Kat® into a vampire. These would be fun to hand out in a class party, or to give special trick-or-treaters.
Don’t be afraid to use the box with other decorative die sets to change the theme. In my third sample, I cut the box from kraft cardstock, and used dies from the Animalopes set to turn it into a reindeer. It’s perfect for small gifts like jewelry, or stocking stuffers. The inner dimensions of the box are 1½” x 1½” x 2⅝.” So what fits inside? Fun size candy bars, Chapstick® tubes, short Hot Wheels® cars, nail polish, beauty blender sponges, an EZ-Light for your crafty friends, whisky stones, keychains, wine glass markers, tea bags, etc. What will you fill your boxes with? For a coordinating to/from tag, use the Tags and Labels set and a sentiment from Snowflake Flip Card set.
[row]
[column size=”1/2″ stack=”sm”] [/column]
[column size=”1/2″ stack=”sm”] [/column]
[/row]
[row]
[column size=”1/2″ stack=”sm”] [/column]
[column size=”1/2″ stack=”sm”] [/column]
[/row]
I hope I’ve inspired you to think outside the box when it comes to Impossible Boxes! They are simple and versatile. I was thinking it would also be fun to use the Animal Print dies like I did with these cards to decorate the boxes too. Maybe for birthday party, or bridal shower favors? I’d love to know what you would use them for!
Thanks so much for stopping by today. I’ll be back next week with another fun card to share!
This site uses affiliate links whenever possible (at no additional cost to you), but only for products I actually use and love.

One thought on “Impossible Box – 3 Ways”