Hello my crafty friend! Have you ever made a rainfall card? They’re so much fun, and really wow anyone who gets a chance to play with them. Here’s a quick look at mine in action. And be sure to read to the bottom for some really exciting news!!!
Isn’t it neat? I’ve made one like this before, and to be honest, it takes a bit of time. However, as I sat down to write up the instructions, a faster and easier method occured to me. I’ll show you what I did, and try to explain how I think it would be easier in the future, but I might just need to show you in a video. Let me know if that’s something you’d be interested in.
Before we get started, I’ll share my supply list, in case you’d like to recreate a similar card…
SUPPLY LIST
Absotoothly Awesome Stamp Set
Abso-toothly Die Set
Beary Big Heart Stamp Set
Beary Big Heart Die Set
Get Well Greetings Stamp Set
Slimline, Knit, Knots & Stitches Die Set
Clear Thread
Seed Beads
Alright, to make it rain, you’re going to need a pair of cardstock strips with holes punched in them. In the past, I lined my strips up on top of a mouse pad and used a ruler and pokey tool to punch evenly spaced holes. For today’s card, I grabbed a stitched border die and used it to cut all my holes at once! Since the die is wider and has more rows than I needed, I just die cut one strip, then cut that apart. After spacing the strips about 6″ apart on a clipboard, I held one in place with the clip, and the other in place with a pair of Misti corner magnets. This way, I could stitch through every other hole with clear thread and seed beads. The clip and magnets allowed me to move the strips around and access the back as I poked through, without getting tangled. After all of the strands were in place and taut, I tied off the ends.
[row]
[column size=”1/2″ stack=”sm”] [/column]
[column size=”1/2″ stack=”sm”] [/column]
[/row]
So what would I do differently for the next one? Instead of strips, I would start with a panel and cut holes along the top and bottom. Then, I’d cut little slits to each hole so that I could slip the thread down into the slots, rather than have to stitch them. After the panel was beaded, I would add foam tape and carefully cut away the center portion of the panel. That would eliminate the need for the clipboard and magnets. It would also go faster since you don’t have to stitch. I’m afraid I don’t have photos to demonstrate since I just thought of it, but we can try it together in a LIVE if you want!
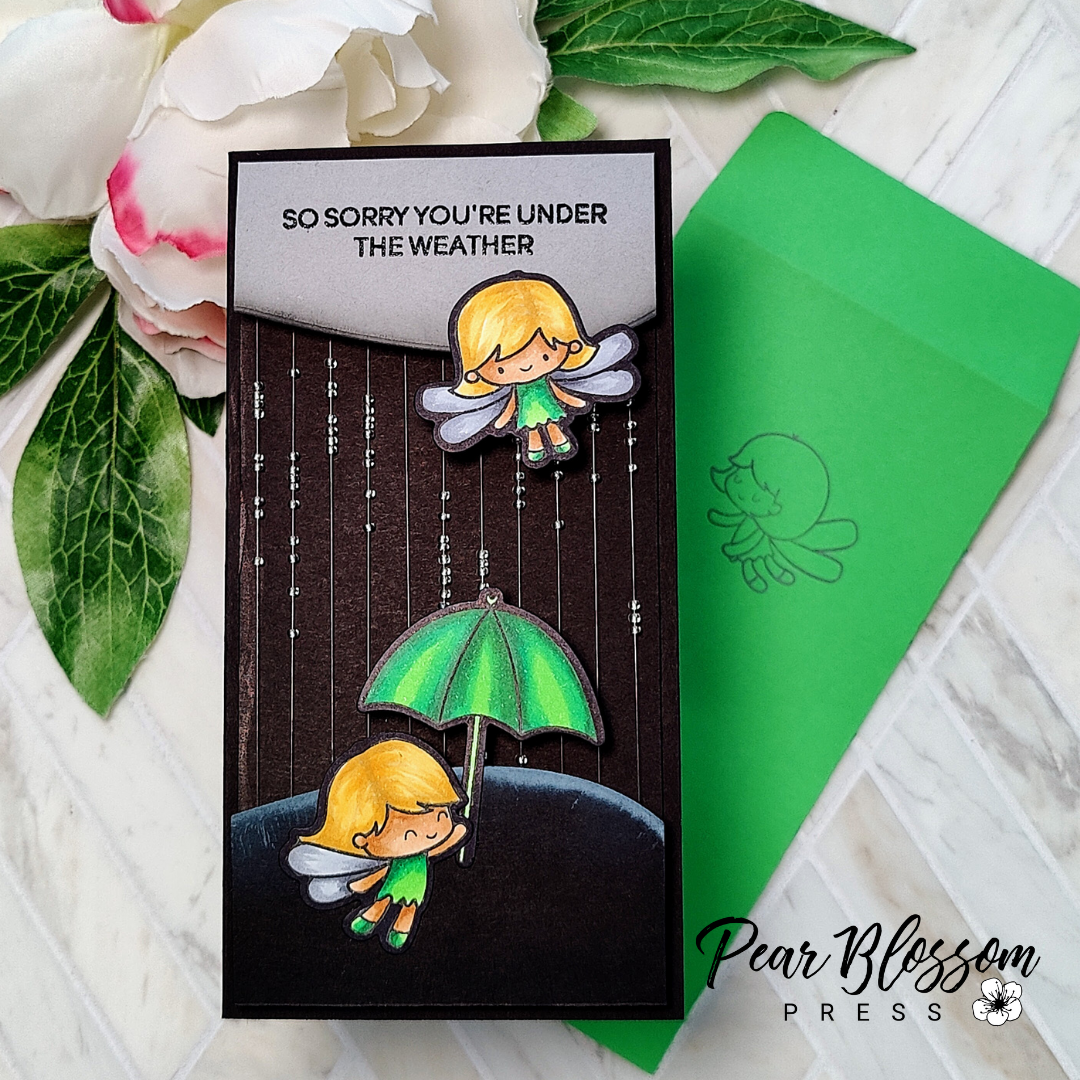
Once you have your rainfall ready to go, it’s time to create a card. I stamped and Copic colored fairies and an umbrella from Heffy Doodle, then cut them out with the coordinating dies. Since I knew I was going to place them on a black background, I outlined the white borders with a black marker to help them blend into the scene.
[row]
[column size=”1/2″ stack=”sm”] [/column]
[column size=”1/2″ stack=”sm”] [/column]
[/row]
While I had my Misti out, I stamped and embossed the sentiments and additional fairies onto a grey panel for the inside of the card, the envelope, and the grey cloud piece for the front of my card. To highlight the black hill, I swiped white ink along the top and lightly blended it down. I did the same for the bottom of the cloud with black ink. Here is a look at all of the pieces ready to assemble. Notice the beaded strips are adhered to my card front panel? They are sandwiched between two layers of foam tape, so the beads will have room to slide freely.

To pull the card together, I glued the grey panel inside the card and the beaded panel to the front. The cloud and hill are attached only with the foam tape on the beaded strips. I glued the fairies and umbrella to the cloud and hill.
Now for the exciting news I mentioned above… If you are wondering why I decided on the dark background, or the rainfall idea in the first place, I was inspired by last week’s episode of Craft Roulette! Are you familiar? It’s a weekly cardmaking gameshow (live every Friday night) on YouTube and it’s so much fun! The best part of this gameshow is that everybody gets to play! Each week, Mary Gunn spins the wheel and we get four things that need to be included in our cards (they’re called parameters on the show). They dictate the card shape, colors, and elements to include. The parameters for last week were Slimline, Dark Background + 2 Colors (neutrals are freebies), and the card had to have something Rainy as well as a Curved Line. I think I checked off all the boxes. If you’d like to play along, I’ll be Mary’s special guest this Friday! Join us!!! I’ll somehow be trying to incorporate lights into the parameters, wink, wink. Plus, we’re giving away prizes! In addition, I’m excited to announce Pear Blossom Press is sponsoring prizes all month long on Craft Roulette! Here’s a link to the show; be sure to set a reminder and join us Friday, June 3rd at 4:30pm Pacific / 7:30pm Eastern.
Want to see more photos of my finished rainfall card? Take a look! Fingers crossed this week’s challenge card will turn out as cool!
[row]
[column size=”1/2″ stack=”sm”] [/column]
[column size=”1/2″ stack=”sm”] [/column]
[/row]
[row]
[column size=”1/2″ stack=”sm”] [/column]
[column size=”1/2″ stack=”sm”]
[/column]
[/row]
Thanks so much for stopping by today! I’ll be back tomorrow with more fun cards, and some cool techniques to share. See you then! And don’t forget to set an alarm for Craft Roulette!
This site uses affiliate links whenever possible (at no additional cost to you), but only for products I actually use and love.

SOOOO FANTASTIC!
That looks amazing!! And what an adorable stamps. I wouldn’t mind a video tutorial, especially with both different techniques. I am going to try this, perhaps I will cut slits on the bottom and top of the card panel, and “weave” the long thread with the beads through the slits. Tape the beginning of the thread on the back, tape it so it doesn’t come loose. Thread through the first slit to the bottom slit. Around the back and through the next slit to the front. Every time on the front leave a few beads. Secure the thread on the back at the last slit so it doesn’t come loose. I do think you have to be careful with the tension of the thread, but that is for all methods. Great card!!
Video please!
Love it! I will mess around with the different ways of doing the beading. Another great card idea!
Yes I’d love to make one of these cards with you via a live someday
Awesome blog! Thank you for the great card idea. I would love to be on the list for a video also. Thank you, Cheryl