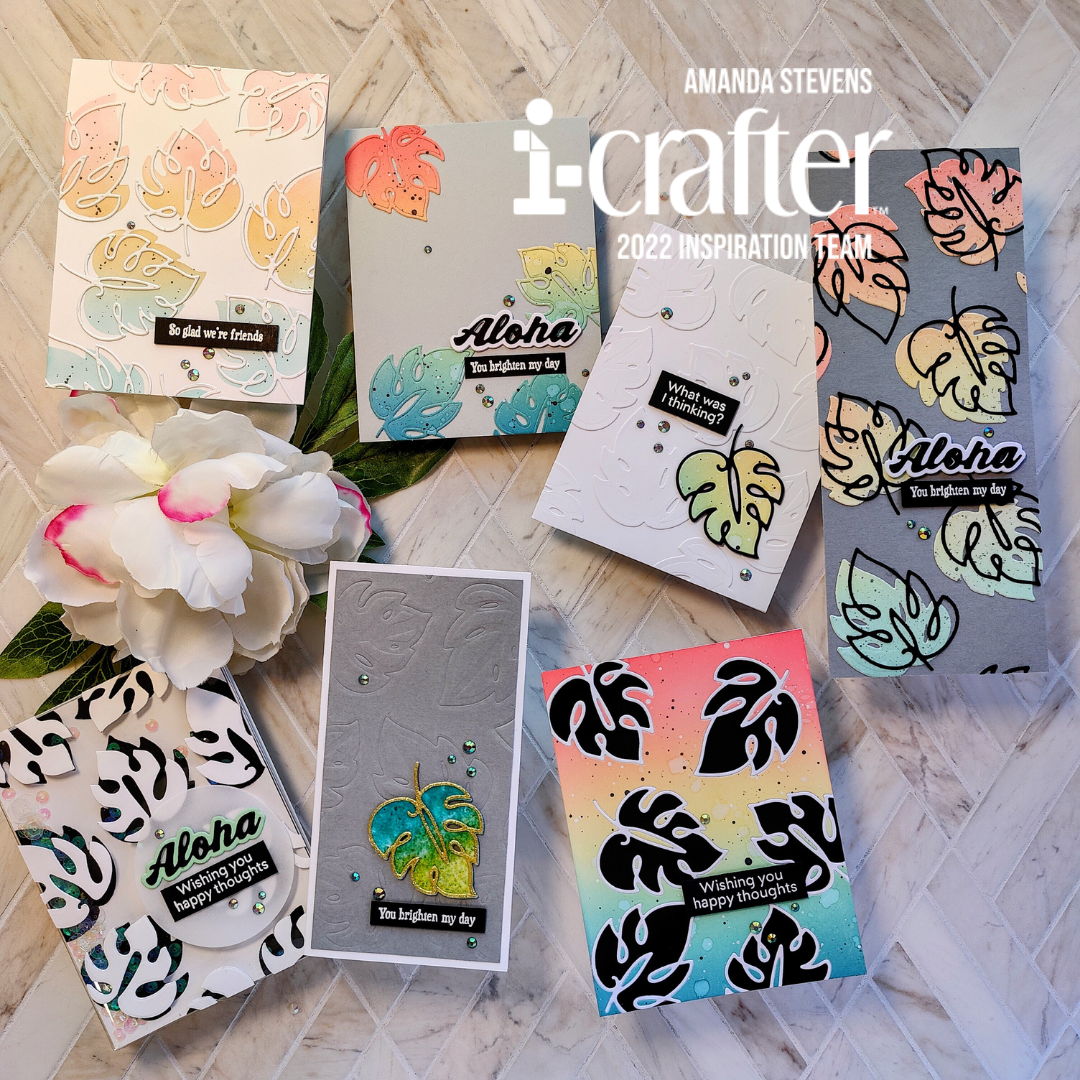
I love cover plate dies, but they can be expensive. Especially, the nesting sets. Did you know you can achieve similar results with your small dies? It’s a great way to stretch your supplies! Today, I’m sharing four different ways (and lots of cards).

To make things easier, I’ll use the same die set so you can see the difference in technique. All of my cards feature i-crafter’s new Doodle Monstera Leaves. (To see i-crafter’s entire new release, click here.) In addition, I pulled out a couple of stamp sets for sentiments, as well as a circle die for one card. Grab similar supplies and meet me in the craft room…
Supply List
Doodle Monstera Leaves Die Set
Classic Circles Die Set
Scattered Thoughts Stamp Set
Bloomin’ Sunshine Stamp Set
i-Mend PRO Deck Cutting Deck
i-Clik Pick
i-Grip Locking Tweezers
Alright, let’s dive in!
Technique #1 Layer On Top
The easiest way to create a background with small dies is to cut your shapes out from another sheet of cardstock and layer them on top of your panel. Depending on the look you’re going for, you can cut the shapes from the same color as your panel, or different colors. For my first background, I opted for a tone-on-tone look and cut everything from white stock. You can see that I spaced my dies out quite a bit when I cut them out from the half sheet of cardstock. I could have moved them closer and cut more leaves from the same panel, but I’ll be using the negative space to make two more cards later, so there won’t be much waste.
[row]
[column size=”1/2″ stack=”sm”] [/column]
[column size=”1/2″ stack=”sm”] [/column]
[/row]
After cutting out the leaves, I arranged them on top of an A2 panel, glued them in place, and trimmed the edges off.
[row]
[column size=”1/2″ stack=”sm”] [/column]
[column size=”1/2″ stack=”sm”] [/column]
[/row]
The background was ready to be used on a card. In addition, I made two other cards using the same Layer On Top technique. Take a look at the finished cards below. Notice that this technique allows you to cover any size card you choose, instead of getting locked into one size with a cover plate? Also, you have control over how many pieces to glue to your panel, so you can leave more negative space if you like. What do you think of this technique?
[row]
[column size=”1/2″ stack=”sm”] [/column]
[column size=”1/2″ stack=”sm”] [/column]
[/row][row]
[column size=”1/2″ stack=”sm”] [/column]
[column size=”1/2″ stack=”sm”] [/column]
[/row]
Technique #2 Inlay
The second technique is slightly more involved than the first. To inlay a panel, you typically die cut the same shapes from several colors of cardstock, then piece them together like a puzzle. It’s easiest to have a solid panel to adhere all of the pieces to. For my inlaid background, I ink blended and splattered an A2 panel. Then, I cut out my leaves, leaving more space between them. (It’s helpful to use low-tack tape to keep track of the little pieces around the edges.) I cut additional leaves from black and white cardstock as well, then puzzle pieced them together, adhering everything to an A2 panel of copy paper. All of the extra leaf pieces were reserved to decorate some of the other cards.
[row]
[column size=”1/2″ stack=”sm”] [/column]
[column size=”1/2″ stack=”sm”] [/column]
[/row]
Even though this method takes a little more effort, the smooth inlaid finish is awesome! Just like with the Layer On Top method, you can dictate the size, shape, and number of images on your panel.
[row]
[column size=”1/2″ stack=”sm”] [/column]
[column size=”1/2″ stack=”sm”] [/column]
[/row]
Technique #3 Emboss
If you love the look of the Inlay technique, but want a tone-on-tone background, try dry embossing with your dies instead. It’s much faster! For this technique, you’ll need a silicone embossing pad (I often refer to it as a squishy pad). Follow the instructions with your die cutting machine for the correct sandwich to emboss. Space your dies out on your panel, allowing them to extend beyond your panel as well, and emboss. As you move the dies around and send the panel through your machine again, you’ll notice that the previously embossed images get slightly flattened. Don’t worry, they should still be highly visible, but to make sure all of your images are equally flattened, run your panel through again at the end with no dies.
[row]
[column size=”1/2″ stack=”sm”] [/column]
[column size=”1/2″ stack=”sm”] [/column]
[/row]
Take a look at the finished card. The subtle texture provides interest, but allows the colorful focal point to pop! I trimmed the grey panel down to make room for a white border. Again, this technique lends itself to any size or shape card. You can even use word dies for a really cool background without much effort!

Technique #4 Stencil
Remember the first panel I cut with all of the space between the dies? We’re going to use it to make the last two cards. (It’s a 3-for-1! How ’bout that!) First we’ll use it as a stencil. Using low-tack tape, I adhered an A2 panel to the back. Then, I blended ink through my homemade stencil and splattered on black dots. After removing the stencil, I glued white die cut outlines on top, slightly askew. It made a beautiful panel, don’t you think?
[row]
[column size=”1/2″ stack=”sm”] [/column]
[column size=”1/2″ stack=”sm”] [/column]
[/row]
[row]
[column size=”1/2″ stack=”sm”] [/column]
[column size=”1/2″ stack=”sm”] [/column]
[/row]
Before I show you the finished card, I want to show you what I did with the stencil. Since it had ink all over the top, I flipped it over and glued it to a black A2 panel. Then I trimmed off the excess for a second background. The Monstera Leaves I used have a loose shape that works in any direction, including reversed. If you want to try this technique, make sure your shapes are equally flexible.
[row]
[column size=”1/3″ stack=”sm”] [/column]
[column size=”1/3″ stack=”sm”] [/column]
[column size=”1/3″ stack=”sm”] [/column]
[/row]
To finish these cards, I simply added a sentiment strip to the stenciled panel. For the bold black and white panel, I turned it into an infinity shaker by adding a shaker cover and seguins. Then, I glued white die cut leaves on top of the shaker cover. The sentiment felt like it was getting lost, so I added a vellum circle underneath.
[row]
[column size=”1/2″ stack=”sm”] [/column]
[column size=”1/2″ stack=”sm”] [/column]
[/row]
[row]
[column size=”1/2″ stack=”sm”] [/column]
[column size=”1/2″ stack=”sm”]
[/column]
[/row]
So what do you think of these techniques? I think they’re pretty cool! Chances are you already have small dies in your stash that you can try them with. I’d love to see if you do! Tag me on Instagram so I can cheer you on! Of course, these looks aren’t exactly the same as if you use cover plate dies, but they are similar. And since they can be used on any size card, it makes your smaller (less expensive) dies more versatile than cover plates! (Lol, don’t get me wrong. I’m still going to buy cover plates, but it’s nice to know we have options.)
Thanks so much for stopping by today! I hope I’ve inspired you to look at your small dies in a new way. If you love the Doodle Monstera Leaves that I used for my cards, be sure to head on over to i-crafter and check out the rest of the release! I’ll be sharing another card tomorrow featuring the cool new pop-up card and window add-on. See you then!
Oh, and don’t forget to set an alarm for this Friday night, June 3rd at 4:30pm Pacific / 7:30pm Eastern, so you can join me on Craft Roulette! Woohoo! I’m so excited! Click this link to set a reminder in YouTube.
Wow, it’s a busy week. And did I mention I decided to paint my craft room this week too? Lol, fingers crossed I get it done before Friday. See you tomorrow!
This site uses affiliate links whenever possible (at no additional cost to you), but only for products I actually use and love.

These are fab tips and I won’t forget about Friday night! Gee, at least I hope I don’t!