Today, I’m playing with colored pencils on kraft cardstock, for a no-line coloring effect. And look Ma – no Gamsol!
So what the heck does any of that mean?
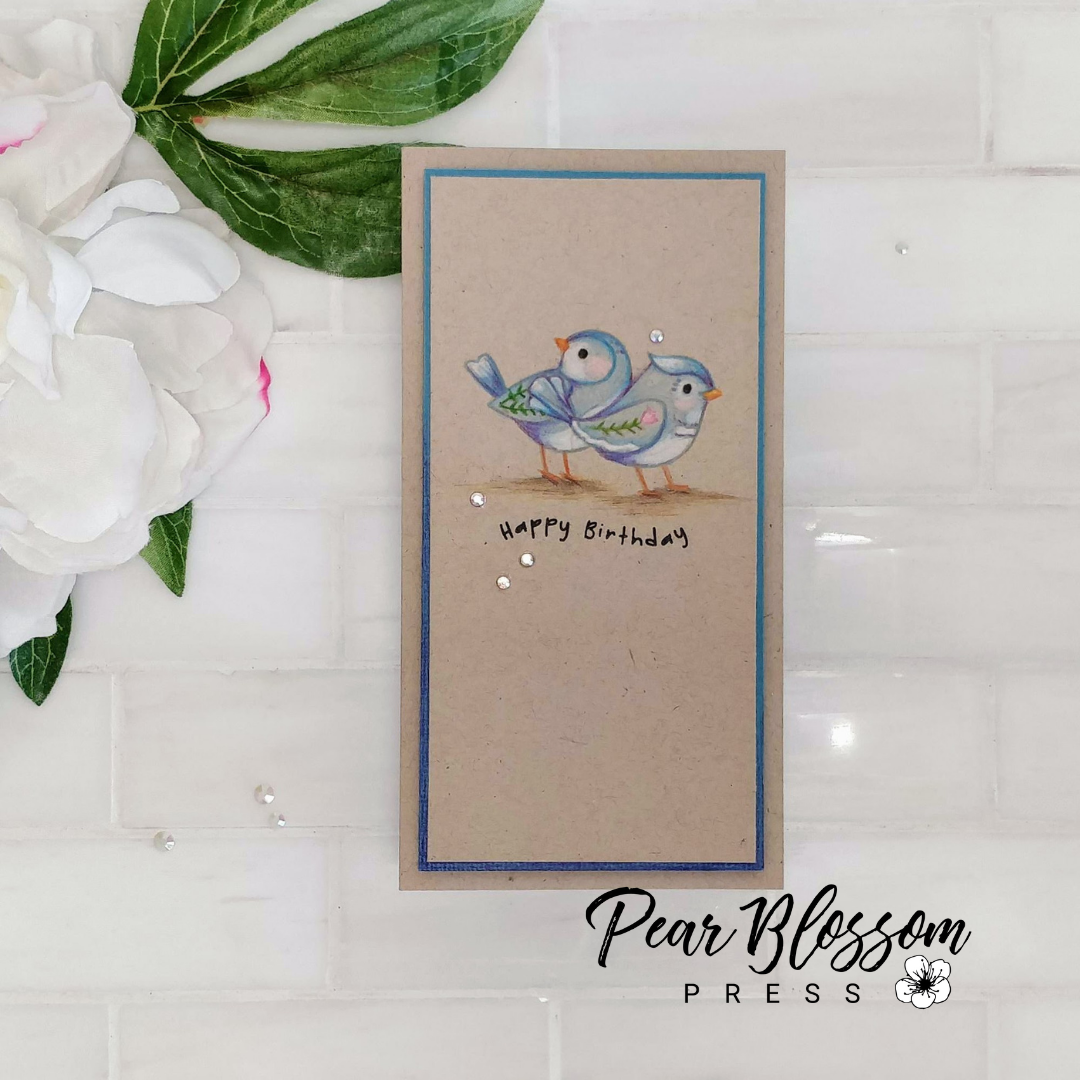
It means that I stamped my sweet little birds from Spellbinder’s September Clear Stamp of the Month onto kraft cardstock with Warm Glow ink. (There was a little masking involved on one bird.) Then, I colored them with colored pencils. By using the brown ink instead of black, I was able to color the images without leaving a visible stamped outline. This is commonly referred to as no-line coloring.
You’ve seen me no-line color a lot with Copic markers, but today I only used pencils. (I decided to push myself during the last coloring challenge and see if I could figure out how to really use my colored pencils.) There are some big differences. First, the points are much smaller, so your strokes are really narrow. This allows you to create fine details, but it also means it takes many more strokes to fill an area. That wasn’t a big deal for these birds, since they are pretty small, and it would have been hard to keep the tiny detail lines on their wings from disappearing with Copics, so I felt like pencils were a good choice here. Another difference between pencils and markers is opacity. You can build up layers of pencil and the color doesn’t sink into the paper. With Copics, the ink is transparent and it soaks in, resulting in more muted results on kraft cardstock. Getting the white details would have required a gel pen, or acrylic paint, and would have been a lot trickier to achieve.

One other difference to consider is how to clean up mistakes. With Copics, we can use a colorless blender to push accidents back into the lines they’ve escaped from, or try to dilute and feather the ink away. With pencils, the pigment is sitting on top of the paper, so you can scrape it off. Just use the tip of a craft knife to remove unwanted pencil marks. (I’ve found using short knife strokes helps to avoid accidentally smearing pigment.)

So what was that bit about Gamsol, or rather no Gamsol? Well, if you watch any of Gina K’s lives, you’ve probably seen her color images with pencils, then blend the pigments with Gamsol. I’ve watched her do it a hundred times, and finally broke down and got some. It’s a low-odor solvent (I can’t smell it at all when I’m working with it) that works great to dissolve the binders in the pencil and allows you to softly move pigments and blend your colored areas. Since the binders are often waxy, you can get shiny spots in areas where you build up layers of pencil; Gamsol fixes that too. So why didn’t I use any on my card today? Because I really wanted to keep the details sharp (you apply Gamsol with a paper stump, or empty marker, and fine lines can get smudged). Plus, I wanted to practice blending by adjusting how much pressure I use, and by building up thin layers of color. For some people, the stroke marks add to the character. Especially, on textured paper. Because I’m so used to working with wet mediums, I tend to want a more blended look. But since the whole point of working with a different medium today was trying to expand my skill set, I didn’t want to force the pencils to act like wet mediums. Know what I mean?
What do you think of my card?

There are definitely some waxy areas on the birds, and a few spots where I wish I had used a lighter hand, but overall, I’m happy with the results. I’m really hoping that in six months I will look back on this card and see a lot more mistakes, because that will mean I’ve improved my skills. I have a few older cards in my stash, and I’m almost embarrassed by them. Almost. But I also feel really good when I look at them and see how far I’ve come. We’ll call today’s post my before photo.

Somehow this post turned into a comparison of colored pencils to Copic markers, and not the tutorial I had intended, but I’ll give you a quick rundown on the rest of the card…
After I colored the birds, I stamped HAPPY BIRTHDAY underneath in black ink. (It is one of the sentiments included in the stamp set with the birds.) Then, I trimmed the panel to 2⅞” x 5⅞.” Before gluing it to a blue panel measuring 3″ X 6,” I used my darkest blue colored pencil to shade the bottom left corner of the panel. (This went fast, as I only had to shade the edges.) Foam tape pops the blue layer up from the kraft mini-slimline card base (3¼” x 6¼”), and a few scattered gems add sparkle to this clean and simple card. It fits into a #7 coin envelope, and mails with a single stamp.
I hope I’ve inspired you to pull out a set of your own lesser used coloring mediums and see what you can do. We can share before and afters in a few months. Let me know what you’re going to play with!
Also, if you are not signed up for any of the monthly Spellbinders Clubs and want to get in on the action, they’ve changed things up a bit. It’s now an actual subscription, but don’t worry, you can cancel at any time. They’ve got all of the details on their site. My card today features stamps from the Clear Stamp of the Month set for September 2021.
Thanks so much for stopping by today! If you missed it, check out my sweet little slimline featuring September’s Small Die of the Month. I’ll be back soon with another fun card to share.
This site uses affiliate links whenever possible (at no additional cost to you), but only for products I actually use and love.

One thought on “No-line With Colored Pencils”