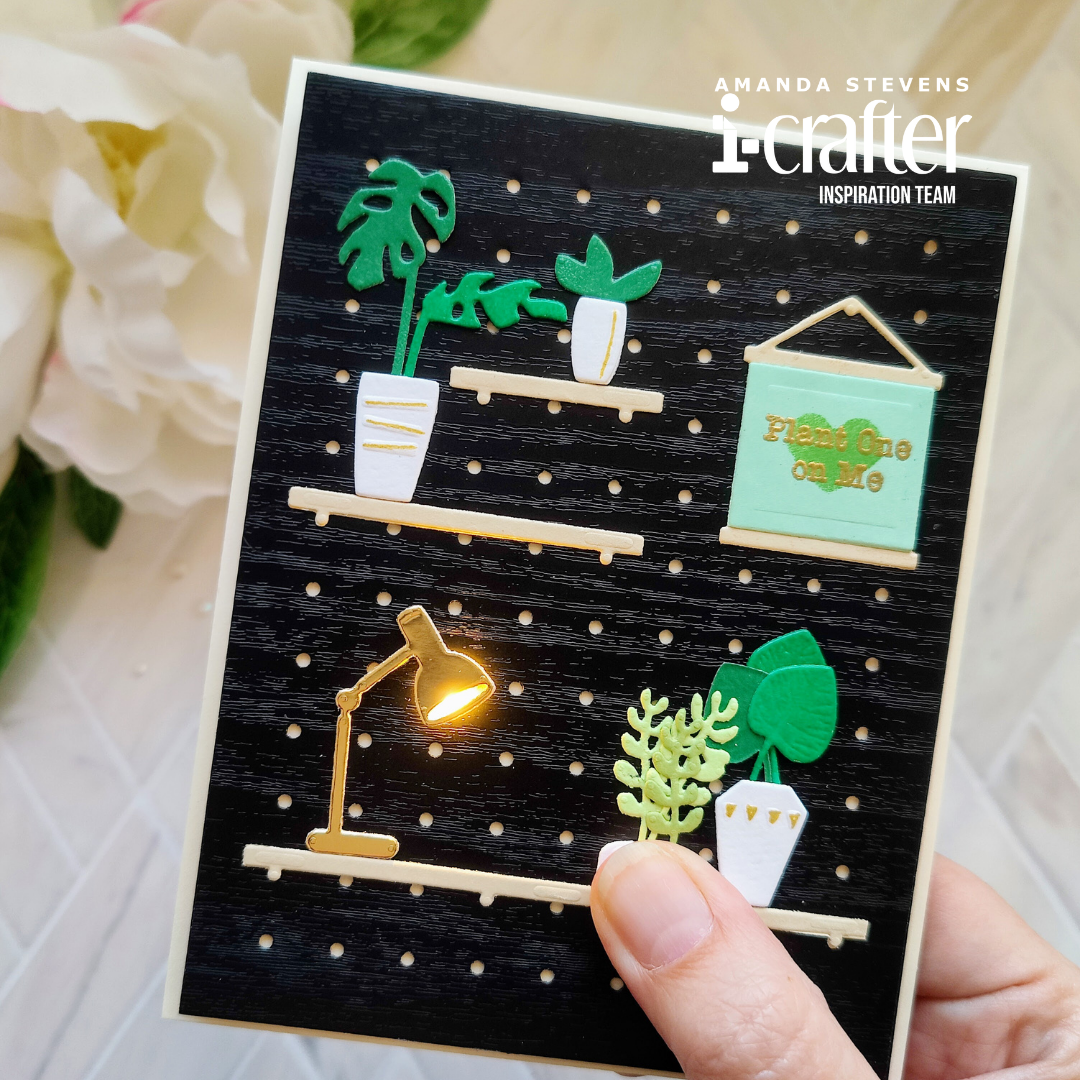
Hello my crafty friend. Today, I’m sharing a fun light-up card, guaranteed to brighten someone’s day! With it’s clean lines and neutral color palette, this card is perfect for guys or gals, and depending on the sentiment you choose, it will work for many occasions. Since the card is made mostly from die cut pieces, there was no coloring necessary and it came together quickly.
Before we start, be sure you have these supplies on hand, and then I’ll walk you through the process…
Supply List
Pegboard Shelfie Die Set
Positively Plants Stamp Set
EZ-Lights
Interactively Yours Stamp Set
First, you’ll want to cut out your pieces and get them ready. I cut and folded a cream A2 card base. Next, I die cut the pegboard three times (twice from black cardstock, and again from black woodgrain vinyl) and stacked them up. Then, I cut a cream panel slightly smaller than the pegboard (to hide my EZ-Light later). I die cut and stacked two of each shelf and vase. For the lamp, I cut two pieces and sandwiched a scrap of vellum in between to diffuse the light.
 Take a look at how cool the woodgrain vinyl looks! It’s perfect for the pegboard…

After the pieces were cut and layered, I wanted to add little details. I used a gold gel pen to highlight the raised areas on the vases. To add shine to some of the leaves, I embossed them with clear powder. I also stamped “PUSH ME” onto one vase (to indicate where the button for my EZ-Light will be). For the sentiment banner, I die cut a heart from fun foam and used it to stamp the background. Then, I embossed “PLANT ONE ON ME” on top with gold powder. (I made this as my husband’s valentine, but in the same stamp set, you’ll find great phrases for birthdays, encouragement, and love notes.) You can see all of these details a little better in the photo below…
 Next, it was time to start assembling the card. I laid all of the pieces out on the pegboard, to determine placement. Then, I glued them all on, except for the lamp. I also glued the smaller cream panel onto the back of the pegboard. (This keeps the battery unit and wires of my EZ-Light from showing through the back side.)
 To make the lamp really light up, I used an EZ-Light. It has three LEDs at the ends of wires, but since I was only lighting up one thing, I bundled them together for one brighter light. I determined which hole in the pegboard they would come through and poked a hole through the cream behind it. Then, I threaded the three LEDs through the hole from the back. In the closeup shot below, you’ll see they just barely stick out of the hole.
 On the back side, I used double-stick tape for the battery unit, and regular tape to secure the wires. I made sure to line up the button in the right place, behind the vase that reads “PUSH ME.”
 After that, I used double thick foam tape to attach the pegboard to my card base.
 A quick test made sure the button was in the right place, then last step was to glue the lamp over the LEDs. What do you think?
 I love how this one turned out, and my husband does too! Since it came together so fast, I plan to make a few more with birthday sentiments for some of my plant-loving friends. Isn’t it fun with the light on?

Who would you make this card for? Would you change the colors? Let me know down below. And if you recreate this card, tag me on Instagram so I can cheer you on!
Thanks so much for stopping by today. I’m working on a bigger project that will be a special gift and I can’t wait to show you! I’ll be back soon with a few more fun cards before then, so stay tuned.
This site uses affiliate links whenever possible (at no additional cost to you), but only for products I actually use and love.

One thought on “Pegboard Light-up Card”