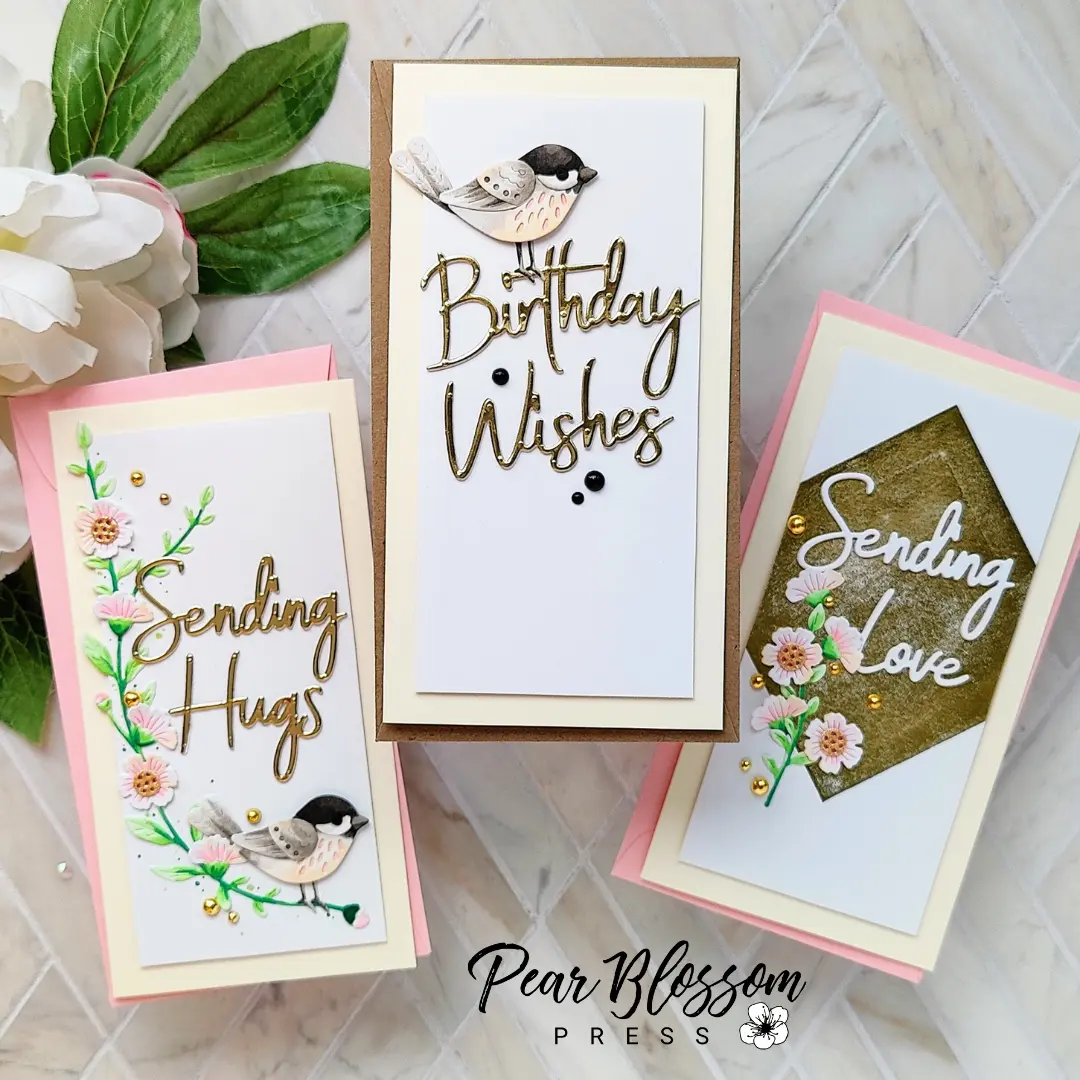
Hello again my crafty friend! Today, I’m sharing a trio of quick and easy mini-slimline cards with shabby chic vibes. I mixed and matched die cut florals, chickadees, and sentiments with a soft color palette and gold accents. I even broke out my Glimmer machine for one of the backgrounds. Here’s a look at all three…

Aren’t they pretty? Let me show you how they came together. Grab your supplies and meet me in the craft room…
SUPPLY LIST
Little Chickadee Die Set
Wreath Builder Die Set
Simply Perfect Mix & Match Sentiments Die Set
Solid Square Glimmer Hot Foil Plate
Glimmer Hot Foil – Gold
Glimmer Hot Foil System
New Year’s Eve Pearls
Just like when I get a new stamp set, I like to cut and piece together decorative die cuts before I decide on how I’ll use them. You can cut your images from colored paper, but I often cut pieces from white and color them myself. That’s what I did here. After cutting out a bunch of pieces, I colored them with Copic markers for a soft, watercolor look. Notice the pink/peach scraps above my birds? Those are to layer behind the birds’ chests. You can skip that if you want, but I chose to bring the colors of the flowers in as accents and help them coordinate with each other. Since I love the dimension of stacked sentiments, I cut all of them out multiple times and glued them together. Gold mirror paper and glitter paper top some of the sentiments and flowers.
[row]
[column size=”1/2″ stack=”sm”] [/column]
[column size=”1/2″ stack=”sm”] [/column]
[/row]
[row]
[column size=”1/2″ stack=”sm”] [/column]
[column size=”1/2″ stack=”sm”] [/column]
[/row]
After all of my pieces were layered up, it was time to create cards. Mini-slimlines are still my favorite size, so I cut three bases from cream cardstock, measuring 3¼” x 6¼” finished (they fit perfectly into #7 coin envelopes). Then, I trimmed white mats to 2⅝” x 5⅝” for card fronts. (If you want to recreate these as A2 cards, cut your white panels down to 3⅝” x 4⅞.”) A big border helps the cream and and white combo pop.
For the card with the white sentiment, I foiled the background with a solid gold square (turned at an angle). I’m still new to foiling, but the results are stunning and I’m really enjoying playing. After heating my plate twice so it was nice and hot, I applied the foil and paper, then ran it through my die cut machine. I’ve found that things shift less if you disengage the heater unit before putting your foil and paper down (see the first picture below). Remember, the ugly side of the foil has the adhesive, so it’s the side that touches your paper. Be sure to let your paper cool before pulling the foil sheet up. After one pass, I got good coverage, but not perfect. I decided to embrace the imperfection and distress the panel a little more with a sanding block. I think it works perfectly with the shabby chic look. Don’t you?
[row]
[column size=”1/2″ stack=”sm”] [/column]
[column size=”1/2″ stack=”sm”] [/column]
[/row]
[row]
[column size=”1/2″ stack=”sm”] [/column]
[column size=”1/2″ stack=”sm”] [/column]
[/row]
Assembly of the cards was very fast from here. I popped the white panels up on the cream bases with thin foam tape. I adhered most of the florals in place with wet glue, and popped a few flowers, as well as the birds, up with more foam tape.
[row]
[column size=”1/2″ stack=”sm”] [/column]
[column size=”1/2″ stack=”sm”] [/column]
[/row]
To help the foliage feel more full on the sending hugs card, I added dots around the vines with green and gold pens.
[row]
[column size=”1/2″ stack=”sm”] [/column]
[column size=”1/2″ stack=”sm”] [/column]
[/row]
I finished all of the cards with gold or black pearls and paired them with coordinating envelopes. While these have a feminine feel, I think the birthday card would work well for most guys if it was paired with a kraft envelope instead of pink. I’m sure my husband, Micah, would love it. What do you think?
[row]
[column size=”1/2″ stack=”sm”] [/column]
[column size=”1/2″ stack=”sm”] [/column]
[/row]
I absolutely love the way these cards turned out! I plan to make a few more in coordinating colors and bundle them up as a Christmas gift. Since they were so quick to make, I might make a few more sets in different color schemes.
Thanks so much for stopping by today. I hope I’ve inspired you to color up some of your own die cuts. And for those of you who have the Glimmer machine, but haven’t pulled it out yet, I hope I’ve inspired you to fire it up! Remember, you can distress any mistakes and make it look like that was on purpose.
I’ll be back soon with another fun card to share; see you then!
This site uses affiliate links whenever possible (at no additional cost to you), but only for products I actually use and love.
