Hello again my crafty friend! As promised yesterday, I’m back with a fun new pop-up card. Inspired in part by my DIY backgrounds from yesterday, I used a hexagon tile die to create colorful panels for this card. I love the bright and cheerful feel, don’t you? And the surprise inside is an unexpected treat!
Want to see how to make one like it? Grab your supplies and meet me in the craft room…
Supply List
Stand Ups Base Die Set
Stand Ups Window Add-on Die Set
Happy Birthday Wiper Die Set
Positively Plants Stamp Set
i-Mend PRO Deck Cutting Deck
i-Clik Pick
i-Grip Locking Tweezers
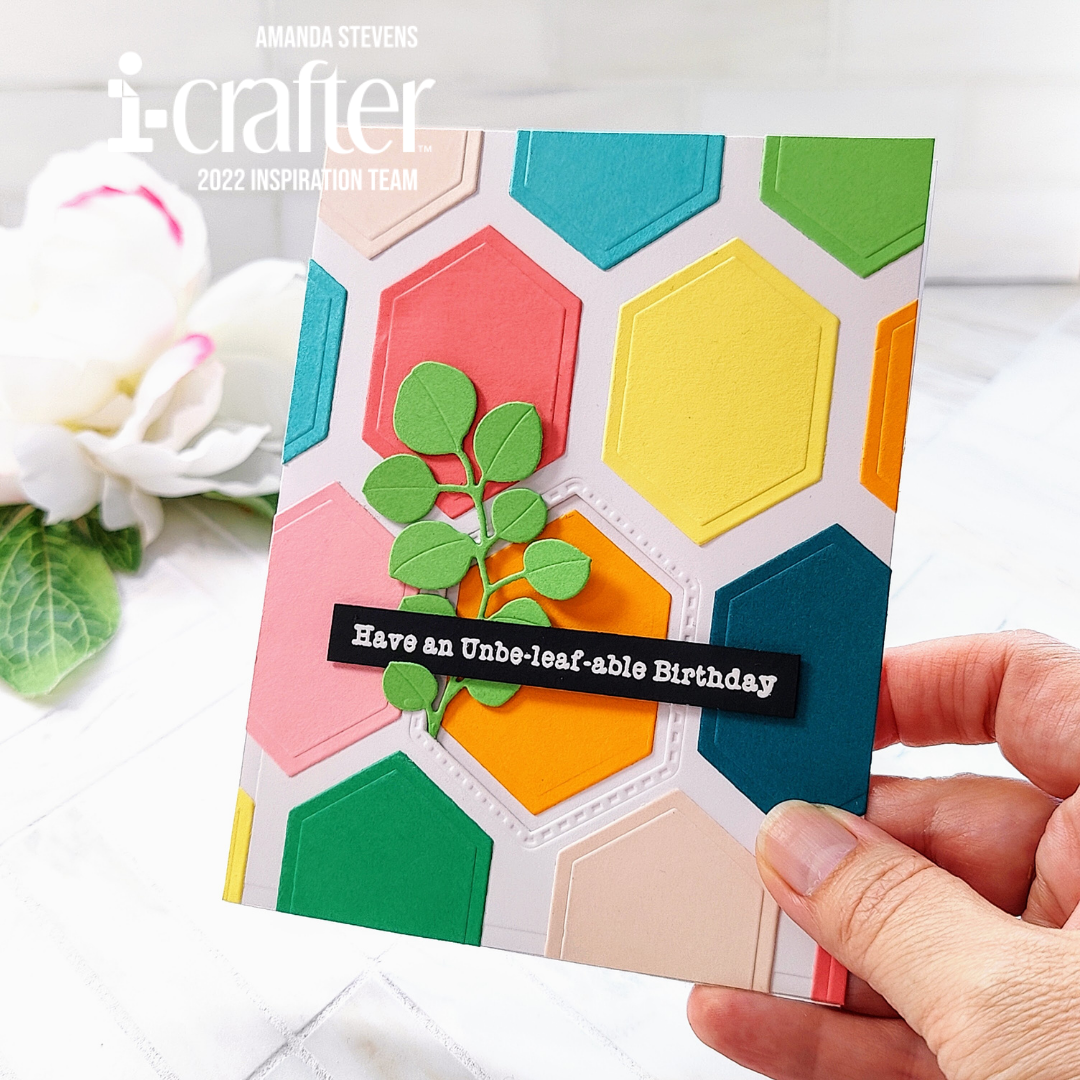
The first step is to cut your pieces. You’ll want an A2 card base with a side fold. In addition, you’ll need two more A2 panels. Using the Window die in the Window Add-on set, cut a window in the front of your card base and again in one of the A2 panels (this one will be your card front). The die has a neat, bracket at the bottom that helps you position the window on an A2 panel. This way, your windows will line up exactly when you layer the card front onto the card base – no fuss! After cutting your windows, cut the smaller hexagon tile from different scraps of colorful cardstock. From the Stand Ups Base set, cut the pop-up mechanism and cube strip, along with a few green eucalyptus branches. Don’t forget to cut out your sentiments. I die cut HAPPY BIRTHDAY and its shadow, then I heat embossed the plant sentiment on Perfect Sentiment black cardstock and trimmed it into a strip.
The next step is to create the hexagon backgrounds. With the help of a grid, line up and glue down the hexagons on both A2 panels (not the card base). Use the window to guide placement on the card front panel. For the second panel, you’ll be cutting it down after you glue the tiles in place, so don’t worry about covering the entire piece. I chose a mix of pink, salmon, orange, yellow, green, and teal for my rainbow. It has a mod feel that works great with the geometric pattern. Reserve a few of the hexagon tiles to create the planter inside the card, and another to place in the window.
[row]
[column size=”1/2″ stack=”sm”] [/column]
[column size=”1/2″ stack=”sm”] [/column]
[/row]
Now we can start assembling the card. Don’t worry, it’s easy! Fold the score lines of the mechanism to train them, then fold it along the center diagonal to form an L shape as shown below. Add glue to the top triangle, tuck it into the fold of the card, and close the card. When you open the card back up, add glue to the long skinny tab, and close the card again. That’s it, your mechanism is done and ready to glue the inner panel to.
[row]
[column size=”1/2″ stack=”sm”] [/column]
[column size=”1/2″ stack=”sm”] [/column]
[/row]
To add the extra bump out for the planter, fold the cube strip into a little box and glue it together. Adhere one side to the colorful panel, then add glue to the bottom side of the box and close the card again. When you open it back up, your panel and cube will stand up.
[row]
[column size=”1/2″ stack=”sm”] [/column]
[column size=”1/2″ stack=”sm”] [/column]
[/row]
Alright, let’s finish decorating! Close the card back up, glue one of the reserved hexagons inside the window. Add a eucalyptus stem and the sentiment strip. I tucked the stem in through the window and layered the strip across, making the window area the focal point. Inside the card, I added the word dies to the panel and a hexagon with more stems in front on the little box.
[row]
[column size=”1/2″ stack=”sm”] [/column]
[column size=”1/2″ stack=”sm”] [/column]
[/row]
The finished card folds nice and flat, and pairs well with a bright colored A2 envelope. Isn’t it awesome?
[row]
[column size=”1/2″ stack=”sm”] [/column]
[column size=”1/2″ stack=”sm”] [/column]
[/row]
[row]
[column size=”1/2″ stack=”sm”] [/column]
[column size=”1/2″ stack=”sm”]
[/column]
[/row]
I’d love to know what you think of this card. Of course, you can change up the sentiments and focal images for any occasion. Did you see Cindyellen’s Father’s Day card using the Stand Ups Base set? It’s fantastic!!! I love how i-crafter’s dies mix and match so well. If you didn’t catch it yet, check out Cindyellen’s video. She walks you through assembling the mechanism too, in case my explanation was cloudy.
Thanks so much for stopping by today! Don’t forget, tomorrow is the big day…I’ll be Mary’s guest on Craft Roulette! Join us and craft along for your chance to win! If you are not familiar, Craft Roulette is a LIVE gameshow for cardmakers like us! Tune in, play along, then enter your card for a chance to win prizes. And when you come back the following week, you’ll see your card featured on the show! It’s tons of FUNN! Here is a link to tomorrow night’s episode. Head over now and set a reminder…
See you tomorrow!
This site uses affiliate links whenever possible (at no additional cost to you), but only for products I actually use and love.

One thought on “Mod Pop-up Card”