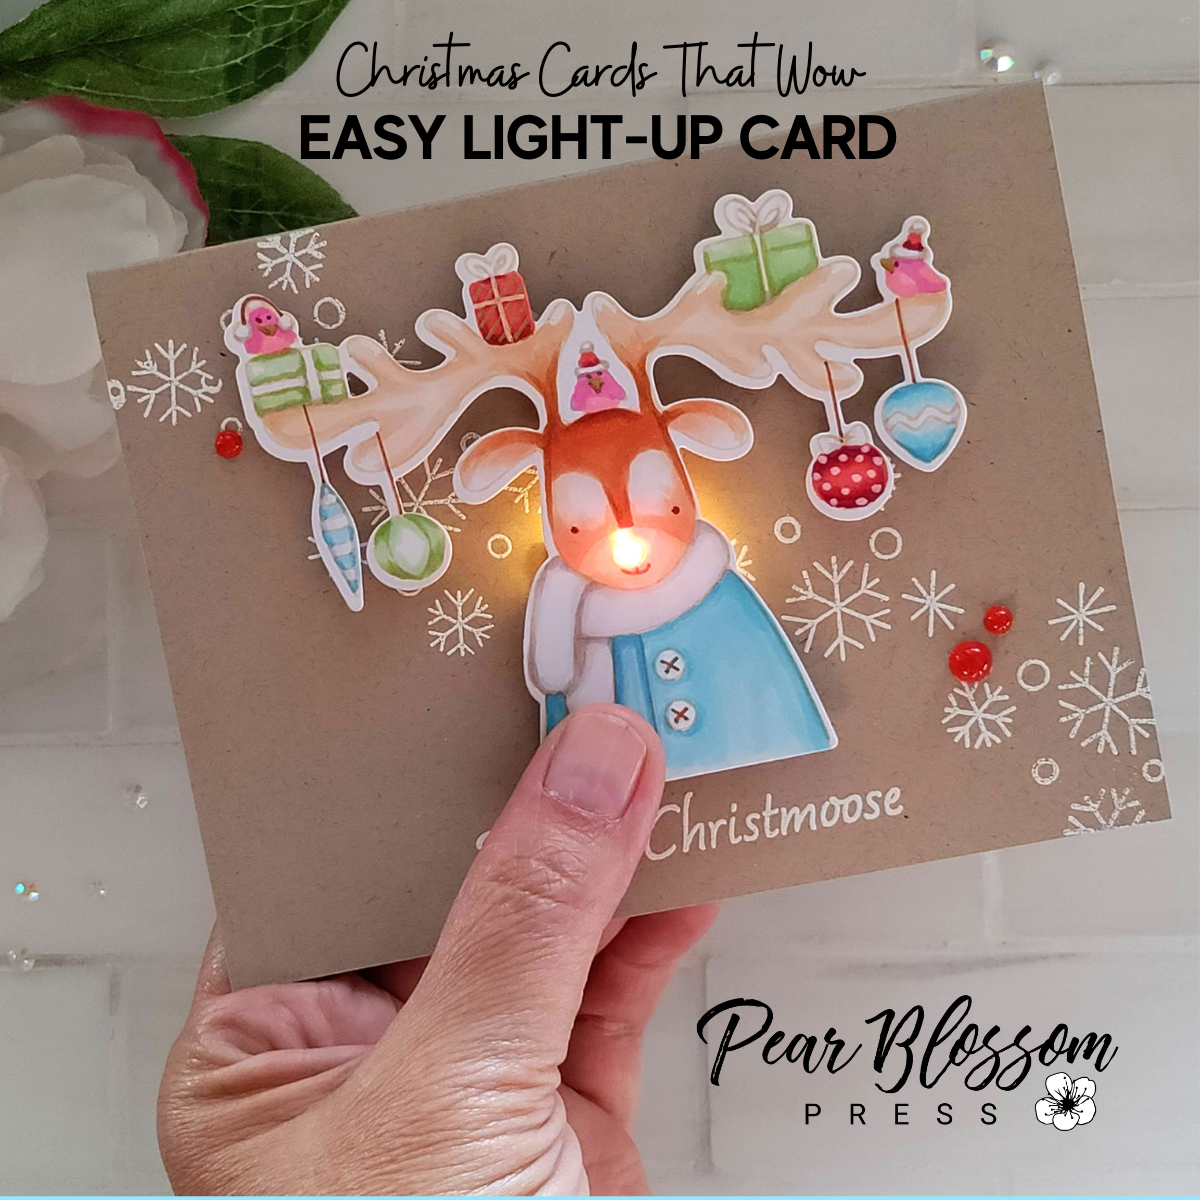
Merry Christmoose! And thanks for joining me at the Card Maker Success Summit. I hope you are inspired to give this fun light-up card a try. Below, you will find a supply list, and step-by-step instructions, along with the shading map I used for the moose image. Let’s get started…

Merry Christmoose Light-up Card Supply List
[row]
[column size=”1/2″ stack=”sm”]
EZ-Lights
Double Thick Foam Tape
Interactive Labels Stamp Set
Red Bubble Gems or Peppermint Jazz Sparkletz
Essential Gel Pens
Clipboard & Collapsible Marker Bags
Christmoose Stamp Set
Christmoose Die Set
Warm Glow Ink
Shark Tooth White Ink
Versamark Ink
White Embossing Powder
[/column]
[column size=”1/2″ stack=”sm”]
Copic Markers (or coloring medium of choice)
Scotch Tape
Scor-Tape
Kraft Cardstock
White X-Press It Blending Card
Kraft Envelopes
Heat Gun
Scissors
Craft Pick
Die Cutting Machine (or fussy cut by hand)
Misti Stamp Postitioner or Acrylic Block
Scor Pal
[/column]
[/row]

Instructions
Step 1. Stamp moose onto white cardstock in Warm Glow ink. (Or color of choice. I prefer Warm Glow for no-line coloring.)
Step 2. Stamp “PRESS” on his chest.
Step 3. Color with Copic markers (or color medium of choice). Refer to the photo below for where to add the darkest shadow colors.

Step 4. Add gel pen highlights.
Step 5. Die cut moose (or fussy cut by hand).
Step 6. Use a craft pick to punch hole in moose’s nose.
Step 7. Turn moose over, tape EZ-Light in place with button under the stamped word “PRESS” and the lights in the hole of the nose. Coil any extra wire up and tape in place. Push button to test lights.
Step 8. Add double thick foam tape around the rest of the moose, avoiding the battery area.
Step 9. (Optional) Slip a cardstock strip between the battery and housing to keep the battery fresh. Write remove on strip.
Step 10. Stamp and heat emboss sentiment and snowflakes on card base, leaving room for the moose above the sentiment.
Step 11. Remove release paper from foam tape and adhere moose to card. (If you slipped a strip under the battery, make sure not to remove the release paper from foam tape that would lock it in place. Recipient needs to be able to pull it free.)
Step 12. Glue red gem over lights on moose’s nose. Add a few more gems to decorate card front, if desired.
Step 13. No naked envelopes! Stamp a small element with white ink onto your envelope to help it coordinate.

Ta-da!!!
You just made an interactive Christmas card!
Each of these steps can be done in batches. I like to stamp and color while watching TV. Then assemble later at my desk.
Not every card needs lights; you can save them for the special people on your list. If you want to create this card without lights, omit steps 2, 6, 7, and 9.
Shipping note: in the US, a letter becomes a “package” when it exceeds 1/4″ thickness. My finished card measures just under 1/4″ thick, and weighs 0.7 ounces, so it does not require extra postage. The weight of your card may vary, but will probably not exceed one ounce either.
Let’s Connect!
I hope you enjoyed the class. I would love to see what you create, and cheer you on! Questions? Reach out for help! Email me at amanda@pearblossompress.com, or tag me on social media @pearblossompress. You are welcome to post in our Facebook group, Interactive Cards & Papercrafts. Or join us on Zoom for Crafternoon on Sundays.
Be sure to sign up for my newsletter for more inspiration (click here). When you do, you’ll also receive a reference guide with a dozen of my favorite interactive elements that you can add to your cards, complete with how-to videos!

For more inspiration, follow us on social media. In addition to the cards I share, we often have special guest designers and collaboration hops! We always post to Facebook, Instagram, and Pinterest. You’ll find lots of how-to videos on our YouTube channel. Make sure you subscribe and turn on notifications, so you can join our LIVE videos too!

Thanks again for joining me for the Summit!
This site uses affiliate links whenever possible (at no additional cost to you), but only for products I actually use and love.

I love how simple and yet has a pop to it, plus you can make it without the lighting element to keep cost of the card. Thank you, Amanda, for presenting at the Cardmaker Success Summit!
Thank you for your tut at the summit. When I clicked the link to your site it came up black listed. Loved your card and demo.
Love the card. Also clicked the link and came up blacklisted for me also. Would still love to get the shading map if possible.
Oh my goodness Amanda! I absolutely loved your demo for the Summit and truly appreciated the generous discount you offered us! I’ve always wanted to try the light up cards since Kathy introduced me to your site, but could never really figure out “how” to make/hide the device, so actually seeing you create one from start to finish was fantastic! I purchased the 5 pack but can’t wait to create more! Thank you SO MUCH! Hugs!