The new release from i-crafter is here, and let me tell you, I love it all!!! There are so many fun new stamps and dies this month, perfect for Fall and Halloween. Lynda has a neat video showing the entire release, along with inspirational pieces for each set, and she’s even opening up her sketch book and sharing how the designs started. I love getting a peek into the process. Here’s a look at the new release…
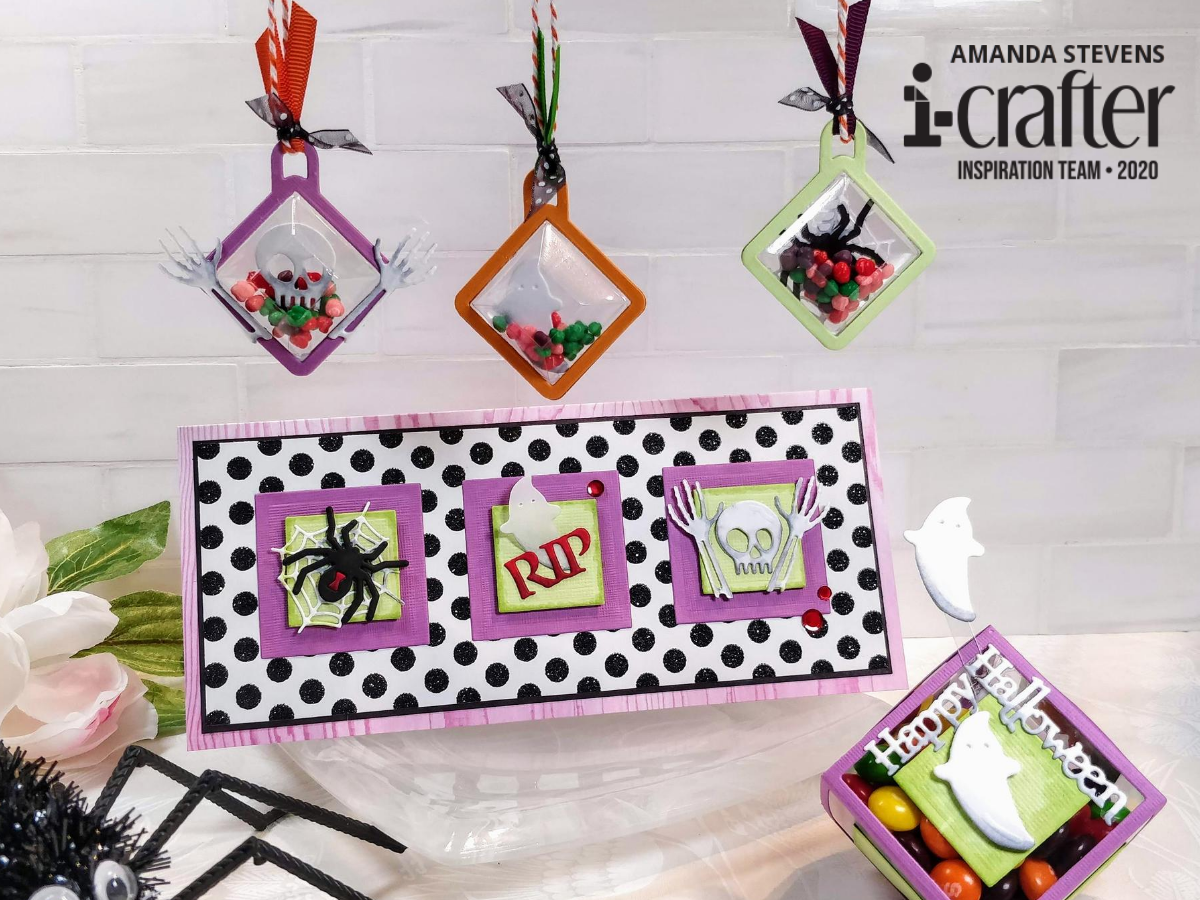
I was so excited to start playing with the new sets; so many of them mix and match to work together, and give you tons of possibilities! Today, I’m sharing a few treats that all feature the Mini Halloween Hauntings. Let’s start with the Geometric Dome hanging treats…

You can whip out a whole batch of these in almost no time. I cut a pair of frames from colored cardstock for each one, using the Terrarium dies, and glued each frame to a Geometric Dome. Before gluing the two frame pieces together, I sandwiched in a Halloween die cut, adhered to an acetate strip, and a sprinkle of Nerds® candy. You can add more decorative elements to the front if you like, or just tie on some ribbon. Normally, these would be fun for classroom treats, since they only have a small amount of candy. I’m going to drop these off to my nieces.


If you want to treat someone to a larger portion of candy, the Geometric Favor Box is the perfect size! I used the die set to cut out a purple frame, and dropped in the larger dies to cut out windows. I pieced the box together with acetate behind each window. (This is fast and easy with Nuvo Deluxe Adhesive.) To decorate the box, I cut the squares and ghosts from the Mini Halloween Hauntings set, and the sentiment from the Halloween Treat Lantern set. The ghost that sticks up from the box is two die cuts with a strip of acetate sandwiched in between. This box holds an entire package of Skittles® candy; the big pretend-you’re-gonna-share-with-a-friend size. This is a great option for kids who are homeschooling, and won’t be able to trick-or-treat. Or your husband. Lol, Micah has already claimed this one.

This fun slimline card is the perfect accompaniment to either candy option. With the help of pattern paper, this card comes together very fast! I layered the die cut elements onto green squares, then popped those squares up with foam tape onto larger purple squares. (These were the window cutouts from the box.) The glittery dots on the background, and a few sequins, add a touch of sparkle. This time, I cut the ghost from vellum instead of cardstock, for a more wispy feel. I should mention that I used Copic markers to add a touch of shading to the decorative elements on all of my projects today. It’s a quick and easy touch, that makes a huge difference! Take a closer look…

Now that you’ve seen a preview from Lynda, and my fun treats, are you ready to see what the rest of the team has made with the new release? Head on over to the i-crafter blog, and hop along! You’ll also be able to see lots of fun projects, and share your own, in the i-crafter fan page on Facebook! Are you already in the group? There is so much inspiration, and sometimes special games and giveaways; you’ll definitely want to come hang out with us there!
Thanks for stopping by today. I’ve been busy on the blog. Not only am I sharing these fun projects, I’m also announcing the new Heffy Doodlers Challenge! Be sure to check it out after you hop along with the team.
*** Please note: since I’ve repackaged candy for these treats, I will only give them to kids who know us personally. Also, I was careful not to use anything with glitter on the candy treats.***
This site uses affiliate links whenever possible (at no additional cost to you), but only for products I actually use and love.

2 thoughts on “Haunting Halloween Treats with i-crafter”