Have you ever made a flexi card (sometimes called a bendy card)? They’ve been on my list to try, but I hadn’t worked out the dimensions or how to get them to latch. Luckily for me, i-crafter just released a new Flexi Card Die Set that takes all the guesswork out of it! It comes with three different sentiments that can be dropped in for different occasions. Once I got started, I realized how quick and easy they are to make, so I made three! Take a look at how awesome they are…
Before I walk you through the process, grab these supplies so you can play along too…
SUPPLY LIST
Flexi Card Set
Tool Box Gift Card Holder Set
Pegboard Shelfie Set
Hummingbird Happiness Set
Pinwheel Card Set
PRO Deck Cutting Deck
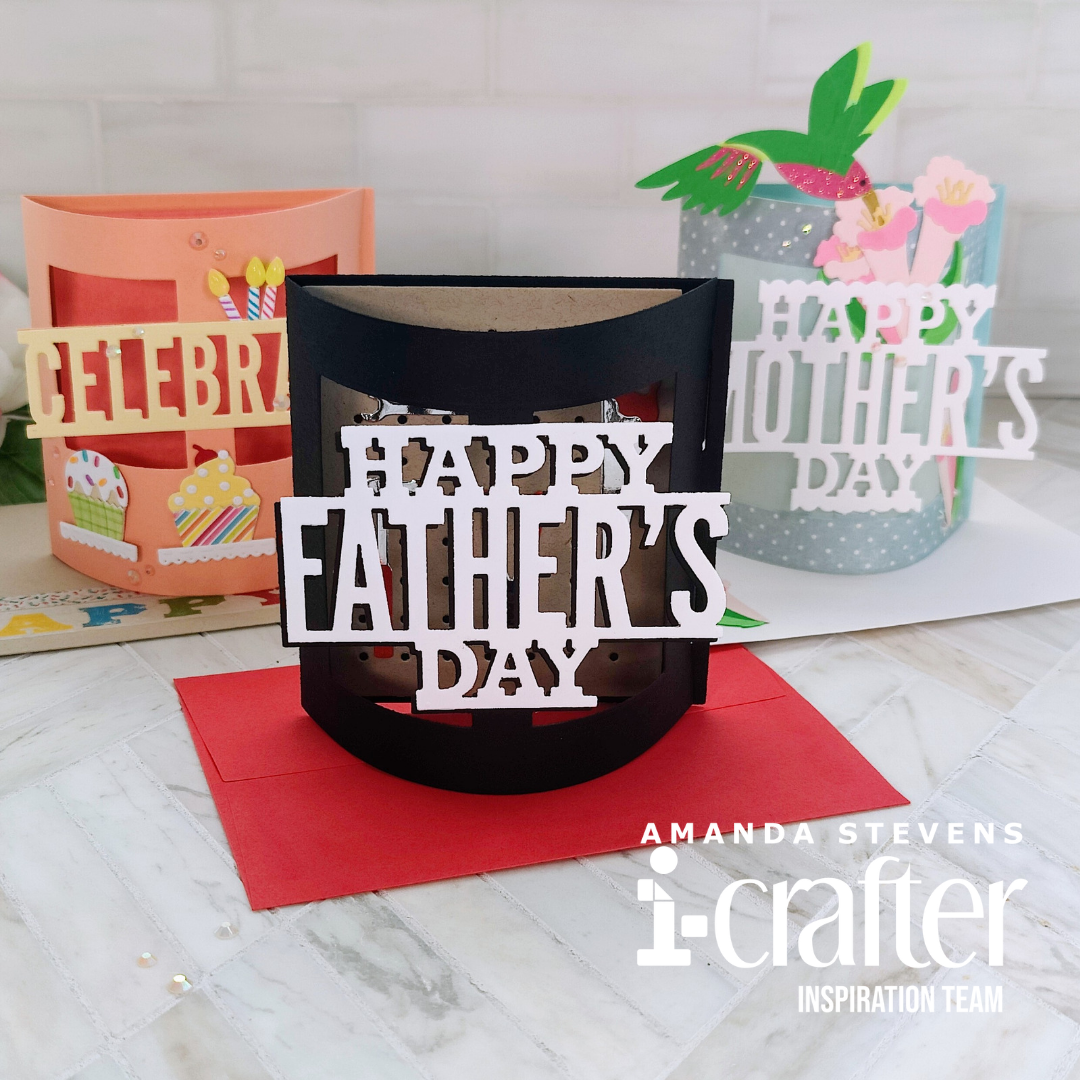
Let’s start with the Father’s Day card. I dropped the sentiment into the larger card front die and cut it out, along with the back die from black cardstock. Assembling the card is simple. The front layer has a long tab on the left that gets glued to the back. That’s it. After that, just decorate however you like.
To decorate the card, I cut just the sentiment again from white cardstock. I also cut out a kraft pegboard (cut to fit the back panel), and tools from red and silver scraps.
[row]
[column size=”1/2″ stack=”sm”] [/column]
[column size=”1/2″ stack=”sm”] [/column]
[/row]
[row]
[column size=”1/2″ stack=”sm”] [/column]
[column size=”1/2″ stack=”sm”] [/column]
[/row]
Since this card was cut from black paper, I added a solid kraft panel to the back for an area to write my personal message. The top layer will be wider than the back when folded flat, and it fits into an A2 envelope. I chose a bold red envelope to coordinate. Here’s another look at the finished card…
[row]
[column size=”1/2″ stack=”sm”] [/column]
[column size=”1/2″ stack=”sm”] [/column]
[/row]
For the Mother’s Day card, I thought it would be neat to turn it into a lantern by adding vellum behind the sentiment and placing a battery operated tealight in the opening of the card. (Obviously, it’s not a good idea to use real candles in a paper lantern, as that would be a fire hazard.) When picking colors for this card, I found a blue and white polka dot pattern paper in my stash. It was lightweight stock, so I cut blue cardstock pieces to layer onto. Initially, I thought I’d be able to sandwich the vellum panel in between the blue and polka dot layers, but I realized that the inner sentiment would be caught by the vellum and would not be able to pop straight out with the top layers. So I had to glue it inside the card.
[row]
[column size=”1/2″ stack=”sm”] [/column]
[column size=”1/2″ stack=”sm”] [/column]
[/row]
A bright hummingbird nestled into pretty little flowers makes this card extra sweet. I sandwiched most of them under the white sentiment layer to keep it easy to read. I decorated the inside of the card and the envelope with extra die cut flowers. Because the bird sits so high on the card, I needed to pair it with a larger square envelope. (It’s a good idea to have your envelope handy during assembly, so you know how much room you have to expand beyond the borders of your card.)
[row]
[column size=”1/2″ stack=”sm”] [/column]
[column size=”1/2″ stack=”sm”] [/column]
[/row]
To give the card more sparkle, I spread Stickles across the pink areas of the bird, and glued on white gems to the card front. I think it’s lovely. What do you think?
[row]
[column size=”1/2″ stack=”sm”] [/column]
[column size=”1/2″ stack=”sm”] [/column]
[/row]
Now, let’s take a quick look at the last card. I popped the CELEBRATE sentiment in when cutting the pieces out. For this card, I wanted to hide a smaller card inside so when you lift the flap, there is an area to write a personal message along with a gift card holder. I cut out cupcakes, candles and the gift card holder with dies in the new Pinwheel Card die set.

Assembly of the card is the same, just overlap the flap and glue the back layer to the front. Then decorate. To add more dimension and make the elements pop, I stacked three layers up for each cupcake. Then, I popped them up with narrow strips of foam tape down the center of each cupcake so the card would still bend nicely. I also added Candle Flame Gems on top of the candles to help them stand out. A few white and pink gems added more sparkle to the finished card, and to decorate the envelope, I added a few strips of washi tape. (Lol, I need to remember to use that more since I have so many rolls in my stash.) Here’s a closer look at the finished card…
[row]
[column size=”1/2″ stack=”sm”] [/column]
[column size=”1/2″ stack=”sm”] [/column]
[/row]
And here’s a peek inside…

Isn’t it fun? I hope you’re inspired to give Flexi Cards a try! I know I’ll definitely be making more soon.
You may have noticed that I only use the tools from the new Tool Box Gift Card Holder set and only the cupcakes from the new Pinwheel Card set. They both make really neat interactive cards as well (I’ll be showing you those soon), but I love that you can mix and match so many of the elements from all of i-crafter’s dies. If you’d like to see more ways of using these new sets, be sure to head on over to the i-crafter blog and check out the design team’s great projects! For more inspiration, catch Lynda’s video here…
Thanks so much for stopping by today. I’ll be back soon with more fun cards to share. I’ll also be heading to Florida next week for Creativation. If you’ll be there, let me know so we can connect! If you can’t make it this year, stay tuned for photos and any exciting news I learn of…
This site uses affiliate links whenever possible (at no additional cost to you), but only for products I actually use and love.

For those of us who aren’t able to purchase the die for this card, do you provide the measurements?