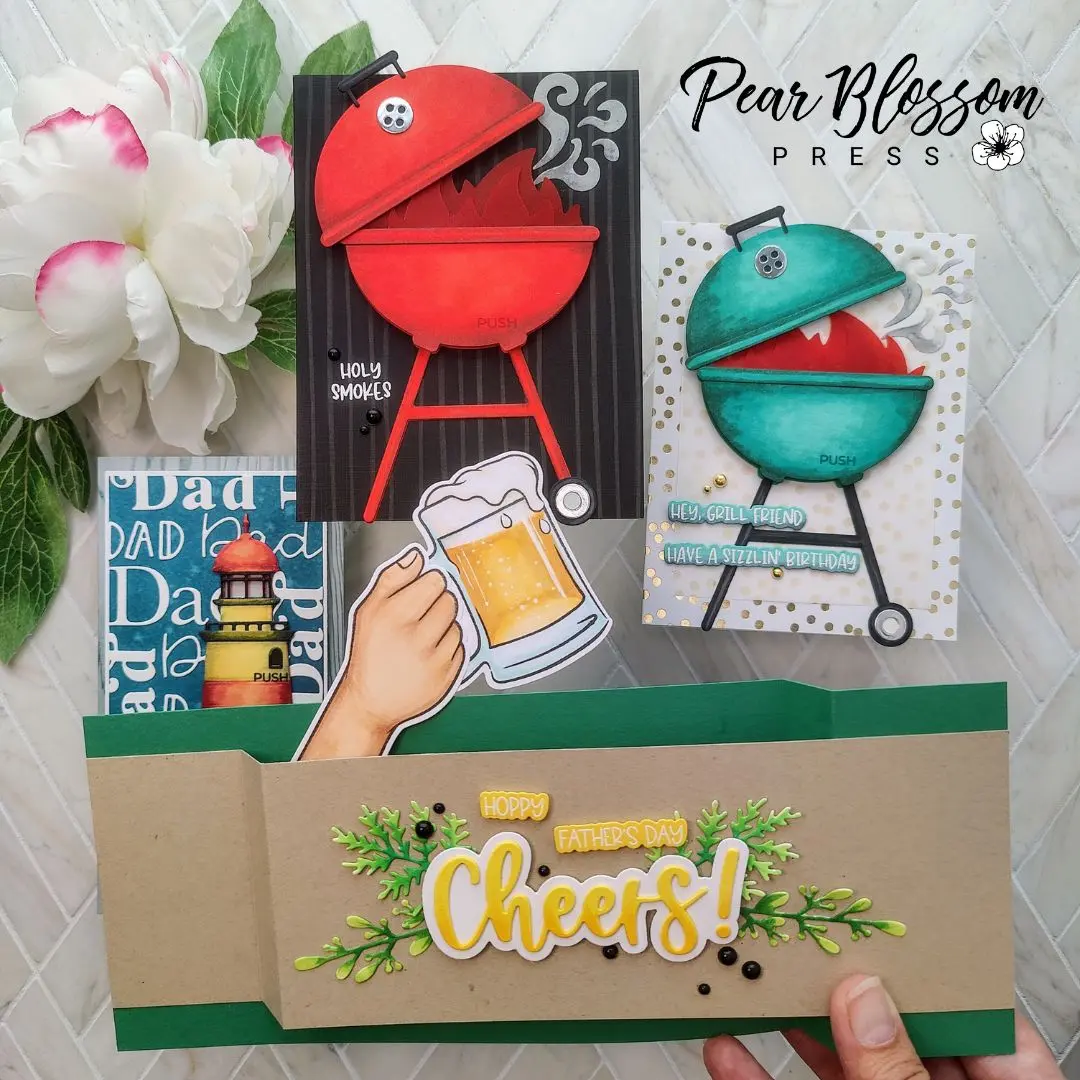

Hello my crafty friend! I’m so excited to share today’s cards with you for several reasons. Taniesa, the owner of Trinity Stamps, and I were talking a few months ago about a Backyard BBQ Die Set that would coordinate with our Lights, and it’s finally here!!! It’s so much cuter than I imagined it would be too!!! She sent over the artwork for the grill itself, so I could cut the pieces out for make and takes, and I was totally in love with the design, but then she added lots of other fun pieces after that. (If you’ve been to one of our events this season, you may have had the chance to make one of these BBQs light up; now the dies are available!) In addition, she designed an Un-Grill-ievable Stamp Set with fun images and punny sentiments, along with its own Coordinating Die Set. The whole collection is just fantastic! Of course, the grill is great for Father’s Day cards, but you can also use it for awesome birthday cards (for guys or gals). Here are two of the grill cards I made…
[row]
[column size=”1/2″ stack=”sm”] [/column]
[column size=”1/2″ stack=”sm”] [/column]
[/row]
[row]
[column size=”1/2″ stack=”sm”] [/column]
[column size=”1/2″ stack=”sm”] [/column]
[/row]
You can see how to assemble the light-up grills below. But wait, there’s more! Lol, you know Taniesa wasn’t going to stop there with Father’s Day approaching, right? She also designed a new Here’s to Brew Stamp and Die Set that I just knew would make the cutest wiper card. (You can substitute the coffee mug for the beer if you like; they’re both included in the set.) And the new Simply Sentimental Dad Stamps and Dies are fantastic on their own, but they also coordinate with the Simply Sentimental Mom Sets that came out last month. I created a fun background with the dad dies and added a Lighthouse on top (you know I had to light that up with a One Light too). The sentiment inside is from the mom set. Here’s a look at both of these interactive cards…
[row]
[column size=”1/2″ stack=”sm”] [/column]
[column size=”1/2″ stack=”sm”] [/column]
[/row]
[row]
[column size=”1/2″ stack=”sm”] [/column]
[column size=”1/2″ stack=”sm”] [/column]
[/row]
Really neat, right? I had a blast putting them together. Want to create cards like these? Grab your supplies and meet me in the craft room…
SUPPLY LIST
BACKYARD BBQ DIE SET
UN-GRILL-IEVABLE STAMPS AND COORDINATING DIES
HERE’S TO BREW STAMPS AND COORDINATING DIES
CHEERS DIE SET
SIMPLY SENTIMENTAL DAD STAMPS AND COORDINATING DIES
SIMPLY SENTIMENTAL MOM STAMPS AND COORDINATING DIES
LIGHTHOUSE DIE SET
PAPERCRAFTING MAGIC STAMPS AND COORDINATING DIES
ONE LIGHTS
DOUBLE THICK FOAM TAPE
Taniesa sized the Backyard BBQ perfectly to fit our One Lights, EZ-Lights, and even the new Twinkle Lights. I used a One Light for each of my cards and I’ve got step-by-step photos to walk you through the process. The first thing I did was to die cut most of the BBQ Pieces from white cardstock, then the wheel and vent pieces from silver cardstock. I like to color my own die cuts with alcohol markers for a no-line coloring look, but you can cut from colored cardstock and skip that step. Next, I glued the small pieces to the larger ones, forming the lid, BBQ bowl, and the leg section.
[row]
[column size=”1/2″ stack=”sm”] [/column]
[column size=”1/2″ stack=”sm”] [/column]
[/row]
I cut a second bowl for each BBQ from coordinating cardstock (they won’t really be seen), and the flames and smoke from vellum. To make the grills actually light up, I used One Lights behind the flames. If you haven’t seen our One Lights yet, they are thin little flashlights that tuck in between the layers of your cards or scrapbook pages. You can see how bright they glow in the photo below…
[row]
[column size=”1/2″ stack=”sm”] [/column]
[column size=”1/2″ stack=”sm”] [/column]
[/row]
Let’s just look at the red BBQ to see the rest of the assembly process (they both go together the same way). I glued the flames to the back side of the top layer BBQ bowl (the one I colored), and I stampe the word “PUSH” near the bottom, slightly to the right. I glued the legs to the solid cardstock bowl, then glued the One Light in the center with the LED at the top. I added double thick foam tape to either side of the light for support, before adhering the top layer of the bowl in place.
[row]
[column size=”1/2″ stack=”sm”] [/column]
[column size=”1/2″ stack=”sm”] [/column]
[/row]
From there, I simply attached my BBQs to card bases and added sentiments. I popped the lids up with more of the double thick foam tape so they were at the same elevation. The Lighthouse card uses the same idea to light it up. I cut a window in the “dad panel” where I wanted the light to shine through. I glued vellum to the back and the lighthouse on top. Another One Light is adhered to the card base and I popped up the entire “dad panel” up with double thick foam tape. I stamped the word “PUSH” on the lighthouse where the button is hidden beneath.
The last card doesn’t light up, but I think it’s equally fun! As soon as I saw the Here’s to Brew Stamp Set, I knew I wanted to make that arm move with a wiper. If you’ve never made a hidden wiper, it’s easy! You can follow along with me in this video where I made another card the same way. In order to fit the long arm and mug, I altered the measurements and turned it into a slimline card. Your back piece should measure 10 5/8″ x 4,” scored at 1 3/4″ and 2 1/2.” The front layer should measure 10 5/8″ x 3,” also scored at 1 3/4″ and 2 1/2.” The wiper mechanism should measure 1″ wide, with a 3/4″ corner score. (In the video, I used a 1/2″ gap for the Z-fold and mechanism. This card has a 3/4″ gap to help keep the beer mug from catching.) Assembly is the same.
Here’s another look at all four of my cards in action. Which is your favorite?
Thanks so much for stopping by today. I hope I’ve inspired you to make some interactive cards. Be sure to head on over to Trinity Stamps and check out the entire new release; there are some fantastic new sets for grads too! I’ll be back soon with more fun cards to share.
This site uses affiliate links whenever possible (at no additional cost to you), but only for products I actually use and love.

Your cards are fantastic Amanda! So much so I think I have to purchase the grill die. Thank you
I love all four of the cards! Couldn’t pick just one.