
Woohoo! Welcome to Trinity Stamps’ Sweet Summer Celebration Release! I’m sharing a fun light-up card today, featuring the awesome new Cupcake Card Die Set. I’ll show you how easy it was to put together and then you can hop with us, leaving comments as you go, and be entered into a drawing to win one of TWO $50.00 USD gift certificates to the Trinity Store!
I think you’ll agree, the new release from Trinity Stamps is awesome, and the inspiration from their Design Team and Special Guests is fabulous! (I bet there are quite a few cards you’ll want to bookmark as you go.) The Blog Hop ends June 15, 2022 at 11:59 PM PDT. Winners will be announced on the Trinity Stamps Blog. The release is live now, so happy shopping!
Here’s how to participate: Leave a comment on this page as well as all of the stops in the lineup below. The hop is open to all, giveaway accounts do not qualify. By entering, entrants confirm they are 13+ years of age and agree to this site’s terms of use.
Ready to see my card? Here’s a look at it in action…
Don’t worry, the die set did all of the hard work. And the addition of lights was EZ with EZ-Lights! I’ll show you how. First, grab your supplies and meet me in the craft room…
Supply List
Cupcake Card Die Set
Simply Sentimental Birthday Stamp Set
Simply Sentimental Birthday Die Set
Sugared Soiree Embellishment Mix
Pickup Stick Tool
EZ-Lights
Double Thick Foam Tape
Push Stamp
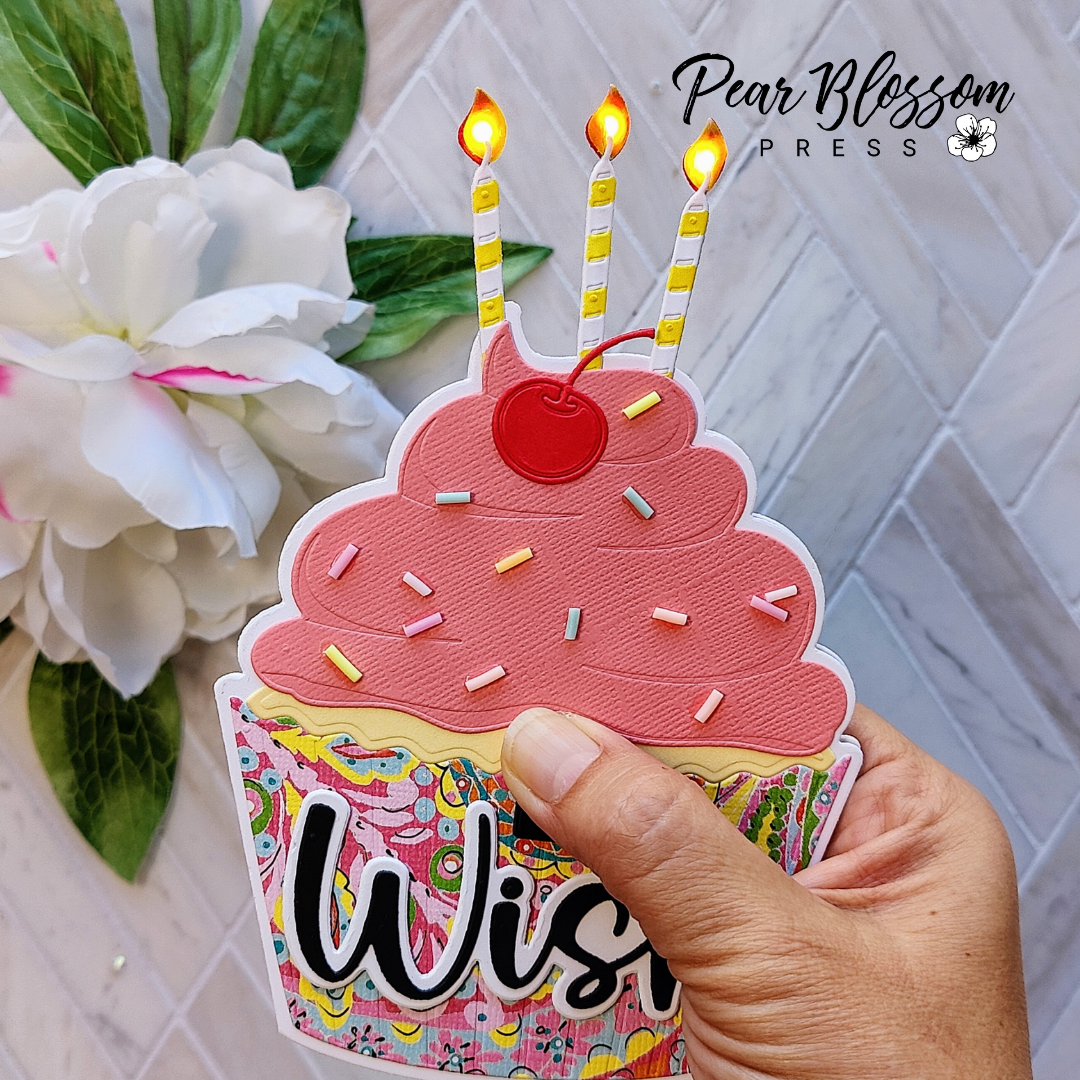
Let’s jump in. The first thing you’ll want to do is to prep your pieces. I die cut the cupcake card base twice, cutting one in half and saving the other half for later. This gave me a whole card, and a separate card front (white pieces below). I cut the cupcake layers from cardstock and pattern paper. (The cupcake liner and frosting dies also double as foiling plates, giving you the ability to add shimmery details, but I didn’t realize it until after I cut them. Next time!) To light up three candles, I cut out six white ones and colored yellow stripes on half of them (they will layer on top of the plain ones). After cutting out three red flames and three vellum flames, I colored the vellum with the same yellow marker. In addition, I pulled out an EZ-Light and my sprinkle mix to have ready.

With all of the parts cut, colored and ready to go, assembly was simple. To light-up the flames, I sandwiched each of the three lights on my EZ-Light onto the plain white candles. I positioned the lights right at the top of the wicks and glued them to the red flames. (Since the candles are narrow, I used glue on the wires, instead of double-stick tape.) While the glue was drying, I held the wires secure to the candles with low-tack tape. Then, I removed the tape and glued the yellow candles and vellum on top.
[row]
[column size=”1/2″ stack=”sm”] [/column]
[column size=”1/2″ stack=”sm”] [/column]
[/row]
[row]
[column size=”1/2″ stack=”sm”] [/column]
[column size=”1/2″ stack=”sm”] [/column]
[/row]
After the candles were dry, it was time to put the card front together. You’ll notice that the decorative layers of the cupcake leave a white border around the edges. To make sure my candles were situated between the white border and the pink layer, I needed to cut a slit in the white layer. (That way I could glue the layers to the front, and tuck my battery behind, between the card front and base.) The candle die was handy, so I used it to cut my slit. Then, I threaded the candles through and glued them to the front side. Before gluing down the yellow cake layer, I stamped the word PUSH in the center.
[row]
[column size=”1/2″ stack=”sm”] [/column]
[column size=”1/2″ stack=”sm”] [/column]
[/row]
With the cupcake layers in place, I flipped the panel over and adhered the battery unit of the EZ-Light in place with the button right under the word PUSH. Double thick foam tape around the perimeter is all you need to adhere the panel to the card base.
[row]
[column size=”1/2″ stack=”sm”] [/column]
[column size=”1/2″ stack=”sm”] [/column]
[/row]
Lol, you’ll find yourself testing the lights often as you go. That’s normal, because they are so fun! To finish the card, I stamped and die cut the MAKE A WISH sentiment from black and white. Stacking several layers of WISH created nice dimension. Then, I glued on the clay sprinkles using my new Pickup Stick. I have to tell you, I’m really liking this tool! There was a learning curve to get used to it, compared to my jewel picker, but I’m finding it much nicer. The clear wax picks up sequins, clay bits, and gems well and releases them easily when you stick them into glue. (My jewel picker tends not to let go.) If your wax is cold when you first pick the tool up, huff a warm breath over it to soften it a bit. After that, it should be good to go!
[row]
[column size=”1/2″ stack=”sm”] [/column]
[column size=”1/2″ stack=”sm”] [/column]
[/row]
Alright my friend, that finishes the card. Here’s a final look before you hop on…
[row]
[column size=”1/2″ stack=”sm”] [/column]
[column size=”1/2″ stack=”sm”] [/column]
[/row]
Thanks so much for stopping by today. I hope I’ve inspired you to give this card a try! Please tag me on social media if you do so I can cheer you on. (You can find me on Instagram, or in the Interactive Cards Facebook group.) Ready for more inspiration? The next stop in the hop is with the incredibly talented Silvia Galloni! Don’t forget to hop along and comment on all of the stops in the hop; there are so many wonderful cards to see. You can’t help but be inspired! In case you get lost along the way, I have the lineup listed below. (Wowza, what a lineup too!)

[row]
[column size=”1/2″ stack=”sm”]
Lineup
Trinity Stamps
Emelie Genberg
Carrie Rhoades
Lisa Mears
Christine Burillo-Kirch
Amanda Wilcox
Katie Brooks
Cassie Trask
Jenny Hall
Jennifer McGuire
Brenda Noelke
[/column]
[column size=”1/2″ stack=”sm”]
Kelly Fusco
Carol Hintermeier
Shanna Slater
Jeannie Lieu
Natasha Davies
Larissa Heskett
Ilina Crouse
Joy Baldwin
Tanya Boser
Amanda Stevens – you are here
Silvia Galloni – next stop
Sandy Allnock
[/column]
[/row]
Thanks again for stopping by today. If you’re heading over to the Trinity Stamps shop to order from the new release, don’t forget, you can pick up your EZ-Lights there too and save on shipping! I’ll be back soon with more fun cards to share. See you then…
This site uses affiliate links whenever possible (at no additional cost to you), but only for products I actually use and love.

I love light up cards. they add that extra special feeling.
So sweet Amanda!
Amazing card. Thanks for all the specific directions. I have saved them for r future use!!
Love it
Love the light-up candles.
Fun card. thanks for sharing
txmlhl(at)yahoo(dot)com
I never would have been brave enough to put the lights on the candles but this is genius and turned out AMAZING!!!
Oh my goodness! There are just no words for this amazing card!!
YOU ROCK! I love that you did the cupcake shape and a light up!!!!!!!!!!!!
I thought your card was awesome before I saw that it lit up but now it is even better!
OMG – that is so awesome!!!
Such a nice die set and so cool, what you did with the candles! Awesome job!
So cute, love the lights
It looks like a lot of work went into that cute card.
So cute. I love the tiny light up candles
So impressive!
So cute!
I like the texture of the frosting, the added dimension and the candles … well they are the icing on the cake! =)
Thanks for sharing and for the inspiration.
Fabulous! Love the lights!
The lit candles look FABULOUS!
Fabulous card!
I love the candles all lit up!! Do well done.
This is awesome!
Love the lights! Cute idea!!
Such a fun and interactive card.
So well done. Perfect application.
Oh this card is going to make someone SO happy! Awesome idea! Thank you so much for sharing this with us today 🤩
This is so much fun!!! I love the candles!
Such a fun shaped card! Love the cupcake and the light up candles!
OMG what a fantastic card – perfect for delighting the birthday recipient
What an awesomely fun card!!
I love how all three candles light up! What a great card!
I love the way these candles light up!
Wow, what a great card that would be to send to someone, with light up candles. thanks for sharing
Awesome card!
cute cupcake card. Love that the candles light up.