Hello my crafty friend! Can you believe it’s already 2022? Fingers crossed for an excellent new year for all of us! Today, I’m scootin’ by with a pair of fun cards, featuring the new Scooter Add-on from i-crafter. It’s designed to pair with the Oval Box Pops, like you see in my valentine. But it can also be used to decorate traditional flat cards, like my birthday card. Let’s take a look at the two cards I made…
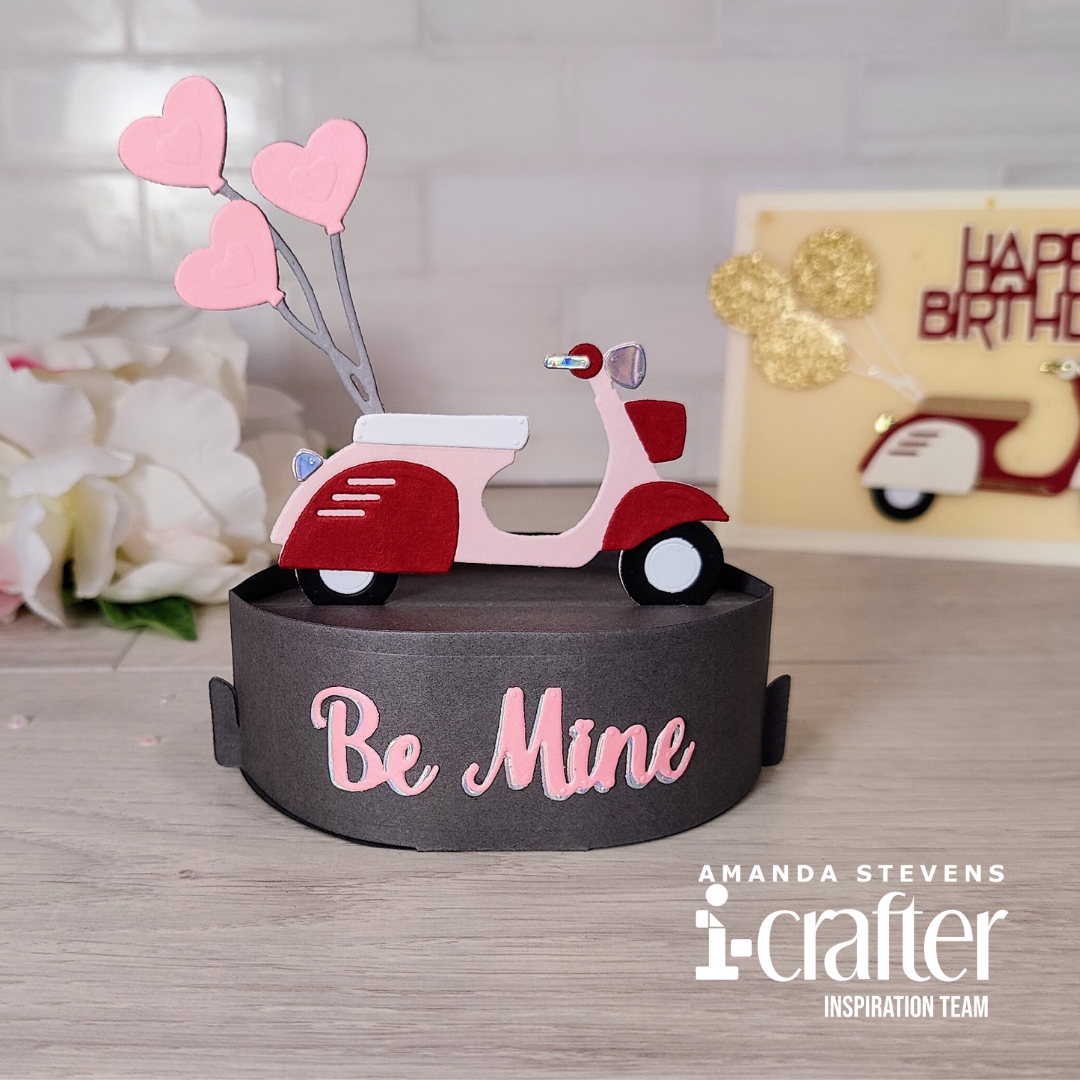
 The Oval Pop Box valentine is really cute, and fun to display on a shelf. It gets assembled just like any of the other oval box pops, you just substitute the Scooter Add-on pieces to decorate it. If you haven’t assembled an oval pop box card yet, check out this post with step-by-step instructions, or this video.
Whenever I make Oval Pop Box Cards I like to decorate both the front and back sides, since it’s meant to be displayed like a figurine. In the photo below, you can see that I cut out a pair of scooters and balloon clusters and glued them together in mirror image. You could get away with a single scooter and balloon strings, but by doubling them up, they are stronger. Unlike with my flat cards, I try not to stack the sentiments too high. They need to curve around the oval base, so I limit it to two layers. Here you can see my sentiment is cut from pink, and stacked slightly offset, on silver holographic paper. Together, they are thin enough to curve nicely.
 It only took a few minutes to assemble the dark grey Oval Pop Box with the Scooter Add-on pieces. I suggest gluing the side flaps together with the box popped up.

I love the color palette, and the little pop of shimmer from the silver holographic paper (under the sentiment, and on the scooter lights and handle). What do you think?
 And you can see the back looks great too!
 While the scooter makes a great valentine, I thought it would be cute to change the balloons and sentiment, to make a birthday card too. Instead of making another Oval Box Pop, I decided to make this one flat. I love that all of the add-on dies can be used by themselves as well.
When assembling the card, I simply cut off the bottom of the scooter, then layered the decorative pieces on top. Instead of using the heart-shaped balloons that came in the set, I swapped them out for regular balloons, and the birthday sentiment in the Happy Birthday Wiper Set. After popping the die cuts onto a piece of yellow vellum with foam tape, I added more foam tape to the back of the vellum, and attached it to a gold splattered card base.
 I love the way this one turned out too!
 And check out the gold accents…
 I hope I’ve inspired you to give these cards a try. If you’d like to recreate them, be sure to head on over to the i-crafter shop and pick up these supplies…
SUPPLY LIST
Oval Box Pops
Scooter Add-on
Happy Birthday Wiper
While you’re there, check out the whole new release!
Thanks so much for stopping by today. I hope 2022 has lots of crafty fun in store for you! I’ll be back soon with another fun project to share. See you then!
This site uses affiliate links whenever possible (at no additional cost to you), but only for products I actually use and love.

One thought on “Scootin’ By”