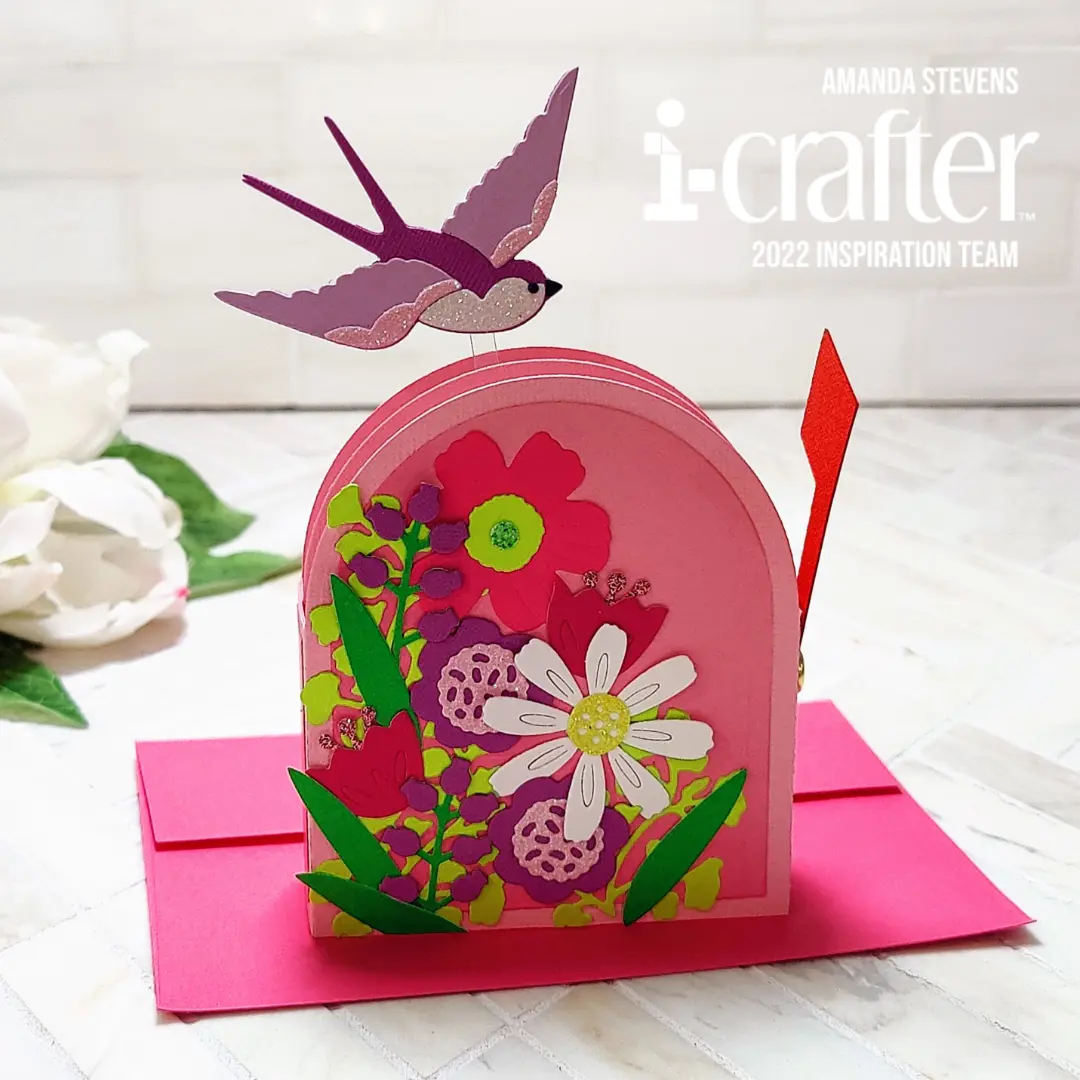
Mailbox box card – no, that’s not a typo. This is a mailbox-shaped box card. And boy, is it pretty! I decorated it with lots of flowers and suspended a bird above on a strip of acetate. For an additional interactive element, I attached the flag with a brad so it really moves. Take a look…
I have to apologize, my camera struggles with pink under LED lighting, and I struggle with settings outside of “auto” so my photos/video don’t really do this card justice. Lol, one of these days I’ll take a real photography class and figure that out, but trust me when I tell you this card is really pretty in person. All of the flower centers and parts of the bird were cut with glitter paper, so there’s plenty of shimmer (and that probably confused my camera even more).
If you’d like to recreate a card like this, grab your supplies and meet me in the craft room…
SUPPLY LIST
Mailbox Box Card Die Set
Floral Garden Die Set
Mini Slimline Zip Envelope Die Set
PRO Mending Deck
i-Clik Pick
i-Grip Locking Tweezers
The first thing you’ll want to do is to cut your parts out. For the mailbox, you’ll need to cut three of the largest arched panels to be the front, back, and inner strut for your card base. (Note that I cut my inner strut layer from a scrap of the same light pink cardstock and it has an arch cut out at the bottom. That’s because I was conserving paper and knew the bottom wouldn’t be seen in the finished card, so I didn’t mind the missing paper at the bottom.) I trimmed 1/4″ off of the left and right side of the inner panel, so that it would be spaced evenly in between the front and back when assembled. I cut the decorative arches and side panels from a slightly darker pink paper and then blended raspberry ink near the bottom before gluing them to the front, back and side panels.
Most of the flowers have glitter paper accents and the bird does too. Since you can see both sides of the bird on the finished card, I cut a pair to glue back-to-back with a strip of acetate in between. To get the back side to be a mirror image, I simply flipped my glitter paper over and cut the pieces out from the back side. Using a pokey tool and pair of locking tweezers helps in the assembly process.
[row]
[column size=”1/2″ stack=”sm”] [/column]
[column size=”1/2″ stack=”sm”] [/column]
[/row]
[row]
[column size=”1/2″ stack=”sm”] [/column]
[column size=”1/2″ stack=”sm”] [/column]
[/row]
In the photos above, you can see the box card assembly in progress. First, you’ll glue the sides of inner strut to the sides of the back layer. Since we trimmed 1/4″ from each side of the inner layer, it will sit about halfway from the front and back. Then, glue the front panel in place with the decorative sides on top. If you’d like your flag to move, punch a hole in the side and attach it with a brad. Adhere the acetate below the bird to the center strut, making sure it won’t extend beyond the size of your envelope (my card fits into an A2 envelope). After that, all that’s left to do is glue your flowers to the front. If you want to decorate the back as well, be sure to leave space to write your personal message. Since I used so many glitter paper accents, I didn’t add any gems.

[row]
[column size=”1/2″ stack=”sm”] [/column]
[column size=”1/2″ stack=”sm”] [/column]
[/row]
I love this card and I know it’s recipient did too. It was for a very special person’s 70th birthday and I wanted her to know I was sending lots of love. You might wonder why I didn’t put a sentiment on the front. I figured this card might be on display for a while, so I wanted it to feel more artsy-fartsy and less card-like. What do you think? Would you display it after your birthday?
I hope I’ve inspired you to make a mailbox box card and fill it with lots of love too. If you do, tag me on Instagram so I can see! I’ll be back soon with more fun cards to share. See you then!
This site uses affiliate links whenever possible (at no additional cost to you), but only for products I actually use and love.
