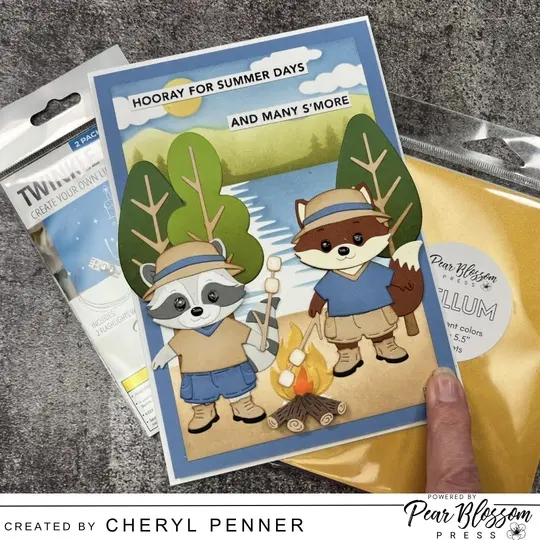
Hello, Cheryl here (aka @ArtsyIslandGirl ) sharing how to create an adorable Campfire card using Twinkle lights and coloured vellum. I’m using The Summer Camp collection from Spellbinders to create the scene but that twinkling campfire really steals the show and takes the card to a whole new level! Ad
The scene on my Twinkling Campfire card is created using Dies, Sentiments stamps and layering stencils from the Summer Camp collection from Spellbinders. These were die cut and assembled before creating the light up camfire feature. The fire for the campfore is created using Pear Blossoms Colored Vellum. Score tape was added to the back of the vellum before die cutting to create vellum stickers so the adhesive would not show. The ends of the twinkle lights are colored before assembly with Poppyfield Alcohol ink so that the lights would resemble the burning coals in the fire. The Poppyfield Alcohol ink is dropped onto the ends of the twinkle lights and allowed to dry completely. The sentiment stamps are used in the Misti stamping tool and stamped with Versamark ink before Heat embossing with Black embossing powder and trimming into sentiment strips.
The background scene is created on a 4 1/4″ x 6 1/4″ piece of cardstock using distress inks. The stencils are placed on the top of that cardstock for stencilling and the bottom part is finished off after stencilling using Vintage Photo distress ink to fill in the remaining area. A 5″ x 7″ card base is created and a 4 3/4″ x 6 3/4″ Matte is created out of Celestial cardstock and added to the card base.


Once the placement for the campfire is decided on, a Paper piercer is used to pierce 3 holes on the bottom of where the fire will be to pus the twinkle lights through. The lights are tested regularly throughout assembly and the excess wire from the twinkle lights are taped down before using score tape is used to secure the battery pack. 3mm thick foam tape is added to the rest of the back before adding it to the card base. The vellum fire pieces are added as well as the rest of the die cuts to create the scene. The “Push here” stamp from the Pear blossom stamp & die set is stamped in the bottome right corner of the card. Glossy accents are added to the Eyes and Nose for some glossy dimension.

*The Supply list contains affiliate links, which means that if you purchase through one of the product links, I may receive a small commission, at absolutely NO extra cost to you.
