When my friends at Spellbinders reached out and told me they were making a fun new line of dies that would work perfectly with our EZ-Lights, I jumped at the chance to put them together! How adorable are these little gnomes?
So cute, right?! I love them! And guess what, there are even more holidays/events you can gear them up for… Easter, St Patrick’s Day, and graduation cards too. Treat yourself to the whole collection with the Gnome Drive Bundle at Spellbinders and add some EZ-Lights to your cart while you’re there. (Did you know Spellbinders carries our lights in their shop?) I’ll show you how to add the lights!
Grab your supplies and meet me in the craft room…
SUPPLY LIST
EZ-LIGHTS
WORLD’S BEST FOAM TAPE
PUSH HERE STAMPS
OLO MARKERS
GNOME DRIVE BUNDLE
OR
GNOME DRIVE HOLIDAY DIES
GNOME DRIVE HALLOWEEN DIES
GNOME DRIVE HEARTS FOR YOU DIES
GNOME DRIVE SPRING DIES
GNOME DRIVE GRADUATION DIES
GNOME DRIVE SENTIMENT STAMPS
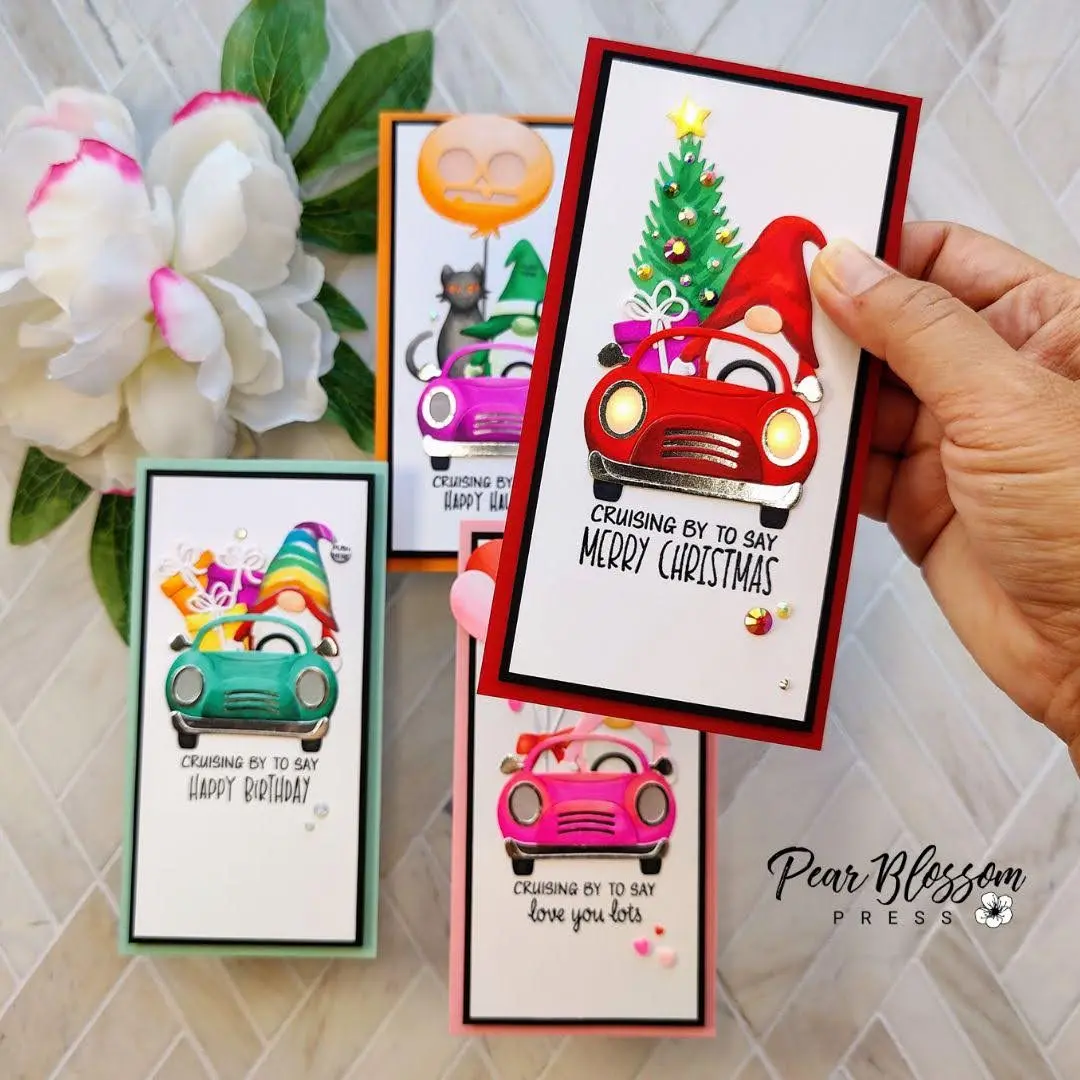
Alright, let’s drive-in! I mean dive in… First, you should know that the car and gnome’s body are in the Gnome Drive Holiday Die Set; it’s the main set. The other die sets are add-ons with different decorative elements, meant to work with the main set. The Gnome Drive Sentiment Stamp Set has lots of sweet and punny sayings that will work with all of the dies in the line.
For all of my cards, I die cut most of the pieces from white cardstock and colored them with Olo Markers (also available in the Spellbinders shop). You can use colored cardstock and save a step, but I like the no-line coloring look you get when you color the pieces. I cut the bumpers, grills, side mirrors, and headlight frames from silver mirror paper for extra shine.
I made the birthday and Christmas card, using dies only from the main Gnome Drive Holiday Die Set. I love that it’s so versatile! (Especially, if you consider other decorative dies you already have in your stash.) Let’s start with the birthday card first. I die cut my pieces and colored them, adding rainbow stripes to his hat and assembling three presents. I stamped “PUSH HERE” on the ball of his cap. Next, I cut the headlights from silver mirror paper and vellum, then I cut the headlight holes in the car.* To prep the card base and front panel, I layered a white panel onto a black mat, then stamped my sentiment. I lined the car up on top, traced the headlight holes and cut them out. Then, I lined the panel up on my blue card base and traced the holes. I also marked where the ball of the gnomes cap would be so I would know where to tape my EZ-Light.
[row]
[column size=”1/2″ stack=”sm”] [/column]
[column size=”1/2″ stack=”sm”] [/column]
[/row]
For this card, I only wanted to light up the headlights, so I only needed two of the three LEDs on my EZ-Light. I simply cut the third off. It’s totally fine to do this, just be careful not to clip the other wires. After taping the remaining two LEDs in place and the button over the mark for the gnome’s cap, I added double thick foam tape to the back of the black/white panel, avoiding the headlight holes and the area where the battery lined up.
[row]
[column size=”1/3″ stack=”sm”] [/column]
[column size=”1/3″ stack=”sm”] [/column]
[column size=”1/3″ stack=”sm”] [/column]
[/row]
Once the panel was adhered to the card base, I glued the car and gnome in place and tucked in the gifts, trimming as necessary to make sure nothing blocked the headlight holes. Then I glued the silver/vellum headlights over the holes and added gems to finish the card. When you push the ball of the gnome’s cap, the headlights turn on!
[row]
[column size=”1/2″ stack=”sm”] [/column]
[column size=”1/2″ stack=”sm”] [/column]
[/row]
The Christmas card came together in the same way, except, I decided to light the star at the top of the tree as well as the headlights, so I didn’t cut any LEDs off. Here’s a look a the pieces and the card panel and base prep…
[row]
[column size=”1/2″ stack=”sm”] [/column]
[column size=”1/2″ stack=”sm”] [/column]
[/row]
When taping the EZ-Light in place, I adhered the two headlight LEDs and battery/button to the card base just like I did for the birthday card. For the third LED, I poked a hole through the star on the black/white panel and taped the light right in there. That way, when I glued a star gem on top, it would glow nice and bright. More double thick foam tape elevated the panel and adhered it to the red card base.
[row]
[column size=”1/2″ stack=”sm”] [/column]
[column size=”1/2″ stack=”sm”] [/column]
[/row]
[row]
[column size=”1/2″ stack=”sm”] [/column]
[column size=”1/2″ stack=”sm”] [/column]
[/row]
A few more gems decorate the tree and add pizzazz to the card.
[row]
[column size=”1/2″ stack=”sm”] [/column]
[column size=”1/2″ stack=”sm”] [/column]
[/row]
The Halloween add-on is so cute! I couldn’t resist making the black cat his co-pilot and the vellum ghost his “ride or die.” Haha. The jack-o-lantern balloon begged to be lit up, so I used all three LEDs on my EZ-Light again. Since the balloon has multiple windows to light up, I set the balloon up like the headlights, with vellum behind the openings. Here’s a look at the colored pieces and card panel and base…
[row]
[column size=”1/2″ stack=”sm”] [/column]
[column size=”1/2″ stack=”sm”] [/column]
[/row]
Assembly was easy. I taped all three LEDs and the battery/button to the orange card base. I taped the balloon into the opening on the black/white panel from behind, then added double thick foam tape to adhere the panel to the base. (If you’re wondering why I taped the third LED to the card base this time, instead of right behind the balloon, like I did for the tree star, it’s because I wanted to get the light as far away from the vellum as possible. That way the light has to bounce around before it shines through. You get a bigger spread of light, instead of a hot spot. Same goes for the headlights.)
[row]
[column size=”1/2″ stack=”sm”] [/column]
[column size=”1/2″ stack=”sm”] [/column]
[/row]
After glueing the gnomies and car in place, I added a few gems to create a magical sparkle and finish the card.
[row]
[column size=”1/2″ stack=”sm”] [/column]
[column size=”1/2″ stack=”sm”] [/column]
[/row]
I’m getting a head start on Valentine’s Day with the last card, but that’s a good thing! Of course, you could always cut a second gnome to make this a wedding or anniversary card instead. It comes together just like the birthday card did. Cut one LED off your EZ-Light, unless you want to light up one of the balloons, and remember to use double thick foam tape to lift the panel from the card base. (If you don’t have double thick foam tape, use two layers of regular foam tape. You want to achieve the same thickness as the battery so your panel lays flat and you don’t get a weird bump on your card). Here’s a look at my parts and pieces…
[row]
[column size=”1/2″ stack=”sm”] [/column]
[column size=”1/2″ stack=”sm”] [/column]
[/row]
And here’s a look at the finished card in action…
[row]
[column size=”1/2″ stack=”sm”] [/column]
[column size=”1/2″ stack=”sm”] [/column]
[/row]
This has been a long post, I know. Thanks for sticking through it all. I hope you are inspired to take the Gnome Drive Bundle for a spin! Kick the tires, light up the headlights, let me know what you think… I’ll be back soon with more fun cards to share.
*In addition to regularly performing stamp surgery, I also perform the occasional die surgery. I use a coping saw with a fine metal blade (from my metalsmithing days) to cut apart dies if I need one part separated from another. It’s not hard at all, but you should clamp the die down so it doesn’t wiggle away from you when you are cutting. In this case, I cut the smaller oval headlights off and apart. If you don’t want to cut apart your headlight dies, you can use a craft knife and/or small oval or circle dies from your stash to achieve the same results.
[row]
[column size=”1/2″ stack=”sm”] [/column]
[column size=”1/2″ stack=”sm”] [/column]
[/row]
Thanks again for stopping by today! This site uses affiliate links whenever possible (at no additional cost to you), but only for products I actually use and love.

Amanda , all these cards are fabulous! So much so that I am going over to Spellbinders to purchase at least one. You are so so clever
These cards are amazing!!! Perfectly made for EZ Lights. I love how cute these gnomes and cars are! Awesome job❤️❤️❤️
Too fun! Love the lights! I am not usually a gnome fan, but these guys are pretty cute!
Hi Amanda, I am a wholesale customer with Spellbinders so order a set of 5 lights yesterday to use with the card. I will use them in classes once I get good enought and know what I’m really doing. Thanks so much. I am not sure how to register a password. Thanks, Jane Fires